Quantcast
Channel: Photo Effect Archives - PSD Vault
Viewing all 248 articles
Browse latest View live

Create Surreal Planetary Object in Photoshop

$
0
0

In this Photoshop tutorial, I will show you the process of creating this awesome looking, surreal planetary object in Photoshop. Along the way, we will use the 3D function in Photoshop CS6 to render the base sphere, as well as the use of clipping masks for applying the textures over the 3D render. We will use a number of selection tools and free transform tools during the process. Various layer blending modes will be applied to achieve the best result possible.

This is an intermediate level tutorial so some steps can be tricky, but why not have a try!

Note: The Photoshop tutorial is done in CS6 – therefore some screenshot may have slighting different layout as in the earlier version. Some brushes are exclusive to Photoshop CS6.

Here is a preview of the final effect I have for this tutorial: (click to enlarge)

surreal planetary objects flatten 550x314 Create Surreal Planetary Object in Photoshop

PSD File Download

You can download the PSD File for this tutorial via the VIP Members Area for only $6.95/Month (or less)! You will not only get this PSD File, but also 100+ other PSD Files + Extra Goodies + Exclusive Photoshop tutorials there. Signup now and get exclusive :) Find out more about the VIP Members Areas

vip sign up 250 Create Surreal Planetary Object in Photoshop

OK Let’s get started!

To complete this tutorial, you will need the following stocks:

Rock Stock 1

Rock Stock 2

Fire Stock

Nebula Brushes

3D Sphere Render (if you don’t have Photoshop CS6)

Step 1

Create a new document sized 1400px * 800px with black background. Create a new layer and use the Ellipse Tool to draw a circle with no fill colour and no border color:

1 eclipse Create Surreal Planetary Object in Photoshop

1 draw 550x417 Create Surreal Planetary Object in Photoshop

If you have Photoshop CS6, you can go to 3D > New Mesh from Layer > Mesh Preset >  Sphere and create a sphere. If not, you can simply down the 3D render here:

1 sphere 550x453 Create Surreal Planetary Object in Photoshop

You can slightly adjust the global light and the coordinates of the sphere, according to the settings below:

1 3d camera Create Surreal Planetary Object in Photoshop

1 coordinator Create Surreal Planetary Object in Photoshop

1 rotate 550x312 Create Surreal Planetary Object in Photoshop

Once you’re happy with the sphere, right-click this layer and go to “Render” and render this 3D object:

1 right click Create Surreal Planetary Object in Photoshop

You can covert this layer into a smart object for future editing, and here is the effect so far:

1 render Create Surreal Planetary Object in Photoshop

Step 2

We can work on the texture application for this sphere in this step.

We can dig two holes for this planet to the following positions, using layer mask:

2 erase 550x431 Create Surreal Planetary Object in Photoshop

Use the cloud filter to render some smoke into the holes:

2 cloud 550x357 Create Surreal Planetary Object in Photoshop

Optionally, you can use a particle brush to add some dots around the planetary object to act as stars:

2 particle 550x375 Create Surreal Planetary Object in Photoshop

Load the Rock Stock 1 image into Photoshop and grab a small piece of it, paste it over to our document and set this new layer as clipping mask to the planetary object layer:

2 clipping mask 550x473 Create Surreal Planetary Object in Photoshop

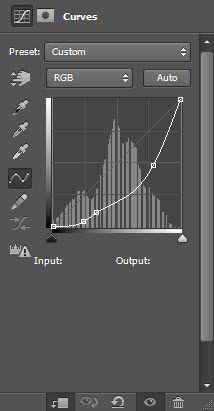
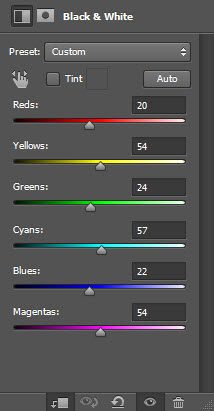
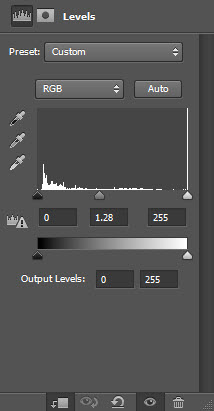
Add the following 3 adjustment layers as clipping mask on top of the rock texture layer:

Black and White

2 bw Create Surreal Planetary Object in Photoshop

Curves

2 curves1 Create Surreal Planetary Object in Photoshop

Levels

2 levels Create Surreal Planetary Object in Photoshop

and you will have the following effect so far:

2 effect1 550x377 Create Surreal Planetary Object in Photoshop

Step 3

Load the Rock Stock 2 image into Photoshop and select the top portion of the rock as shown below:

3 select 550x445 Create Surreal Planetary Object in Photoshop

Copy and paste the selection onto our document and position it as shown below:

Hint: you will need to use the free transform tool to adjust the shape and size of the rock.

3 rock 550x388 Create Surreal Planetary Object in Photoshop

Use a soft eraser to carefully remove the bottom of the rock, so it blends with the planetary body:

3 rotate 550x339 Create Surreal Planetary Object in Photoshop

Repeat the process above to add another rock piece to the right side of the planetary body:

3 rock 2 550x312 Create Surreal Planetary Object in Photoshop

Optional: we can add some particle effect around the rock with a particle brush:

3 particle 550x338 Create Surreal Planetary Object in Photoshop

and here is the effect so far:

3 effect 550x459 Create Surreal Planetary Object in Photoshop

Step 4

We will add some fire effect to our planetary object. Load the fire stock into Photoshop and select the following portion:

4 select fire 550x519 Create Surreal Planetary Object in Photoshop

Copy and paste the selection onto our document, then experiment the following 4 blending mode and see what result they bring to the image:

  1. Color Burn
  2. Color Dodge
  3. Overlay
  4. Vivid Light

4 blending 550x552 Create Surreal Planetary Object in Photoshop

Repeat the above steps and apply fire texture to different parts of the planet as shown below:

4 effect 550x392 Create Surreal Planetary Object in Photoshop

Step 5

We can add some small asteroids into the image. Go to the Rock Stock 2 and select a small piece as shown below:

5 rock select 550x353 Create Surreal Planetary Object in Photoshop

Copy and paste the selection to our document and use a small eraser to fade the edge of the rock:

5 erase 550x400 Create Surreal Planetary Object in Photoshop

Apply the following Levels adjustment to this small rock layer:

5 lvs 550x394 Create Surreal Planetary Object in Photoshop

Repeat the above steps and add more rocks to our image, as shown below:

5 rock 550x231 Create Surreal Planetary Object in Photoshop

We can use the Nebula brush to add some Nebula effect to our image:

5 liquify 550x246 Create Surreal Planetary Object in Photoshop

and here is the effect so far:

5 effect 550x352 Create Surreal Planetary Object in Photoshop

I further added some colours to the image and here is the final effect: (click to enlarge)

surreal planetary objects flatten 550x314 Create Surreal Planetary Object in Photoshop

That’s it for this tutorial! Hope you enjoy going through it and find it useful. Drop me a comment below if you have any question.

Till next time, have a great day!

The post Create Surreal Planetary Object in Photoshop appeared first on PSD Vault.


Artistic Photo Manipulation with Cracked Face Effect in Photoshop

$
0
0

In this Photoshop tutorial, I will show you the process of creating this Artistic Photo Manipulation with Cracked Face Effect in Photoshop. We will practice a number of layer masking techniques and image adjustment tricks along the way, as well as applying some interesting filter effect to our image.

This is an intermediate level tutorial so some steps can be tricky, but why not have a try!

Note: The Photoshop tutorial is done in CS6 – therefore some screenshot may have slighting different layout as in the earlier version. Some brushes are exclusive to Photoshop CS6.

Here is a preview of the final effect I have for this tutorial: (click to enlarge)

cracked face rock flatten 550x300 Artistic Photo Manipulation with Cracked Face Effect in Photoshop

PSD File Download

You can download the PSD File for this tutorial via the VIP Members Area for only $6.95/Month (or less)! You will not only get this PSD File, but also 100+ other PSD Files + Extra Goodies + Exclusive Photoshop tutorials there. Signup now and get exclusive :) Find out more about the VIP Members Areas

vip sign up 250 Artistic Photo Manipulation with Cracked Face Effect in Photoshop

OK Let’s get started!

To complete this tutorial, you will need the following stocks:

Model by faestock

Painted Wall with Crack

Rock Texture

Grunge Brushset

Step 1

Create a new document sized 1280px * 700px with white background. Grab the gradient fill tool and fill the background layer as shown below:

1 fill1 550x300 Artistic Photo Manipulation with Cracked Face Effect in Photoshop

Load the model image into Photoshop and copy and paste its facial area into our document:

1 face 550x296 Artistic Photo Manipulation with Cracked Face Effect in Photoshop

Select the eraser tool with a grunge brush set:

1 grunge 550x143 Artistic Photo Manipulation with Cracked Face Effect in Photoshop


1 erase Artistic Photo Manipulation with Cracked Face Effect in Photoshop

Add the following 2 adjustment layers as clipping mask to this face layer:

Levels

1 lvs Artistic Photo Manipulation with Cracked Face Effect in Photoshop

Curves

1 curves Artistic Photo Manipulation with Cracked Face Effect in Photoshop

and here is the effect so far:

1 effect 550x340 Artistic Photo Manipulation with Cracked Face Effect in Photoshop

Step 2

We can apply the crack texture to the facial area. Load the wall stock image into Photoshop and select a portion of the image as shown below:

2 sel 550x599 Artistic Photo Manipulation with Cracked Face Effect in Photoshop

Copy and paste the selection over to our image and place it above all previous layers. Adjust its size slightly with the free transform tool, and set it as a clipping mask to the layer below:

2 paste Artistic Photo Manipulation with Cracked Face Effect in Photoshop

Apply the following layer mask on this crack texture layer to reveal the eyes, nose and lips area:

2 mask Artistic Photo Manipulation with Cracked Face Effect in Photoshop

and you will have the following effect:

2 effect2 Artistic Photo Manipulation with Cracked Face Effect in Photoshop

Add another 2 adjustment layers as clipping mask to this crack layer:

2 lvs1 Artistic Photo Manipulation with Cracked Face Effect in Photoshop

Curves

2 curves2 Artistic Photo Manipulation with Cracked Face Effect in Photoshop

and here is the effect so far:

2 effect 21 Artistic Photo Manipulation with Cracked Face Effect in Photoshop

Step 3

Let’s add the abstract pattern into the image with the help of the rock stock image we downloaded at the beginning of this tutorial. Load the image into Photoshop and select a piece as shown below:

3 sel1 550x331 Artistic Photo Manipulation with Cracked Face Effect in Photoshop

Copy and paste the selection behind the face as shown below:

3 paste1 550x342 Artistic Photo Manipulation with Cracked Face Effect in Photoshop

Apply the following layer mask over the rock texture layer:

3 mask 550x375 Artistic Photo Manipulation with Cracked Face Effect in Photoshop

You will have the following effect:

3 effect1 550x452 Artistic Photo Manipulation with Cracked Face Effect in Photoshop

Add the following 2 adjustment layers to this rock layer as clipping masks:

Black and White

3 bw Artistic Photo Manipulation with Cracked Face Effect in Photoshop

Levels

3 lvs Artistic Photo Manipulation with Cracked Face Effect in Photoshop

Let’s add another piece of rock texture on top of the face as shown below:

3 paste 21 550x307 Artistic Photo Manipulation with Cracked Face Effect in Photoshop

Slightly adjust the contrast of this new piece of rock with the following settings:

3 lvs 2 Artistic Photo Manipulation with Cracked Face Effect in Photoshop

Optionally, we can add some small particles by selecting a few small pieces from the wall stock image:

3 sel samll piece 550x316 Artistic Photo Manipulation with Cracked Face Effect in Photoshop

And copy and paste them over to our image:

3 particle1 550x399 Artistic Photo Manipulation with Cracked Face Effect in Photoshop

Step 4

We will draw a few curvy lines onto our image to spice up the effect a bit. Grab the Line Tool from the toolbox:

4 lines Artistic Photo Manipulation with Cracked Face Effect in Photoshop

Set its fill color to light blue with no stroke:

4 fill 550x455 Artistic Photo Manipulation with Cracked Face Effect in Photoshop

and draw a thin line as shown below:

4 draw Artistic Photo Manipulation with Cracked Face Effect in Photoshop

Then go to Filter > Distort > Wave:

4 wave 550x359 Artistic Photo Manipulation with Cracked Face Effect in Photoshop

You will have the following dialog window pop up, just click on “OK” to proceed:

4 raster 550x305 Artistic Photo Manipulation with Cracked Face Effect in Photoshop

Use the following settings for the wave filter:

4 wave set 550x433 Artistic Photo Manipulation with Cracked Face Effect in Photoshop

and here is effect for the line:

4 effect1 Artistic Photo Manipulation with Cracked Face Effect in Photoshop

We will add a small piece of flyer rock to the end of the line:

4 rock 550x339 Artistic Photo Manipulation with Cracked Face Effect in Photoshop

Repeat the process above to add a few more of the lines and rock to our image, as shown below:

4 rock 2 550x346 Artistic Photo Manipulation with Cracked Face Effect in Photoshop

Step 5

We’re almost done! For final touches, we can add some cloud effect behind the facial area:

5 cloud 550x352 Artistic Photo Manipulation with Cracked Face Effect in Photoshop

We can also paint some extra abstract patterns onto the canvas:

5 paint 550x391 Artistic Photo Manipulation with Cracked Face Effect in Photoshop

Once you’re happy with the overall effect, flatten the image and duplicate the background layer, apply the following Wave filter to the duplicated layer:

5 wave 550x432 Artistic Photo Manipulation with Cracked Face Effect in Photoshop

Add the following layer mask to the duplicate layer to reveal the background layer:

5 mask 550x307 Artistic Photo Manipulation with Cracked Face Effect in Photoshop

and here is the effect so far:

5 effect1 550x296 Artistic Photo Manipulation with Cracked Face Effect in Photoshop

I further enhanced the image by adding some color effect with the color balance layer, and here is the final effect: (click to enlarge)

cracked face rock flatten 550x300 Artistic Photo Manipulation with Cracked Face Effect in Photoshop

That’s it for this tutorial! Hope you enjoy going through it and find it useful. Drop me a comment below if you have any question.

Till next time, have a great day!

The post Artistic Photo Manipulation with Cracked Face Effect in Photoshop appeared first on PSD Vault.

VIP Exclusive Photoshop Tutorial – The Creation of “Shine” Digital Art

$
0
0

Welcome to another Exclusive Photoshop tutorial written specifically for the PSD Vault VIP Members! In this tutorial, author Kris Shields will explain the creation process of his “Shine” digital art.

What You Will Learn

This Photoshop tutorial will cover:

  1. Advanced hair manipulation
  2. Advanced Make-up application to the model image
  3. Advanced composition techniques

VIP Exclusive Tutorial

If you’re a VIP member, you can log in to the VIP Members Area and click on Exclusive Tutorial button to download the tutorial. If you’re yet to become a VIP member, you can simply click on the banner below to signup:

vip sign up 250 VIP Exclusive Photoshop Tutorial   The Creation of Shine Digital Art

To find out more about PSD Vault VIP Membership, check out this video below:

trans VIP Exclusive Photoshop Tutorial   The Creation of Shine Digital Art

Final Image Preview

(Click to Enlarge)

Shine 457x700 VIP Exclusive Photoshop Tutorial   The Creation of Shine Digital Art

About the Author

Kris Shields (Colour Drip) is a 23 Year Old Digital Artist/ Graphic Designer from the United Kingdom who aims to work with different styles and elements, blending reality with a range of colour and shinny goodness. He is currently working on a range of projects including digital illustrations, 3D renders, typography and collaborations with other young creative minds.

Kris on Behance

Tutorial Spotlights

Here are some sample screenshots in this tutorial:

6 457x700 VIP Exclusive Photoshop Tutorial   The Creation of Shine Digital Art

12 457x700 VIP Exclusive Photoshop Tutorial   The Creation of Shine Digital Art

13 457x700 VIP Exclusive Photoshop Tutorial   The Creation of Shine Digital Art

Interested? Log in to your VIP members area to download it now!

Not a member yet? Click on the banner below to sign up now:

vip sign up 250 VIP Exclusive Photoshop Tutorial   The Creation of Shine Digital Art

Hope you enjoy it and find it useful! Thank you for your support and have a nice day!

The post VIP Exclusive Photoshop Tutorial – The Creation of “Shine” Digital Art appeared first on PSD Vault.

Create Intriguing Fantasy Matte Painting in Photoshop

$
0
0

In this Photoshop tutorial, I will show you the methods I used to create intriguing fantasy matte painting in Photoshop. We will go through a series of methods of merging and combining different types of objects, as well as colouring techniques through image adjustment layers.

This is an immediate level tutorial and some steps can be a little tricky, have a try!

Note: The Photoshop tutorial is done in CS6 – therefore some screenshot may have slighting different layout as in the earlier version. Some brushes are exclusive to Photoshop CS6.

Here is a preview of the final effect I have for this tutorial: (click to enlarge)

fantasy scene matte painting final1 550x190 Create Intriguing Fantasy Matte Painting in Photoshop

PSD File Download

You can download the PSD File for this tutorial via the VIP Members Area for only $6.95/Month (or less)! You will not only get this PSD File, but also 100+ other PSD Files + Extra Goodies + Exclusive Photoshop tutorials there. Signup now and get exclusive :) Find out more about the VIP Members Areas

vip sign up 250 Create Intriguing Fantasy Matte Painting in Photoshop

OK Let’s get started!

To complete this tutorial, you will need the following stocks:

Mountain

Cloud

Rock

Model

Debris Brush

Step 1

Create a document sized 1440px * 500px with black background. Load the mountain stock image into Photoshop and select the lower half (mountain) portion of the image:

1 sel 550x189 Create Intriguing Fantasy Matte Painting in Photoshop

Copy and paste the selection over to our document, place it into the position shown below:

Hint: use the free transform tool to resize your selection as you see fit.

1 paste1 550x256 Create Intriguing Fantasy Matte Painting in Photoshop

Use a soft eraser to remove the parts of this mountain layer as shown below:

1 erase 550x148 Create Intriguing Fantasy Matte Painting in Photoshop

Add the following 3 adjustment layers as clipping masks to this mountain layer:

Black and White

1 bw1 Create Intriguing Fantasy Matte Painting in Photoshop

Levels

1 lvs Create Intriguing Fantasy Matte Painting in Photoshop

Curves

1 curves Create Intriguing Fantasy Matte Painting in Photoshop

On top of the above adjustment layers, we will add some more mountain textures. Go back to the mountain stock image and select a few mountain tips:

1 sel 2 550x287 Create Intriguing Fantasy Matte Painting in Photoshop

Copy and paste the selection over to our documents. Apply the Black and White adjustment settings (leave the values as default) and use a soft eraser to fade the edges of the copied texture, so it blends into our previous mountain texture:

1 paste 2 550x150 Create Intriguing Fantasy Matte Painting in Photoshop

Optional: I painted some red textures over the ground with the soft brush (set blending mode to “color burn”) to give the image a more dramatic effect:

1 burnt 550x149 Create Intriguing Fantasy Matte Painting in Photoshop

and here is the effect so far:

1 effect1 550x122 Create Intriguing Fantasy Matte Painting in Photoshop

Step 2

We will the cloud into our image in this step. Load the cloud image into Photoshop and select the following portion:

2 sel 550x206 Create Intriguing Fantasy Matte Painting in Photoshop

Copy and paste the selection over to our image and place it above the ground:

2 paste 550x206 Create Intriguing Fantasy Matte Painting in Photoshop

Use a soft erase to the remove the following parts of the cloud:

2 erase 550x138 Create Intriguing Fantasy Matte Painting in Photoshop

Add the following 3 adjustment layer as clipping masks to the cloud layer:

Black and White

2 bw1 Create Intriguing Fantasy Matte Painting in Photoshop

Levels

2 lvs Create Intriguing Fantasy Matte Painting in Photoshop

Curves

2 curves Create Intriguing Fantasy Matte Painting in Photoshop

and here is the effect so far:

2 effect1 550x160 Create Intriguing Fantasy Matte Painting in Photoshop

Step 3

We will ad the cliff parts into our image in this step. Load the rock texture into Photoshop and select the following portion from it:

3 rock 550x256 Create Intriguing Fantasy Matte Painting in Photoshop

Copy and paste the selection over to our document, flip it horizontally and move the layer to the bottom right position, resize it to a smaller scale:

3 sel 550x343 Create Intriguing Fantasy Matte Painting in Photoshop

Use a soft eraser to fade the bottom and right parts of the rock as shown below:

3 erase 550x298 Create Intriguing Fantasy Matte Painting in Photoshop

and here is the effect so far:

3 effect 550x246 Create Intriguing Fantasy Matte Painting in Photoshop

Step 4

We will be adding the model into our image in this step. Load the model image into Photoshop and cut out the model, then paste it over and above the cliff we’ve just constructed in the previous step:

4 paste 550x356 Create Intriguing Fantasy Matte Painting in Photoshop

Add the following 2 adjustment layers as clipping masks to this model layer:

Black and White

4 bw Create Intriguing Fantasy Matte Painting in Photoshop

Levels

4 lvs Create Intriguing Fantasy Matte Painting in Photoshop

Use a soft brush to paint some shadow under the model:

4 shadow 550x389 Create Intriguing Fantasy Matte Painting in Photoshop

Optional: you can add some cloud effect around the model for some extra effect:

4 cloud 550x326 Create Intriguing Fantasy Matte Painting in Photoshop

Step 5

We will add a beacon of light shooting from our model in this step. Create a new layer and use a soft white brush to paint a dot to the position shown below:

5 dot 550x359 Create Intriguing Fantasy Matte Painting in Photoshop

Duplicate this layer and compress it down as shown below:

5 compress 550x305 Create Intriguing Fantasy Matte Painting in Photoshop

and you will have the following effect:

5 effect Create Intriguing Fantasy Matte Painting in Photoshop

Create a new layer and use the line tool to draw a line above the model with white colour, set its layer opacity to around 75%:

5 line 280x700 Create Intriguing Fantasy Matte Painting in Photoshop

Duplicate this line layer once and use the Gaussian Blur filter to blur it. Press Ctrl + F to reply this Gaussian Filter a few times:

5 blur Create Intriguing Fantasy Matte Painting in Photoshop

and here is the effect so far:

5 effect 2 550x181 Create Intriguing Fantasy Matte Painting in Photoshop

I further painted some cloud for extra effect:

5 debr 550x225 Create Intriguing Fantasy Matte Painting in Photoshop

Step 6

OK we’re almost done! For some final touches, we will add some flying debris with the debris brush we download at the beginning of the tutorial. We will use the black colour to paint the debris, then apply the following Motion Blur filter to add some blur to the debris:

6 mo blur Create Intriguing Fantasy Matte Painting in Photoshop

Lastly, add the following Selective Color adjustment layer on top to add some colours for our image:

6 sel red Create Intriguing Fantasy Matte Painting in Photoshop

6 sel black Create Intriguing Fantasy Matte Painting in Photoshop

6 sel neu Create Intriguing Fantasy Matte Painting in Photoshop

6 sel white Create Intriguing Fantasy Matte Painting in Photoshop

and here is my final result: (click to enlarge)

fantasy scene matte painting final1 550x190 Create Intriguing Fantasy Matte Painting in Photoshop

That’s it for this tutorial! Hope you enjoy going through it and find it useful. Drop me a comment below if you have any question.

Till next time, have a great day!

The post Create Intriguing Fantasy Matte Painting in Photoshop appeared first on PSD Vault.

Create Unique Abstract Photo Manipulation in Photoshop with Human, Rock and City Stocks

$
0
0

In this Photoshop tutorial, I will show you the methods I used to create unique abstract photo manipulation by mixing rock and city stock images in Photoshop. We will combine 3 objects: human, rock and city into one manipulation and form a unique looking digital art. We will primarily use the adjustment layers tool, layer blending modes and various filter to achieve this manipulation.

This is an immediate level tutorial and some steps can be a little tricky, have a try!

Note: The Photoshop tutorial is done in CS6 – therefore some screenshot may have slighting different layout as in the earlier version. Some brushes are exclusive to Photoshop CS6.

Here is a preview of the final effect I have for this tutorial: (click to enlarge)

dream flatten 546x700 Create Unique Abstract Photo Manipulation in Photoshop with Human, Rock and City Stocks

PSD File Download

You can download the PSD File for this tutorial via the VIP Members Area for only $6.95/Month (or less)! You will not only get this PSD File, but also 100+ other PSD Files + Extra Goodies + Exclusive Photoshop tutorials there. Signup now and get exclusive :) Find out more about the VIP Members Areas

vip sign up 250 Create Unique Abstract Photo Manipulation in Photoshop with Human, Rock and City Stocks

OK Let’s get started!

To complete this tutorial, you will need the following stocks:

Model – by Anikathropoloustock

Rock

City

Grunge Brush Set (Pick a few from the list)

Debris Brush Set

Step 1

Create a new document sized 780px * 1000px with white background. Grab the Gradient Fill tool to fill the background with the following gradients: (Set the Gradient Fill tool to use Radial Fill)

1 fill1 545x700 Create Unique Abstract Photo Manipulation in Photoshop with Human, Rock and City Stocks

Load the model image into Photoshop and cut out the model, paste it to the position as shown below: (Use the Free Transform tool to resize this layer to a smaller scale)

1 model 547x700 Create Unique Abstract Photo Manipulation in Photoshop with Human, Rock and City Stocks

Grab the eraser tool to tidy up the edges of the model:

1 erase1 550x422 Create Unique Abstract Photo Manipulation in Photoshop with Human, Rock and City Stocks

Add the following 3 adjustment layers as clipping masks to this model layer:

Black and White

1 bw2 Create Unique Abstract Photo Manipulation in Photoshop with Human, Rock and City Stocks

On this black and white adjustment layer, use a soft eraser tool on its layer mask to reveal some colors on the model the facial area:

1 bw mask 550x329 Create Unique Abstract Photo Manipulation in Photoshop with Human, Rock and City Stocks

Levels

1 lvs1 Create Unique Abstract Photo Manipulation in Photoshop with Human, Rock and City Stocks

Curves

1 curves1 Create Unique Abstract Photo Manipulation in Photoshop with Human, Rock and City Stocks

and here is the effect so far:

1 effect2 Create Unique Abstract Photo Manipulation in Photoshop with Human, Rock and City Stocks

Use a grunge brush set, paint some grunge texture below the model layer:

1 ground 550x393 Create Unique Abstract Photo Manipulation in Photoshop with Human, Rock and City Stocks

Step 2

We will work on the rock texture in this step. Load the rock image into Photoshop and select the following piece from the image:

2 sel1 550x540 Create Unique Abstract Photo Manipulation in Photoshop with Human, Rock and City Stocks

Copy and paste the selection over to our image and place the layer below the model layer, in the position shown below:

2 paste1 550x618 Create Unique Abstract Photo Manipulation in Photoshop with Human, Rock and City Stocks

Use the chalk brush as eraser, remove the following portions from the rock layer and tidy up the edge:

2 eraser 550x326 Create Unique Abstract Photo Manipulation in Photoshop with Human, Rock and City Stocks

2 erase1 550x422 Create Unique Abstract Photo Manipulation in Photoshop with Human, Rock and City Stocks

Add the following 3 adjustment layer as clipping masks to this rock layer:

Black and White

2 bw2 Create Unique Abstract Photo Manipulation in Photoshop with Human, Rock and City Stocks

Levels

2 lvs1 Create Unique Abstract Photo Manipulation in Photoshop with Human, Rock and City Stocks

Curves

2 curves1 Create Unique Abstract Photo Manipulation in Photoshop with Human, Rock and City Stocks

and you will have the following effect so far:

2 effect2 550x473 Create Unique Abstract Photo Manipulation in Photoshop with Human, Rock and City Stocks

Use the debris brush you downloaded to paint some small particles into the space we removed in the previous step:

2 particle 550x302 Create Unique Abstract Photo Manipulation in Photoshop with Human, Rock and City Stocks

Put all these rock related layers into a layer group, duplicate this group a few times and move them to different positions as shown below: (Rotate and resize the duplicated groups as you see fit)

2 repeat 550x544 Create Unique Abstract Photo Manipulation in Photoshop with Human, Rock and City Stocks

Step 3

We will work on the city building part of the manipulation in this step. Load the city image into Photoshop and select the following area:

3 sel1 Create Unique Abstract Photo Manipulation in Photoshop with Human, Rock and City Stocks

Copy and paste the selection over to our document and place it into the position shown below: (resize the layer to a small scale to fit the size of the rock texture)

3 paste 550x373 Create Unique Abstract Photo Manipulation in Photoshop with Human, Rock and City Stocks

Use the chalk brush as eraser to blend the city edges into the rock texture:

3 erase1 550x343 Create Unique Abstract Photo Manipulation in Photoshop with Human, Rock and City Stocks

Add the following 3 adjustment layers as clipping masks to this city layer:

Black and White

3 bw Create Unique Abstract Photo Manipulation in Photoshop with Human, Rock and City Stocks

Levels

3 lvs1 Create Unique Abstract Photo Manipulation in Photoshop with Human, Rock and City Stocks

Curves

3 curves Create Unique Abstract Photo Manipulation in Photoshop with Human, Rock and City Stocks

and here is the effect so far:

3 effect1 550x337 Create Unique Abstract Photo Manipulation in Photoshop with Human, Rock and City Stocks

Repeat the steps described above to add another lot of buildings to the top left position as shown below:

3 dup 550x319 Create Unique Abstract Photo Manipulation in Photoshop with Human, Rock and City Stocks

Paint some particles on top of the city building with the debris brushes for extra effect:

3 particle 550x391 Create Unique Abstract Photo Manipulation in Photoshop with Human, Rock and City Stocks

Step 4

We’re almost done. We will work on some final touches in this step. Add some cloud round the rock with a cloud brush or cloud filter, use the Warp tool to warp the cloud so it forms a circular shape:

4 cloud1 550x334 Create Unique Abstract Photo Manipulation in Photoshop with Human, Rock and City Stocks

Flatten the image, duplicate the background layer and apply the following Crystalize filter to the duplicated layer:

4 crystallize Create Unique Abstract Photo Manipulation in Photoshop with Human, Rock and City Stocks

4 cry set 550x439 Create Unique Abstract Photo Manipulation in Photoshop with Human, Rock and City Stocks

and you will have the following effect:

4 pixel 550x615 Create Unique Abstract Photo Manipulation in Photoshop with Human, Rock and City Stocks

Of course we don’t want to the whole image to be pixelated, so let’s apply the following layer mask on this crystallized layer:

4 mask 550x625 Create Unique Abstract Photo Manipulation in Photoshop with Human, Rock and City Stocks

Use a soft brush to paint some highlights on the model’s forehead:

4 highlight 550x284 Create Unique Abstract Photo Manipulation in Photoshop with Human, Rock and City Stocks

I further adjusted the colour balance of the image with the colour balance adjustment layer, and here is my final effect: (click to enlarge)

dream flatten 546x700 Create Unique Abstract Photo Manipulation in Photoshop with Human, Rock and City Stocks

That’s it for this tutorial! Hope you enjoy going through it and find it useful. Drop me a comment below if you have any question.

Till next time, have a great day!

The post Create Unique Abstract Photo Manipulation in Photoshop with Human, Rock and City Stocks appeared first on PSD Vault.

The Creation of “Mechanical Man” Photo Manipulation in Photoshop

$
0
0

In this tutorial, I will show you the process of creating this “Mechanical Man” digital art in Photoshop. We will use a number of photo manipulation techniques to merge several objects into one piece, and apply image adjustments to fine-tune each of the objects to achieve the desired effect.

This is an immediate level tutorial and some steps can be a little tricky, have a try!

Note: The Photoshop tutorial is done in CS6 – therefore some screenshot may have slighting different layout as in the earlier version. Some brushes are exclusive to Photoshop CS6.

Here is a preview of the final effect I have for this tutorial: (click to enlarge)

mechanical man flatten 550x332 The Creation of Mechanical Man Photo Manipulation in Photoshop

PSD File Download

You can download the PSD File for this tutorial via the VIP Members Area for only $6.95/Month (or less)! You will not only get this PSD File, but also 100+ other PSD Files + Extra Goodies + Exclusive Photoshop tutorials there. Signup now and get exclusive :) Find out more about the VIP Members Areas

vip sign up 250 The Creation of Mechanical Man Photo Manipulation in Photoshop

OK Let’s get started!

To complete this tutorial, you will need the following stocks:

Model

Old factory stock 1

Old factory stock 2

Abstract Brushset (pick a few sets from the list)

Note: This tutorial utilises heavily on layer mask techiques – if you have any difficulty with layer mask, please check out this video tutorial below:

Step 1

Create a new document sized 1400px * 800px with white background. Load the model stock into Photoshop and select the facial area as shown below:

1 sel 535x700 The Creation of Mechanical Man Photo Manipulation in Photoshop

Copy and paste the selection over to our document, reduce its size and place it at the center of the canvas:

1 paste1 550x300 The Creation of Mechanical Man Photo Manipulation in Photoshop

Apply the following Unsharp Mask filtter settings to sharpen this face layer a little:

1 unsharp The Creation of Mechanical Man Photo Manipulation in Photoshop

Use the eraser tool to fade the edges of the face as shown below:

1 erase1 550x345 The Creation of Mechanical Man Photo Manipulation in Photoshop

Add the following 2 adjustment layers as clipping mask to the face layer:

Black and White

1 bw1 The Creation of Mechanical Man Photo Manipulation in Photoshop

Set the layer blending mode of this black and white adjustment layer to “Hard Light”:

1 hard light 550x394 The Creation of Mechanical Man Photo Manipulation in Photoshop

Then add the following layer mask on this black and white adjustment layer:

1 bw mask 550x498 The Creation of Mechanical Man Photo Manipulation in Photoshop

Curves

1 curves The Creation of Mechanical Man Photo Manipulation in Photoshop

and here is the effect so far:

1 effect1 550x371 The Creation of Mechanical Man Photo Manipulation in Photoshop

Step 2

We will starting the mechanical parts into the image in the step. Load the “Factory stock 1″ image into Photoshop and select the pipe on the top:

2 sel1 550x272 The Creation of Mechanical Man Photo Manipulation in Photoshop

Copy and paste the selection over to our image and adjust its size as shown below:

2 attach 550x433 The Creation of Mechanical Man Photo Manipulation in Photoshop

Add the following 2 adjustment layers as clipping mask to this new pipe layer:

Black and White

2 bw1 The Creation of Mechanical Man Photo Manipulation in Photoshop

Levels

2 lvs1 The Creation of Mechanical Man Photo Manipulation in Photoshop

and here is your effect so far:

2 effect1 550x444 The Creation of Mechanical Man Photo Manipulation in Photoshop

Repeat the above steps and add another pipe on top: (with a different angle)

2 dup 550x449 The Creation of Mechanical Man Photo Manipulation in Photoshop

Step 3

We will keep adding more mechanical parts to the image. Select this round piece from the “Factory stock 1″ image:

3 sel1 550x440 The Creation of Mechanical Man Photo Manipulation in Photoshop

Copy and paste the selection over to our document, resize and place it onto the following position:

3 paste1 550x259 The Creation of Mechanical Man Photo Manipulation in Photoshop

Add the following 2 adjustment layers as clipping mask to it:

Black and White

3 bw The Creation of Mechanical Man Photo Manipulation in Photoshop

Levels

3 lvs The Creation of Mechanical Man Photo Manipulation in Photoshop

and here is the effect you will have so far:

3 effect1 550x354 The Creation of Mechanical Man Photo Manipulation in Photoshop

Repeat the above step and add more of these mechanical pieces to our image – use free transform tool to rotate and resize the pieces as you see fit.

You will aim to achieve the following effect:

3 dup 550x342 The Creation of Mechanical Man Photo Manipulation in Photoshop

Step 4

We will add more mechanical piece into the image. Load the “Factory stock 2″ image into Photoshop and select the bottom one as shown below:

4 sel 550x436 The Creation of Mechanical Man Photo Manipulation in Photoshop

Copy and paste the selection over to our image, place the new layer below the face layer and use a cloud or smoke brush (you should find lots of them on Google) as eraser, remove portions of it as shown below:

4 erase1 550x381 The Creation of Mechanical Man Photo Manipulation in Photoshop

Optionally, you can a few low visibility meters to the image (set layer opacity to around 20%):

4 more clocks 550x267 The Creation of Mechanical Man Photo Manipulation in Photoshop

Step 5

We’re almost done! For final touches, we can add a few brush patterns below the face with the abstract brush sets you downloaded:

5 pattern 550x274 The Creation of Mechanical Man Photo Manipulation in Photoshop

The strokes on the right were added with a 20px Round Point Stiff brush:

5 brush 550x259 The Creation of Mechanical Man Photo Manipulation in Photoshop

and erase parts of it with the eraser tool:

5 erase The Creation of Mechanical Man Photo Manipulation in Photoshop

I further added the colour balance of this image with a few colour balance and curves adjustment layers, and here is my final effect: (click to enlarge)

mechanical man flatten 550x332 The Creation of Mechanical Man Photo Manipulation in Photoshop

You can check out the following video tutorial on how to add colours with adjustment layers:

That’s it for this tutorial! Hope you enjoy going through it and find it useful. Drop me a comment below if you have any question.

Till next time, have a great day!

The post The Creation of “Mechanical Man” Photo Manipulation in Photoshop appeared first on PSD Vault.

Create Awesome Planet Explosion Effect in Photoshop

$
0
0

In this tutorial, I will show the methods you can use to create this awesome planet explosion effect in Photoshop. We will use a few simple manipulation and selection techniques, mixing with custom brush painting and finally, adjustment layers for adding colors.

This is an immediate level tutorial and some steps can be a little tricky, have a try!

Note: The Photoshop tutorial is done in CS6 – therefore some screenshot may have slighting different layout as in the earlier version. Some brushes are exclusive to Photoshop CS6.

Here is a preview of the final effect I have for this tutorial: (click to enlarge)

planet explosion flatten 550x305 Create Awesome Planet Explosion Effect in Photoshop

PSD File Download

You can download the PSD File for this tutorial via the VIP Members Area for only $6.95/Month (or less)! You will not only get this PSD File, but also 100+ other PSD Files + Extra Goodies + Exclusive Photoshop tutorials there. Signup now and get exclusive :) Find out more about the VIP Members Areas

vip sign up 250 Create Awesome Planet Explosion Effect in Photoshop

OK Let’s get started!

To complete this tutorial, you will need the following stocks:

Rock Texture

Space Brush (Pick a few sets from the list)

Debris Brush

Step 1

Create a new document sized 1400px * 900px with black background. We will start building the planet core using the rock texture.

Use the Elliptical Marquee Tool with 20px feather to select a circle below: (hold down the “Shift” while selecting for a perfect circle)

1 sel1 550x331 Create Awesome Planet Explosion Effect in Photoshop

Copy and paste the selection over to our document, reduce its size and place it on the left side of the canvas:

1 paste2 550x289 Create Awesome Planet Explosion Effect in Photoshop

Use a soft eraser to remove parts of the layer as shown below:

1 erase2 550x292 Create Awesome Planet Explosion Effect in Photoshop

Add the following 3 adjustment layers as clipping masks to this layer:

Black and White

1 bw2 Create Awesome Planet Explosion Effect in Photoshop

Levels

1 lvs1 Create Awesome Planet Explosion Effect in Photoshop

Curves

1 curves1 Create Awesome Planet Explosion Effect in Photoshop

And you will have the following effect so far:

1 effect2 550x396 Create Awesome Planet Explosion Effect in Photoshop

Repeat the steps above to add a few more pieces of the rock texture, and form a full planet shape as shown below:

1 effect 2 550x390 Create Awesome Planet Explosion Effect in Photoshop

Step 2

We will add break-apart effect with the debris brushes downloaded at the beginning of the tutorial:

2 brush 550x128 Create Awesome Planet Explosion Effect in Photoshop

Go to the rock texture file and create a new layer:

2 brush layer 550x390 Create Awesome Planet Explosion Effect in Photoshop

Use the debris brush to paint some particles over this new layer:

2 paint 550x350 Create Awesome Planet Explosion Effect in Photoshop

Hold down the “Alt” key and left-click the “brush” layer on the layer pane to make a selection over this layer:

2 sel2 550x290 Create Awesome Planet Explosion Effect in Photoshop

2 ants 550x302 Create Awesome Planet Explosion Effect in Photoshop

Maintain this selection, and go back to the background layer of rock texture and copy the selection. Paste it over to our document and re-size it as shown below:

2 resize 550x415 Create Awesome Planet Explosion Effect in Photoshop

Use a big soft eraser to fade the edges of this particle layer to add a bit of depth:

2 fade 550x372 Create Awesome Planet Explosion Effect in Photoshop

Step 3

We will render some gas/cloud to spice up the explosion effect: (I used this brush set here to paint this effect)

3 cloud 550x359 Create Awesome Planet Explosion Effect in Photoshop

Duplicate this cloud layer, compress and rotate the duplicated layer as shown below:

3 warp 550x384 Create Awesome Planet Explosion Effect in Photoshop

Repeat the above process and add some more cloud effect around the planet:

3 effect2 550x325 Create Awesome Planet Explosion Effect in Photoshop

Step 4

We will add some extra pieces of rocks around the exploding planet. We can simply use the method described in step 1, and use the free transform tool to rotate the layer into the angle as shown below:

Hint: You can also use the Quick Selection tool to select a few larger rocks from the texture.

4 more rock 2 550x458 Create Awesome Planet Explosion Effect in Photoshop

4 more rock 550x366 Create Awesome Planet Explosion Effect in Photoshop

Use the space brush you downloaded, paint a few space patterns/objects around the canvas:

4 brush 550x328 Create Awesome Planet Explosion Effect in Photoshop

4 brush 2 550x293 Create Awesome Planet Explosion Effect in Photoshop

and here is my overall effect so far:

4 effect1 550x357 Create Awesome Planet Explosion Effect in Photoshop

Step 5

We will work on adding colours in this final step. To do this, add the following 2 adjustment layers on top of all previous layers:

Selective Color

5 sel white Create Awesome Planet Explosion Effect in Photoshop

5 sel neu Create Awesome Planet Explosion Effect in Photoshop

5 sel black Create Awesome Planet Explosion Effect in Photoshop

Layer mask on this selective color adjustment layer:

5 sel mask 550x302 Create Awesome Planet Explosion Effect in Photoshop

Color Balance

5 col mide Create Awesome Planet Explosion Effect in Photoshop

Layer mask on this color balance adjustment layer:

5 col mask 550x301 Create Awesome Planet Explosion Effect in Photoshop

Vibrance

5 vib Create Awesome Planet Explosion Effect in Photoshop

and here is my final effect: (click to enlarge)

planet explosion flatten 550x305 Create Awesome Planet Explosion Effect in Photoshop

That’s it for this tutorial! Hope you enjoy going through it and find it useful. Drop me a comment below if you have any question.

Till next time, have a great day!

The post Create Awesome Planet Explosion Effect in Photoshop appeared first on PSD Vault.

Create “Dark Scientist” Conceptual Photo Manipulation in Photoshop

$
0
0

This tutorial is written exclusively for PSD Vault by Vik Aadi, a talented digital artist from India.

In this tutorial, we will learn how to create an conceptual surreal photo-manipulation. We are going to learn the process of creating depth of field using a few advance tools. We are going to learn how to blend images so seamlessly that it would look like a single image using the Brush tool, the Eraser tool and several adjustment layers.

Furthermore, we will learn how to create light and darkness to make the background look seamless. We are going to learn how to use textures and give life to our image, and we are going to learn how to create a moody, dreamy tone using a few adjustment layers and lighting effects.

Final Image (click to enlarge)

mad scientist flatten 550x364 Create Dark Scientist Conceptual Photo Manipulation in Photoshop

PSD File Download

You can download the PSD File for this tutorial via the VIP Members Area for only $6.95/Month (or less)! You will not only get this PSD File, but also 100+ other PSD Files + Extra Goodies + Exclusive Photoshop tutorials there. Signup now and get exclusive :) Find out more about the VIP Members Areas

vip sign up 250 Create Dark Scientist Conceptual Photo Manipulation in Photoshop

Step 1

Create a new file with a width of 1000 px and a height of 664 px at 300 dpi (Dots per Inch). Background Contents should be White.

Now,let’s open the Haunted House stock 9 in Photoshop. We will be using the room from this stock image so we will need to transfer it to our main canvas.

Click the Haunted House stock 9 and press V to activate the Move Tool. Left-click the image and drag the image to the main canvas and change layer name to “Room”.

1 Create Dark Scientist Conceptual Photo Manipulation in Photoshop

Step 2

Now activate Patch tool .

2 Create Dark Scientist Conceptual Photo Manipulation in Photoshop

Now use Patch tool over the part where we can see the sun light .

The result should be similar to this:

3 Create Dark Scientist Conceptual Photo Manipulation in Photoshop

The result should be similar to this:

4 Create Dark Scientist Conceptual Photo Manipulation in Photoshop

Now with the use of patch tool remove all the sun light parts .

5 Create Dark Scientist Conceptual Photo Manipulation in Photoshop

Now add layer mask to room layer and paint over the windows to remove them.

6 Create Dark Scientist Conceptual Photo Manipulation in Photoshop

The result should be similar to this:

7 Create Dark Scientist Conceptual Photo Manipulation in Photoshop

Step 3

Now,make a layer below the room layer and name it “Red” fill it with #5a0101 color .

8 Create Dark Scientist Conceptual Photo Manipulation in Photoshop

Now create new Curves adjustment layer from the bottom of layers palette .Press Alt+left click in between 2 layer’s (Red layer and Curves) to make a mask.

When the Curves box opens, input the following:

9 Create Dark Scientist Conceptual Photo Manipulation in Photoshop

Now create new Color Balance adjustment layer from the bottom of layers palette .Press Alt+left click in between 2 layer’s (Red layer and Color Balance) to make a mask.

When the Color Balance box opens, input the following:

10 Create Dark Scientist Conceptual Photo Manipulation in Photoshop

Now,let’s open Halloween Stock – Y – 2 in Photoshop. We will be using the girl from this stock image so we will need to transfer it to our main canvas.

Click the Halloween Stock – Y – 2 and press V to activate the Move Tool. Left-click the image and drag the image to the main canvas and change layer name to “girl 1″.

11 Create Dark Scientist Conceptual Photo Manipulation in Photoshop

Step 4

Now change it’s layer mode to “Overlay” .

12 Create Dark Scientist Conceptual Photo Manipulation in Photoshop

Now create new Levels adjustment layer from the bottom of layers palette .Press Alt+left click in between 2 layer’s (Girl 1 layer and Levels) to make a mask.

When the Levels box opens, input the following:

13 Create Dark Scientist Conceptual Photo Manipulation in Photoshop

Step 5

Now follow the same steps and add one more girl .

14 Create Dark Scientist Conceptual Photo Manipulation in Photoshop

Now Make a new layer above girls layer and name it shadow .

Now activate Brush tool (B) with these settings :

  • Brush size: 400px
  • Hardness: 0%
  • Opacity: 40%
  • Flow: 100%
  • Color: #000000
  • Now paint over the highlighted area.

15 Create Dark Scientist Conceptual Photo Manipulation in Photoshop

The result should be similar to this:

16 Create Dark Scientist Conceptual Photo Manipulation in Photoshop

Now,let’s open the Swimming pool in Photoshop. We will be using the sky from this water image so we will need to transfer it to our main canvas.

Click the Swimming pool and press V to activate the Move Tool. Left-click the image and drag the image to the main canvas and change layer name to “water 1″.

Now Desaturate the image .

17 Create Dark Scientist Conceptual Photo Manipulation in Photoshop

Now Change it’s layer mode to “Overlay” and opacity to “40%” .

18 Create Dark Scientist Conceptual Photo Manipulation in Photoshop

Again,let’s open the Swimming pool in Photoshop. We will be using the sky from this water image so we will need to transfer it to our main canvas.

Click the Swimming pool and press V to activate the Move Tool. Left-click the image and drag the image to the main canvas and change layer name to “water 1″.

Now Change it’s layer mode to “Overlay” and opacity to “20%” .

19 Create Dark Scientist Conceptual Photo Manipulation in Photoshop

Now bring splash image to our canvas and place it over the water 1 layer and mane it “Water splash 1″ .

20 Create Dark Scientist Conceptual Photo Manipulation in Photoshop

Now add more splash to over canvas and change the layer mode to “screen” .

21 Create Dark Scientist Conceptual Photo Manipulation in Photoshop

Now lets get back to the room layer .

When the Hue/Saturation box opens, input the following.Press Alt+left click in between 2 layer’s (Room layer and Hue/Saturation) to make a mask.

When the Hue/Saturation box opens, input the following:

22 Create Dark Scientist Conceptual Photo Manipulation in Photoshop

When the Color Balance box opens, input the following.Press Alt+left click in between 2 layer’s (Room layer and Color Balance) to make a mask.

When the Color Balance box opens, input the following:

23 Create Dark Scientist Conceptual Photo Manipulation in Photoshop

The result should be similar to this:

24 Create Dark Scientist Conceptual Photo Manipulation in Photoshop

Now lets do some color corrections.

IMPORTANT: We’re going to apply a series of adjustment layers above all other layers. Even though we still have more aspects of our piece to work on, these adjustment layers should remain as the top layers for the rest of the tutorial.

Now we will add Vigntte .So add one more layer and name it “Vigntte” and fill the layer with white color .

Now goto Filter > Distrot > Lens Correction .

When the Lens Correction box opens, input the following:

25 Create Dark Scientist Conceptual Photo Manipulation in Photoshop

Now change it’s layer mode to “Multiply” .

26 Create Dark Scientist Conceptual Photo Manipulation in Photoshop

Step 6

Now create new Curves adjustment layer from the bottom of layers palette .

When the Curves box opens, input the following:

27 Create Dark Scientist Conceptual Photo Manipulation in Photoshop

Now create new Curves adjustment layer from the bottom of layers palette .

When the Curves box opens, input the following:

28 Create Dark Scientist Conceptual Photo Manipulation in Photoshop

Now create new Gradient map layer from the bottom of layers palette .

When the Gradient map box opens, input the following:

29 Create Dark Scientist Conceptual Photo Manipulation in Photoshop

Now create new Curves adjustment layer from the bottom of layers palette .

When the Curves box opens, input the following:

30 Create Dark Scientist Conceptual Photo Manipulation in Photoshop

Now create new Gradient map layer from the bottom of layers palette .

When the Gradient map box opens, input the following:

Change it’s layer mode to “Luminosity”

31 Create Dark Scientist Conceptual Photo Manipulation in Photoshop

Step 7

The result should be similar to this:

32 Create Dark Scientist Conceptual Photo Manipulation in Photoshop

Now select the mask of Gradient map 1 .

  • Brush size: 400px
  • Hardness: 0%
  • Opacity: 40%
  • Flow: 100%
  • Color: #000000

Now paint over the highlighted area.

33 Create Dark Scientist Conceptual Photo Manipulation in Photoshop

The result should be similar to this:

34 Create Dark Scientist Conceptual Photo Manipulation in Photoshop

Step 8

Now,let’s open Pipes image in Photoshop from our source file folder. We will be using the Pipes from this stock image so we will need to transfer it to our main canvas.

Click the Pipes and press V to activate the Move Tool. Left-click the image and drag the image to the main canvas and change layer name to “Pipes”.

35 466x700 Create Dark Scientist Conceptual Photo Manipulation in Photoshop

Next, activate the Transform tool (Ctrl/Cmd +T), then while the “Pipes” layer is selected and then resize it as shown below:

36 Create Dark Scientist Conceptual Photo Manipulation in Photoshop

Now,let’s open the Regenerator in Photoshop. We will be using the top part from this stock image so we will need to transfer it to our main canvas.

Click the Regenerator and press V to activate the Move Tool. Left-click the image and drag the image to the main canvas and change layer name to “Top part”.

37 Create Dark Scientist Conceptual Photo Manipulation in Photoshop

Now,let’s open the Regenerator in Photoshop. We will be using the Bottom part from this stock image so we will need to transfer it to our main canvas.

Click the Regenerator and press V to activate the Move Tool. Left-click the image and drag the image to the main canvas and change layer name to “Bottom part”.

38 Create Dark Scientist Conceptual Photo Manipulation in Photoshop

Now create new Curves adjustment layer from the bottom of layers palette .Press Alt+left click in between 2 layer’s (Bottom part layer and Curves) to make a mask.

When the Curves box opens, input the following:

39 Create Dark Scientist Conceptual Photo Manipulation in Photoshop

The result should be similar to this:

40 Create Dark Scientist Conceptual Photo Manipulation in Photoshop

Now create new Color balance layer from the bottom of layers palette .Press Alt+left click in between 2 layer’s (Bottom part layer and Color balance) to make a mask.

When the Color balance box opens, input the following:

41 Create Dark Scientist Conceptual Photo Manipulation in Photoshop

Now,let’s open the Old Fire Protection Valve Prop in Photoshop. We will be using the Valve from this stock image so we will need to transfer it to our main canvas.

Click the Old Fire Protection Valve Prop and press V to activate the Move Tool. Left-click the image and drag the image to the main canvas and change layer name to “Valve”.

42 Create Dark Scientist Conceptual Photo Manipulation in Photoshop

Now,let’s open the water image in Photoshop . We will be using the water image from this stock image so we will need to transfer it to our main canvas.

Click the water image and press V to activate the Move Tool. Left-click the image and drag the image to the main canvas and change layer name to “water 1″.

Now add vector mask from the bottom of layers palette .

Now activate Brush tool (B) with these settings :

  • Brush size: 400px
  • Hardness: 0%
  • Opacity: 40%
  • Flow: 100%
  • Color: #000000

Now paint over the highlighted area.

43 Create Dark Scientist Conceptual Photo Manipulation in Photoshop

The result should be similar to this:

44 Create Dark Scientist Conceptual Photo Manipulation in Photoshop

Step 9

Now,let’s open the Swimming pool image in Photoshop . We will be using the water image from this stock image so we will need to transfer it to our main canvas.

Click the Swimming pool image and press V to activate the Move Tool. Left-click the image and drag the image to the main canvas and change layer name to “water 2″.

Now add vector mask from the bottom of layers palette .

Now activate Brush tool (B) with these settings :

  • Brush size: 400px
  • Hardness: 0%
  • Opacity: 40%
  • Flow: 100%
  • Color: #000000

Now paint over the highlighted area.

45 Create Dark Scientist Conceptual Photo Manipulation in Photoshop

Now change it’s layer mode to “Overlay” .

46 Create Dark Scientist Conceptual Photo Manipulation in Photoshop

Now create new Hue/Saturation adjustment layer from the bottom of layers palette .Press Alt+left click in between 2 layer’s (water2 layer and Hue/Saturation) to make a mask.

When the Hue/Saturation box opens, input the following:

47 Create Dark Scientist Conceptual Photo Manipulation in Photoshop

Step 10

The result should be similar to this:

48 Create Dark Scientist Conceptual Photo Manipulation in Photoshop

Now,make a duplicate of Water2 layer with its Hue/Saturation adjustment layer .

49 Create Dark Scientist Conceptual Photo Manipulation in Photoshop

Step 11

Now,let’s open the V4 THE ROBOT 02 in Photoshop. We will be using the Cybog from this stock image so we will need to transfer it to our main canvas.

Click the V4 THE ROBOT 02 and press V to activate the Move Tool. Left-click the image and drag the image to the main canvas and change layer name to “Cybog”.

50 Create Dark Scientist Conceptual Photo Manipulation in Photoshop

Now create new Brightness/Contrast adjustment layer from the bottom of layers palette .Press Alt+left click in between 2 layer’s (Cybog layer and Brightness/Contrast) to make a mask.

When the Brightness/Contrast box opens, input the following:

51 Create Dark Scientist Conceptual Photo Manipulation in Photoshop

Now create new Hue/Saturation adjustment layer from the bottom of layers palette .Press Alt+left click in between 2 layer’s (Cybog layer and Hue/Saturation) to make a mask.

When the Hue/Saturation box opens, input the following:

52 Create Dark Scientist Conceptual Photo Manipulation in Photoshop

Now create new Curves adjustment layer from the bottom of layers palette .Press Alt+left click in between 2 layer’s (Cybog layer and Curves) to make a mask.

When the Curves box opens, input the following:

53 Create Dark Scientist Conceptual Photo Manipulation in Photoshop

The result should be similar to this:

54 Create Dark Scientist Conceptual Photo Manipulation in Photoshop

Now,let’s open the Mad Scientist – 15 in Photoshop. We will be using the Scientist from this stock image so we will need to transfer it to our main canvas.

Click the Mad Scientist – 15 and press V to activate the Move Tool. Left-click the image and drag the image to the main canvas and change layer name to “Mad Scientist”.

55 Create Dark Scientist Conceptual Photo Manipulation in Photoshop

Now create new Hue/Saturation adjustment layer from the bottom of layers palette .Press Alt+left click in between 2 layer’s (Mad Scientist layer and Hue/Saturation) to make a mask.

When the Hue/Saturation box opens, input the following:

56 Create Dark Scientist Conceptual Photo Manipulation in Photoshop

Step 12

Now create new Curves adjustment layer from the bottom of layers palette .Press Alt+left click in between 2 layer’s (Mad Scientist layer and Curves) to make a mask.

When the Curves box opens, input the following:

57 Create Dark Scientist Conceptual Photo Manipulation in Photoshop

Now select the mask layer of both curves and hue/saturation layer .

Now activate Brush tool (B) with these settings :

  • Brush size: 400px
  • Hardness: 0%
  • Opacity: 40%
  • Flow: 100%
  • Color: #000000

Now paint over the highlighted area.

58 Create Dark Scientist Conceptual Photo Manipulation in Photoshop

The result should be similar to this:

59 Create Dark Scientist Conceptual Photo Manipulation in Photoshop

Step 13

Now,let’s open the Sci-fi_Prop 4 – Stock in Photoshop. We will be using the Machine from this stock image so we will need to transfer it to our main canvas.

Click the Sci-fi_Prop 4 – Stock and press V to activate the Move Tool. Left-click the image and drag the image to the main canvas and change layer name to “Machine” 1″.

60 Create Dark Scientist Conceptual Photo Manipulation in Photoshop

Now create new Curves adjustment layer from the bottom of layers palette .Press Alt+left click in between 2 layer’s (Machine layer and Curves) to make a mask.

When the Curves box opens, input the following:

61 Create Dark Scientist Conceptual Photo Manipulation in Photoshop

Step 14

Now select the mask layer of both curves layer .

Now activate Brush tool (B) with these settings :

  • Brush size: 400px
  • Hardness: 0%
  • Opacity: 40%
  • Flow: 100%
  • Color: #000000

Now paint over the highlighted area.

62 Create Dark Scientist Conceptual Photo Manipulation in Photoshop

Now bring bulb image to our canvas :

63 Create Dark Scientist Conceptual Photo Manipulation in Photoshop

Now make a new layer below bulb layer and name it “Below Light” .

Now activate Brush tool (B) with these settings :

  • Brush size: 400px
  • Hardness: 0%
  • Opacity: 100%
  • Flow: 100%
  • Color: #ffffff

Now paint over the highlighted area.

64 Create Dark Scientist Conceptual Photo Manipulation in Photoshop

Now change it’s layer mode to “Overlay” .

Now add vector mask from the bottom of layers palette .

Now activate Brush tool (B) with these settings :

  • Brush size: 400px
  • Hardness: 0%
  • Opacity: 40%
  • Flow: 100%
  • Color: #000000

Now paint over the highlighted area.

65 Create Dark Scientist Conceptual Photo Manipulation in Photoshop

Now add a layer above the bulb layer and name it “Top light” .

66 Create Dark Scientist Conceptual Photo Manipulation in Photoshop

Now get back to our pipes layer.

Now create new Curves adjustment layer from the bottom of layers palette .Press Alt+left click in between 2 layer’s (Pipes layer and Curves) to make a mask.

When the Curves box opens, input the following:

67 Create Dark Scientist Conceptual Photo Manipulation in Photoshop

Now select the mask of curves layer .

Now activate Brush tool (B) with these settings :

  • Brush size: 400px
  • Hardness: 0%
  • Opacity: 40%
  • Flow: 100%
  • Color: #000000

Now paint over the highlighted area.

68 Create Dark Scientist Conceptual Photo Manipulation in Photoshop

Now Make a new layer and name it “light” and make it a layer mask .

Now activate Brush tool (B) with these settings :

  • Brush size: 400px
  • Hardness: 0%
  • Opacity: 40%
  • Flow: 100%
  • Color: #ffffff

Now paint over the highlighted area.

69 Create Dark Scientist Conceptual Photo Manipulation in Photoshop

Now Make a new layer above light layer and name it “light” and make it a layer mask .

Now activate Brush tool (B) with these settings :

  • Brush size: 50px
  • Hardness: 0%
  • Opacity: 100%
  • Flow: 100%
  • Color: #ffffff

Now paint over the highlighted area.

70 Create Dark Scientist Conceptual Photo Manipulation in Photoshop

Repeat the same process and add light to the Scientise,Machine and Regenerator :

71 Create Dark Scientist Conceptual Photo Manipulation in Photoshop

Now,let’s open the ELECTRIC POWER STATION in Photoshop. We will be using the Generator from this stock image so we will need to transfer it to our main canvas.

Click the ELECTRIC POWER STATION and press V to activate the Move Tool. Left-click the image and drag the image to the main canvas and change layer name to “Generator”.

72 Create Dark Scientist Conceptual Photo Manipulation in Photoshop

Now create new Curves layer from the bottom of layers palette .Press Alt+left click in between 2 layer’s (Generator layer and Curves) to make a mask.

When the Curves box opens, input the following:

73 Create Dark Scientist Conceptual Photo Manipulation in Photoshop

Now select the mask of curve layer .

Now activate Brush tool (B) with these settings :

  • Brush size: 400px
  • Hardness: 0%
  • Opacity: 40%
  • Flow: 100%
  • Color: #000000

Now paint over the highlighted area.

74 Create Dark Scientist Conceptual Photo Manipulation in Photoshop

Step 15

Now make a new layer below the generator layer and name it “Back glow” .

Now activate Brush tool (B) with these settings :

  • Brush size: 400px
  • Hardness: 0%
  • Opacity: 40%
  • Flow: 100%
  • Color: #ffffff

Now paint over the highlighted area.

75 Create Dark Scientist Conceptual Photo Manipulation in Photoshop

Now make a new layer below the generator layer and name it “top glow” .

Now activate Brush tool (B) with these settings :

  • Brush size: 50px
  • Hardness: 0%
  • Opacity: 100%
  • Flow: 100%
  • Color: #ffffff

Now paint over the highlighted area.

76 Create Dark Scientist Conceptual Photo Manipulation in Photoshop

Now we will add light to our generator so repeat the same process as we have done with others.

77 Create Dark Scientist Conceptual Photo Manipulation in Photoshop

Step 16

Now Install the lightning brush and draw some lightning take white (ffffff) as color .

78 Create Dark Scientist Conceptual Photo Manipulation in Photoshop

And this is the final result for this tutorial: (click to enlarge)

mad scientist flatten 550x364 Create Dark Scientist Conceptual Photo Manipulation in Photoshop

That’s it for this tutorial! Hope you enjoy going through it and find it useful. Drop me a comment below if you have any question.

Till next time, have a great day!

The post Create “Dark Scientist” Conceptual Photo Manipulation in Photoshop appeared first on PSD Vault.


VIP Exclusive Photoshop Tutorial – Advanced Shape and Lighting Manipulation via Cinema 4D and Photoshop

$
0
0

Welcome to another Exclusive Photoshop tutorial written specifically for the PSD Vault VIP Members! In this tutorial, author Kgaogelo Mphela will talk through a number of advanced shape and lighting Manipulation techniques via Cinema 4D and Photoshop.

Final Image Preview

This is the image you will be creating: (click to enlarge)

lady gypsy psdvault final 550x366 VIP Exclusive Photoshop Tutorial   Advanced Shape and Lighting Manipulation via Cinema 4D and Photoshop

What You Will Learn

This Photoshop tutorial will cover:

  1. Advanced shape creation in Cinema 4D
  2. Advanced lighting techniques
  3. Retouch techniques

VIP Exclusive Tutorial

If you’re a VIP member, you can log in to the VIP Members Area and click on Exclusive Tutorial button to download the tutorial. If you’re yet to become a VIP member, you can simply click on the banner below to signup:

vip sign up 250 VIP Exclusive Photoshop Tutorial   Advanced Shape and Lighting Manipulation via Cinema 4D and Photoshop

About the Author

Kgaogelo Mphela is a graphic artist from Pretoria, South Africa with the passion for graphics since a young age, mostly working on Photoshop.

Tutorial Spotlights

Here are some sample screenshots in this tutorial:

lady gypsy psdvault 1 VIP Exclusive Photoshop Tutorial   Advanced Shape and Lighting Manipulation via Cinema 4D and Photoshop

lady gypsy psdvault 2 VIP Exclusive Photoshop Tutorial   Advanced Shape and Lighting Manipulation via Cinema 4D and Photoshop

lady gypsy psdvault 3 VIP Exclusive Photoshop Tutorial   Advanced Shape and Lighting Manipulation via Cinema 4D and Photoshop

Interested? Log in to your VIP members area to download it now!

Not a member yet? Click on the banner below to sign up now:

vip sign up 250 VIP Exclusive Photoshop Tutorial   Advanced Shape and Lighting Manipulation via Cinema 4D and Photoshop

Hope you enjoy it and find it useful! Thank you for your support and have a nice day!

The post VIP Exclusive Photoshop Tutorial – Advanced Shape and Lighting Manipulation via Cinema 4D and Photoshop appeared first on PSD Vault.

Create “Trapped in the Trees” Photo Manipulation in Photoshop

$
0
0

In this tutorial, I will show you the processes of creating this unique “Trapped in the trees” photo manipulation in Photoshop. The idea of this photo manipulation is to surround a face with tree trunks and branches and create a trapped effect. We will achieve this by utilising a few simple Photoshop techniques.

This is an immediate level tutorial and some steps can be a little tricky, have a try!

Note: The Photoshop tutorial is done in CS6 – therefore some screenshot may have slighting different layout as in the earlier version. Some brushes are exclusive to Photoshop CS6.

Here is a preview of the final effect I have for this tutorial: (click to enlarge)

tree face manip flatten 550x314 Create Trapped in the Trees Photo Manipulation in Photoshop

PSD File Download

You can download the PSD File for this tutorial via the VIP Members Area for only $6.95/Month (or less)! You will not only get this PSD File, but also 100+ other PSD Files + Extra Goodies + Exclusive Photoshop tutorials there. Signup now and get exclusive :) Find out more about the VIP Members Areas

vip sign up 250 Create Trapped in the Trees Photo Manipulation in Photoshop

OK Let’s get started!

To complete this tutorial, you will need the following stocks:

Model by anettfrozen

Fallen Tree by faestock

Fire

Crow

Splatter brushes (pick a few)

Step 1

Create a new document sized 1400px * 800px with white background. Load the Model stock image into Photoshop and select the facial area of the model:

1 sel 550x366 Create Trapped in the Trees Photo Manipulation in Photoshop

Copy and paste the selection over to our document. Re-size this new face layer with the free transform tool, and rotate the face clockwise slightly as show below:

1 rotate 550x371 Create Trapped in the Trees Photo Manipulation in Photoshop

Add a layer mask to this face layer and use some of the splatter brushes you downloaded, remove some portions around the face edges as shown below:

1 erase 550x411 Create Trapped in the Trees Photo Manipulation in Photoshop

Step 2

We will work on the face layer further in this step. Let’s add the following 3 adjustment layers as clipping masks to the face layer:

Black and White

2 bw Create Trapped in the Trees Photo Manipulation in Photoshop

Reveal the eyes area on this black and white’s layer mask:

2 bw mask 550x254 Create Trapped in the Trees Photo Manipulation in Photoshop

Levels

2 lvs Create Trapped in the Trees Photo Manipulation in Photoshop

Curves

2 curves Create Trapped in the Trees Photo Manipulation in Photoshop

Load the fallen tree stock into Photoshop and select a piece of the tree:

2 sel 550x251 Create Trapped in the Trees Photo Manipulation in Photoshop

Copy and paste the selection over to our document and set it as clipping mask (make sure it’s above the previous adjustment layer), and you will have the following effect:

Hint: you can use the free transform tool to re-size and rotate this tree layer, to achieve the best result.

2 clipping 550x387 Create Trapped in the Trees Photo Manipulation in Photoshop

Add one more black and white adjustment layer as clipping mask on top of this tree layer. Set the layer opacity of this black and white adjustment layer to around 40%:

2 bw 2 Create Trapped in the Trees Photo Manipulation in Photoshop

and here is the effect so far:

2 effect1 550x457 Create Trapped in the Trees Photo Manipulation in Photoshop

Step 3

We will start adding the tree branches in this step. Grab another piece of the tree from the fallen tree stock and paste it over to our document. Use the free transform tool to re-size and rotate it to the angel shown below:

3 branch 550x260 Create Trapped in the Trees Photo Manipulation in Photoshop

Add the following 2 adjustment layers as clipping masks for this tree branch layer:

Black and White

3 bw Create Trapped in the Trees Photo Manipulation in Photoshop

Levels

3 lvs1 Create Trapped in the Trees Photo Manipulation in Photoshop

and here is the effect so far:

3 effect1 550x230 Create Trapped in the Trees Photo Manipulation in Photoshop

Step 4

We will keep adding the branches in until the face in surrounded by them. We can use the same process as mentioned in step 3, and make sure your select different pieces from the fallen tree stock image, so we can ensure the variety for our image:

4 bran 2 550x405 Create Trapped in the Trees Photo Manipulation in Photoshop

4 bran 3 550x321 Create Trapped in the Trees Photo Manipulation in Photoshop

Make sure you adjust the size of each branch pieces with the free transform tool as well:

4 bran 4 550x332 Create Trapped in the Trees Photo Manipulation in Photoshop

4 bran 5 550x319 Create Trapped in the Trees Photo Manipulation in Photoshop

Step 5

We will add the fire texture to the image in step 5. Load the fire stock image into Photoshop and select the fire:

5 fire 550x311 Create Trapped in the Trees Photo Manipulation in Photoshop

Copy and paste the selection over to our document and set the blending mode to “overlay”, and move them to the following portions:

5 fire overlay 550x282 Create Trapped in the Trees Photo Manipulation in Photoshop

Add some fire texture around the eye area as well:

5 fire copy 550x229 Create Trapped in the Trees Photo Manipulation in Photoshop

Step 6

We will work on a series of extra effects in this step. Load the crow stock image into Photoshop and add it to the position shown below:

6 crow 550x362 Create Trapped in the Trees Photo Manipulation in Photoshop

We will render some smoke/cloud with the cloud filter or brush as shown below:

6 smoke 550x251 Create Trapped in the Trees Photo Manipulation in Photoshop

Use the splatter brush to add some abstract patterns below:

6 paint 550x312 Create Trapped in the Trees Photo Manipulation in Photoshop

Step 7

We’re almost done! We will apply a few filter effects to touch up this image. Flatten the layers and duplicate the background layer, apply the following Ink Outlines filter to the duplicated layer:

7 ink outlines Create Trapped in the Trees Photo Manipulation in Photoshop

Attach the following layer mask to this ink outline filtered layer:

7 mask ink outline 550x311 Create Trapped in the Trees Photo Manipulation in Photoshop

and here is the effect so far:

7 effect ink 550x357 Create Trapped in the Trees Photo Manipulation in Photoshop

Optionally, we can duplicate the background layer once more and move this duplicated layer to the top, and apply the following Stained Glass filter:

7 stained glass Create Trapped in the Trees Photo Manipulation in Photoshop

Set this layer blending mode to “Screen”:

7 screen 550x288 Create Trapped in the Trees Photo Manipulation in Photoshop

Add the following selective color adjustment layer to fine tune the colours a bit:

7 sel red Create Trapped in the Trees Photo Manipulation in Photoshop

7 sel whites Create Trapped in the Trees Photo Manipulation in Photoshop

7 neu Create Trapped in the Trees Photo Manipulation in Photoshop

7 black Create Trapped in the Trees Photo Manipulation in Photoshop

and this is the final effect I have: (click to enlarge)

tree face manip flatten 550x314 Create Trapped in the Trees Photo Manipulation in Photoshop

That’s it for this tutorial! Hope you enjoy going through it and find it useful. Drop me a comment below if you have any question.

Till next time, have a great day!

The post Create “Trapped in the Trees” Photo Manipulation in Photoshop appeared first on PSD Vault.

Best of PSD Vault Photoshop Tutorials 2013

$
0
0

Time has certainly flown by and 2013 is almost behind us! As we enjoy this holiday season, I would like to say a big thank you for everyone who visited PSD Vault, it has been a great joy for us to share our Photoshop knowledge, and provide you with art inspiration and promote some great digital artworks in the design community. We hope you’ve learnt a thing or two from us to improve your Photoshop skills.

Enjoy this final post of the year ih which we showcase you a list of the best Photoshop tutorials published on PSD Vault in 2013:

Create Abstract Photo Manipulation with Tree Bark Texture and Brush Elements

In this tutorial, I will show you the steps I took to Create this Abstract Manipulation with Tree Bark Texture and Brush Elements. Along the way, you will learn how you can apply layer masks to image adjustment layers to create unique effect, as well as learning to blend texture and to use various elements to create great abstract effect.

brush abstract flatten 492x700 Best of PSD Vault Photoshop Tutorials 2013

Design a Hot Golden Text with Disintegration Effect in Photoshop

In this Photoshop tutorial, I will show you the steps I took to Design this Hot, Golden Text with Disintegration Effect in Photoshop. We will mainly use the selection tool and layer mask to perform some texturing for the letters, and use image adjustment tools to fine-tune the effect.

golden nugget text flatten 500x184 Best of PSD Vault Photoshop Tutorials 2013

Create a Surreal Photo Manipulation by Mixing Ice and Fire Textures

In this Photoshop tutorial, I will show you the steps I took to Create a Unique Photo Manipulation via Mixture of Ice and Fire Textures. Along the way, I will show some interesting ways to manipulate texture via image adjustment tool and free transform tool. This is an intermediate level tutorial, have a try!

ice fire photo manip flatten 500x662 Best of PSD Vault Photoshop Tutorials 2013

Design Fluid Typography on Watercolour Background in Photoshop

In this tutorial, I will show you the steps to Design this Fluid Typography on Watercolour Background in Photoshop. We will mainly use custom brushes and the liquify tool to achieve this simple, but unique effect. This is a beginner level tutorial, have a try!

fluid text flatten 500x239 Best of PSD Vault Photoshop Tutorials 2013

The Creation of “Dragon Mountain” Digital Art in Photoshop

In this tutorial, I will show you the steps to Design “Dragon Mountain” Digital Art in Photoshop. This is a good example to show you a few simple methods to blending objects together in Photoshop, and edit them with various image adjustment tools. This is an intermediate level tutorial, have a try!

dragon mountain flatten 500x312 Best of PSD Vault Photoshop Tutorials 2013

Abstract Sci-fi Style Energy Laser Beam Creation in Photoshop

In this tutorial, I will show you the steps to create Abstract Sci-fi Style Energy Laser Beam in Photoshop. We will go through some interesting techniques to create these beams, on top of a space background, such as lighting effect, colour overlay and image adjustment.

space abstract line 500x500 Best of PSD Vault Photoshop Tutorials 2013

The Creation of “Imminent Danger” Digital Art in Photoshop

In this tutorial, I will show you the steps of The Creation of “Imminent Danger” Digital Art in Photoshop, with elements such as urban building, grunge brushset and surreal lighting effect.

urban scene with grunge texture flatten 500x279 Best of PSD Vault Photoshop Tutorials 2013

Create Unique 3D Grass and Stone Text Effect in Photoshop CS6 Extended

In this tutorial, I will show you the steps to Create Unique 3D Grass and Stone Text Effect in Photoshop CS6 extended. We will explore the use of the 3D functions to create this interesting text effect. We will also go through some texturing techniques and filter effects.

3d grass stone text flatten 500x281 Best of PSD Vault Photoshop Tutorials 2013

Create Intriguing Manipulation by Mixing Nature and Grunge Elements in Photoshop

In this tutorial, I will show you the process of creating this create an intriguing manipulation by mixing nature and grunge elements in Photoshop. This will be an interesting experiment for you to use tools such as image adjustment layers and layer blending modes, as well as practice the use of liquify filter and brush tool.

grunge nature scene 2 flatten 538x700 Best of PSD Vault Photoshop Tutorials 2013

Create Melted Metal Text Effect in Photoshop

In this tutorial, I will show you how you can create this melted metal text effect in Photoshop. We will mainly go through the use of layer blending options, image adjustments, and various filter effects which you use to produce this cool text effect.

rusted metal text flatten 550x306 Best of PSD Vault Photoshop Tutorials 2013

Create Fresh Fruit 3D Text Effect in Photoshop

In this Photoshop tutorial, I will show you the process of creating fresh fruit 3D text effect in Photoshop. You will learn a few trick to render a nice and unique 3D text effect and apply various fruits around it. We will use a number filter to add some extra effect for our text.

3d fruit text flatten 550x314 Best of PSD Vault Photoshop Tutorials 2013

Create Unique Abstract Photo Manipulation in Photoshop with Human, Rock and City Stocks

In this Photoshop tutorial, I will show you the methods I used to create unique abstract photo manipulation by mixing rock and city stock images in Photoshop. We will combine 3 objects: human, rock and city into one manipulation and form a unique looking digital art. We will primarily use the adjustment layers tool, layer blending modes and various filter to achieve this manipulation.

dream flatten 546x700 Best of PSD Vault Photoshop Tutorials 2013

Create Awesome Planet Explosion Effect in Photoshop

In this tutorial, I will show the methods you can use to create this awesome planet explosion effect in Photoshop. We will use a few simple manipulation and selection techniques, mixing with custom brush painting and finally, adjustment layers for adding colors.

planet explosion flatten 550x305 Best of PSD Vault Photoshop Tutorials 2013

That’s it! Hope you enjoy these tutorials and have a wonderful new year – we will be back in 2014 with more awesome Photoshop tutorials.

The post Best of PSD Vault Photoshop Tutorials 2013 appeared first on PSD Vault.

Create “Unleash the Dark Power” Surreal Scene in Photoshop

$
0
0

In this tutorial, I will show you the steps I took to create this ”Unleash the Dark Power” surreal scene in Photoshop. You will have the opportunity to practice objects merging, image adjustments, selection techniques, as well as a number of filter effects.

This is an immediate level tutorial and some steps can be a little tricky, have a try!

Note: The Photoshop tutorial is done in CS6 – therefore some screenshot may have slighting different layout as in the earlier version. Some brushes are exclusive to Photoshop CS6.

Here is a preview of the final effect I have for this tutorial: (click to enlarge)

city scene flatten 550x276 Create Unleash the Dark Power Surreal Scene in Photoshop

PSD File Download

You can download the PSD File for this tutorial via the VIP Members Area for only $6.95/Month (or less)! You will not only get this PSD File, but also 100+ other PSD Files + Extra Goodies + Exclusive Photoshop tutorials there. Signup now and get exclusive :) Find out more about the VIP Members Areas

vip sign up 250 Create Unleash the Dark Power Surreal Scene in Photoshop

OK Let’s get started!

To complete this tutorial, you will need the following stocks:

Model by Falln-Stock

City stock image

Flame

Crack brush

Step 1

Create a new document sized 1400px * 704px with black background. Load the city stock image into Photoshop and select the buildings on the right:

1 sel city 489x700 Create Unleash the Dark Power Surreal Scene in Photoshop

Copy and paste the selection over to our document, use the free transform tool to distort the selection as shown below:

1 distort 550x514 Create Unleash the Dark Power Surreal Scene in Photoshop

Use a soft eraser to remove the following areas of the building:

1 remove 550x584 Create Unleash the Dark Power Surreal Scene in Photoshop

Add the following adjustment layers as clipping masks to this building layer:

Black and White

1 bw Create Unleash the Dark Power Surreal Scene in Photoshop

Layer mask on the black and white adjustment layer:

1 bw mask 550x472 Create Unleash the Dark Power Surreal Scene in Photoshop

Levels

1 lvs Create Unleash the Dark Power Surreal Scene in Photoshop

Layer mask on the levels adjustment layer:

1 lvs mask 550x592 Create Unleash the Dark Power Surreal Scene in Photoshop

Curves

1 curves Create Unleash the Dark Power Surreal Scene in Photoshop

Layer mask on the curves adjustment layer:

1 curves mask 550x513 Create Unleash the Dark Power Surreal Scene in Photoshop

Group the building layer and all its 3 adjustment layers together, duplicate the group and move the duplicated layers to the position shown below, and use the free transform tool to scale and rotate the group:

1 more building 550x382 Create Unleash the Dark Power Surreal Scene in Photoshop

Repeat the above step and add more buildings into the image, make sure you use free transform to rotate and re-size them to add more variety and depth for our image:

1 effect 550x676 Create Unleash the Dark Power Surreal Scene in Photoshop

1 effect 2 550x463 Create Unleash the Dark Power Surreal Scene in Photoshop     

Step 2

We will work on the model in this step. Load the model stock image into Photoshop and cut the guy’s figure out, paste it over to our document as shown below:

2 paste 550x402 Create Unleash the Dark Power Surreal Scene in Photoshop

Use a eraser tool to remove the bottom part of the model:

2 erase 550x472 Create Unleash the Dark Power Surreal Scene in Photoshop

Add the following 3 adjustment layers as clipping masks to this model layer:

Black and White

2 bw Create Unleash the Dark Power Surreal Scene in Photoshop

Levels

2 lvs Create Unleash the Dark Power Surreal Scene in Photoshop

Curves

2 cruves Create Unleash the Dark Power Surreal Scene in Photoshop

and here is the effect so far:

2 effect Create Unleash the Dark Power Surreal Scene in Photoshop

Step 3

We will add extra effect over the model in this step. Create a new layer above all previous layer and set its layer blending mode to “overlay”. Load the crack brushes you downloaded at the beginning of the tutorial and select the following brush:

3 brush Create Unleash the Dark Power Surreal Scene in Photoshop

Set the color of the brush to white and paint on the following position: (you need to reduce the size of the brush before you paint)

2 paint 550x280 Create Unleash the Dark Power Surreal Scene in Photoshop

Keep adding similar brush paintings to the other arm:

3 more brush 550x253 Create Unleash the Dark Power Surreal Scene in Photoshop

Load the flame stock image into Photoshop and select the flame portion:

3 fire Create Unleash the Dark Power Surreal Scene in Photoshop

Add the flame to the left and right hand of the model as shown below:

3 fire paste 550x215 Create Unleash the Dark Power Surreal Scene in Photoshop

Step 4

We will add some extra fire effect to the image in this step. Go back to the fire stock image and select the fire, copy and paste it over to our document – this time don’t reduce its size, simply cover the buildings with the fire and only erase the parts to reveal the model below:

4 paste big fire Create Unleash the Dark Power Surreal Scene in Photoshop

Change the layer blending mode of this fire layer to “Overlay”, and here is the effect you will have:

4 overlay 550x394 Create Unleash the Dark Power Surreal Scene in Photoshop

Add some cloud/smoke effect around the model with the cloud filter:

4 cloud 550x356 Create Unleash the Dark Power Surreal Scene in Photoshop

Step 5

We will continue to add more fire to the image to fill the empty space on the canvas. Simply use the quick selection tool to select more pieces from the fire stock and paste them to our canvas:

5 more fire 550x232 Create Unleash the Dark Power Surreal Scene in Photoshop

You can use the liquify filter to warp the fire pattern as shown below:

5 liq 550x347 Create Unleash the Dark Power Surreal Scene in Photoshop

Step 6

We will add some final touches to our image in this final step. Flatten the image, duplicate the background layer and use the liquify filter on the buildings and warp the edges as shown below:

5 liq 2 550x411 Create Unleash the Dark Power Surreal Scene in Photoshop

Add some colours to our image with this selective color adjustment layer:

6 sel red 1 Create Unleash the Dark Power Surreal Scene in Photoshop

5 sel yel 1 Create Unleash the Dark Power Surreal Scene in Photoshop

6 sel purple 1 Create Unleash the Dark Power Surreal Scene in Photoshop

6 sel white 1 Create Unleash the Dark Power Surreal Scene in Photoshop

5 sel neu 1 Create Unleash the Dark Power Surreal Scene in Photoshop

5 sel black 1 Create Unleash the Dark Power Surreal Scene in Photoshop

Layer mask on this selective color adjustmemt layer:

6 mask 550x274 Create Unleash the Dark Power Surreal Scene in Photoshop

and you will have the following effect:

6 effect 1 550x258 Create Unleash the Dark Power Surreal Scene in Photoshop

I further added some colors around the model and here is my final effect: (click to enlarge)

city scene flatten 550x276 Create Unleash the Dark Power Surreal Scene in Photoshop

That’s it for this tutorial! Hope you enjoy going through it and find it useful. Drop me a comment below if you have any question.

Till next time, have a great day!

The post Create “Unleash the Dark Power” Surreal Scene in Photoshop appeared first on PSD Vault.

Create Colourful Fiery Portrait in Photoshop

$
0
0

In this tutorial, I will show you the steps I took to create this awesome fiery portrait in Photoshop.This is a beginner-intermediate level tutorial aiming to give some practices on layer blending, selection and coloring techniques in Photoshop. Some steps can be a little tricky, but why not have a try!

Note: The Photoshop tutorial is done in CS6 – therefore some screenshot may have slighting different layout as in the earlier version. Some brushes are exclusive to Photoshop CS6.

Here is a preview of the final effect I have for this tutorial: (click to enlarge)

portrait 2 flatten 532x700 Create Colourful Fiery Portrait in Photoshop

PSD File Download

You can download the PSD File for this tutorial via the VIP Members Area for only $6.95/Month (or less)! You will not only get this PSD File, but also 100+ other PSD Files + Extra Goodies + Exclusive Photoshop tutorials there. Signup now and get exclusive :) Find out more about the VIP Members Areas

vip sign up 250 Create Colourful Fiery Portrait in Photoshop

OK Let’s get started!

To complete this tutorial, you will need the following stocks:

Model by MariaAmanda

Fire Texture

Background Texture

Step 1

Create a new document sized 800px * 1132px with black background. Load the following blue background texture from the texture pack, copy and paste it over to our document. Resize the texture to fit the size of our canvas:

1 bg paste 504x700 Create Colourful Fiery Portrait in Photoshop

Add the following image adjustment layers to this background texture layer:

Black and White

1 bw1 Create Colourful Fiery Portrait in Photoshop

Curves

1 curves1 Create Colourful Fiery Portrait in Photoshop

and here is the effect you will have:

1 effect1 Create Colourful Fiery Portrait in Photoshop

Step 2

We will work on the model in this step. Load the model image into Photoshop and select the upper body area, paste it over to our document:

2 model sel 550x628 Create Colourful Fiery Portrait in Photoshop

Reduce the size of this model layer a bit and move it to the left bottom corner of the canvas:

2 model move 550x411 Create Colourful Fiery Portrait in Photoshop

Apply the following Surface Blur filter to this model layer to smooth the skin out:

2 sur blur Create Colourful Fiery Portrait in Photoshop

Optional step: if you have Photoshop cs6 or above, apply the Oil Painting filter with the following settings to get a even smoother result for the model layer:

2 oil paint Create Colourful Fiery Portrait in Photoshop

Apply the following Accented Edges filter settings as shown below:

2 accen edge 550x345 Create Colourful Fiery Portrait in Photoshop

Use the dodge and burn tool to burn the following area slightly:

2 burn 550x465 Create Colourful Fiery Portrait in Photoshop

Then, add the following image adjustment layers as clipping masks to this model layer:

Black and White

2 bw1 Create Colourful Fiery Portrait in Photoshop

Levels

2 lvs1 Create Colourful Fiery Portrait in Photoshop

Curves

2 curves Create Colourful Fiery Portrait in Photoshop

Attached the following layer mask to this model layer:

2 mask 492x700 Create Colourful Fiery Portrait in Photoshop

and you will have the following effect so far:

2 effect1 550x535 Create Colourful Fiery Portrait in Photoshop

Step 3

We will add the fire stock into our mix in this step. Load the fire image into Photoshop and use the quick selection tool select a few pieces:

3 sel 550x485 Create Colourful Fiery Portrait in Photoshop

Copy and paste the selection to our document and reduce its size, move it to the hair/facial area of the model and change the blending mode to either “screen” or “soft light”:

3 paste Create Colourful Fiery Portrait in Photoshop

Repeat the above step and add some more fire over the face, make sure you play with the blending mode for each new fire layer and see what result those blending modes give you:

3 paste 2 550x506 Create Colourful Fiery Portrait in Photoshop

This is my result so far:

3 effect 550x503 Create Colourful Fiery Portrait in Photoshop

Step 4

We will be adding a few extra effects for our image in this step. We can create a new layer and paint some cloud effect around the following area, with a cloud/smoke brush, or with the cloud filter:

4 cloud1 550x562 Create Colourful Fiery Portrait in Photoshop

We will go back to the fire stock image and select the entire fire:

4 sel fire 550x653 Create Colourful Fiery Portrait in Photoshop

Copy and paste the selection over to our document and place it above the model layer. Use the free transform tool to flip it horizontally, set its blending mode to “color burn”:

4 col burn 550x394 Create Colourful Fiery Portrait in Photoshop

and here is the effect you will have:

4 effect 550x358 Create Colourful Fiery Portrait in Photoshop

Step 5

We’re almost done! For final touches, we can flatten the image and duplicate the background layer, apply the following Accented Edges filter settings to the duplicate layer:

5 acc edge 550x451 Create Colourful Fiery Portrait in Photoshop

Add the following layer mask to this duplicate layer:

5 mask 550x610 Create Colourful Fiery Portrait in Photoshop

Change the layer blending mode to “overlay” for this duplicated layer:

5 overlay 550x394 Create Colourful Fiery Portrait in Photoshop

and here is the effect you will have:

5 effect 550x677 Create Colourful Fiery Portrait in Photoshop

I further add some colors for the photo with the selective color adjustment layer (I will leave the settings to you, feel free to apply whatever colour scheme you like!), and here is my final effect: (click to enlarge)

portrait 2 flatten 532x700 Create Colourful Fiery Portrait in Photoshop

You can check out this video tutorial below if you wish to learn more about colouring techniques using adjustment layers:

That’s it for this tutorial! Hope you enjoy going through it and find it useful. Drop me a comment below if you have any question.

Till next time, have a great day!

The post Create Colourful Fiery Portrait in Photoshop appeared first on PSD Vault.

VIP Exclusive Photoshop Tutorial – The Creation of “Ascension” Digital Art

$
0
0

Welcome to another Exclusive Photoshop tutorial for the PSD Vault VIP Members! In this tutorial, we will walk you through the creation process of this “Ascension” digital art using both Photoshop and Cinema 4D.

This tutorial is written by Kgaogelo Mphela exclusively for PSD Vault.

Final Image Preview

This is the image you will be creating: (click to enlarge)

Ascension 456x700 VIP Exclusive Photoshop Tutorial   The Creation of Ascension Digital Art

What You Will Learn

This Photoshop tutorial will cover:

  1. Advanced shape creation in Cinema 4D
  2. Advanced lighting techniques
  3. Retouch techniques

VIP Exclusive Tutorial

If you’re a VIP member, you can log in to the VIP Members Area and click on Exclusive Tutorial button to download the tutorial. If you’re yet to become a VIP member, you can simply click on the banner below to signup:

vip sign up 250 VIP Exclusive Photoshop Tutorial   The Creation of Ascension Digital Art

About the Author

Kgaogelo Mphela is a graphic artist from Pretoria, South Africa with the passion for graphics since a young age, mostly working on Photoshop.

Tutorial Spotlights

Here are some sample screenshots in this tutorial:

ascension 1 VIP Exclusive Photoshop Tutorial   The Creation of Ascension Digital Art

ascension 2 VIP Exclusive Photoshop Tutorial   The Creation of Ascension Digital Art

ascension 3 VIP Exclusive Photoshop Tutorial   The Creation of Ascension Digital Art

Interested? Log in to your VIP members area to download it now!

Not a member yet? Click on the banner below to sign up now:

vip sign up 250 VIP Exclusive Photoshop Tutorial   The Creation of Ascension Digital Art

Hope you enjoy it and find it useful! Thank you for your support and have a nice day!

The post VIP Exclusive Photoshop Tutorial – The Creation of “Ascension” Digital Art appeared first on PSD Vault.

The Creation of “Thinker” Photo Manipulation in Photoshop

$
0
0

In this tutorial, I will show you the processes of creating this “Thinker” photo manipulation in Photoshop. We will use a model image and combine with abstract lines and a few flying stones to form this artwork. We will also be using several adjustment layers to perform the final touches.

Note: The Photoshop tutorial is done in CS6 – therefore some screenshot may have slighting different layout as in the earlier version. Some brushes are exclusive to Photoshop CS6.

Here is a preview of the final effect I have for this tutorial: (click to enlarge)

dynamic photo manip flatten 494x700 The Creation of Thinker Photo Manipulation in Photoshop

PSD File Download

You can download the PSD File for this tutorial via the VIP Members Area for only $6.95/Month (or less)! You will not only get this PSD File, but also 100+ other PSD Files + Extra Goodies + Exclusive Photoshop tutorials there. Signup now and get exclusive :) Find out more about the VIP Members Areas

vip sign up 250 The Creation of Thinker Photo Manipulation in Photoshop

OK Let’s get started!

To complete this tutorial, you will need the following stocks:

Background texture

Model by DaeStock

Stone

Step 1

Create a new document sized 800px * 1132px with black background. Choose a texture image you like from the texture pack you just downloaded, copy and paste the texture over to our document:

1 paste1 518x700 The Creation of Thinker Photo Manipulation in Photoshop

Use a big soft eraser to remove the following portion from the background texture:

1 erase1 487x700 The Creation of Thinker Photo Manipulation in Photoshop

Add the following adjustment layer on top of the texture layer:

Black and White

1 bw1 The Creation of Thinker Photo Manipulation in Photoshop

Levels

1 lvs1 The Creation of Thinker Photo Manipulation in Photoshop

and you will have the following effect so far:

1 effect1 550x633 The Creation of Thinker Photo Manipulation in Photoshop

Step 2

We will add the model onto our canvas in this step. Load the model stock image into Photoshop and cut out the model, paste it over to our document. Re-size and position it to the centre of the canvas as shown below:

2 paste1 542x700 The Creation of Thinker Photo Manipulation in Photoshop

We will also remove the following parts from the leg to create a “detached” effect:

2 remove 550x338 The Creation of Thinker Photo Manipulation in Photoshop

Add the following 2 adjustment layers as clipping mask to this model layer:

Black and White

2 bw 2 The Creation of Thinker Photo Manipulation in Photoshop

Levels

2 lvs1 The Creation of Thinker Photo Manipulation in Photoshop

and you will have the following effect so far:

2 effect1 550x578 The Creation of Thinker Photo Manipulation in Photoshop

Step 3

We will add some abstract lines into the mix. Use a solid brush to paint a line on the canvas, then use the liquify filter to warp the line as shown below:

3 liqf The Creation of Thinker Photo Manipulation in Photoshop

The settings for the liquify filter brush:

3 liq settings The Creation of Thinker Photo Manipulation in Photoshop

Repeat this process and add a few lines around the model:

2 more lines The Creation of Thinker Photo Manipulation in Photoshop

Continue to add the lines around the canvas as shown below:

3 line groups The Creation of Thinker Photo Manipulation in Photoshop

Step 4

We will add some flying stones around the canvas in this step. Load the stone texture into Photoshop and select a piece of stone from it:

4 sel 550x411 The Creation of Thinker Photo Manipulation in Photoshop

Copy and paste the selection over to our document. Reduce its size and use a cyan brush to paint over the cracks to create some special fantasy effect:

4 paint 550x370 The Creation of Thinker Photo Manipulation in Photoshop

Set this blue paint layer’s blending mode to “Overlay”:

4 overlay 550x461 The Creation of Thinker Photo Manipulation in Photoshop

and here is the effect for the stone:

4 effect1 The Creation of Thinker Photo Manipulation in Photoshop

Repeat the step above and add a few more stones around the canvas:

4 more stones 550x660 The Creation of Thinker Photo Manipulation in Photoshop

Use the Smudge tool to add some blurry motions for the stone, in order to create some flying effect:

4 blur 550x437 The Creation of Thinker Photo Manipulation in Photoshop

Step 5

We will add some extra effect to spice up the image a bit. Use a black soft brush to paint some lines under the body as shown below:

5 dark lines 550x430 The Creation of Thinker Photo Manipulation in Photoshop

Use a particle brush to paint some dots around body:

5 particles 550x365 The Creation of Thinker Photo Manipulation in Photoshop

Apply the following Radial Blur settings to this particle layer:

5 rad blur The Creation of Thinker Photo Manipulation in Photoshop

And you will have the following effect:

5 after rad blur 550x364 The Creation of Thinker Photo Manipulation in Photoshop

Step 6

Ok we’re almost done! For final touches, I flattened the layer and duplicate the background layer, apply some blur to the foot area to add some motions as shown below:

6 blur The Creation of Thinker Photo Manipulation in Photoshop

Add some colours for the image with the following adjustment layers:

Selective Color

6 col reds The Creation of Thinker Photo Manipulation in Photoshop

6 col whites The Creation of Thinker Photo Manipulation in Photoshop

6 col neu The Creation of Thinker Photo Manipulation in Photoshop

6 col black The Creation of Thinker Photo Manipulation in Photoshop

Curves

6 curves rgb The Creation of Thinker Photo Manipulation in Photoshop

6 cur red The Creation of Thinker Photo Manipulation in Photoshop

6 cur green The Creation of Thinker Photo Manipulation in Photoshop

6 cur blue The Creation of Thinker Photo Manipulation in Photoshop

and here is my final effect: (click to enlarge)

dynamic photo manip flatten 494x700 The Creation of Thinker Photo Manipulation in Photoshop

That’s it for this tutorial! Hope you enjoy going through it and find it useful. Drop me a comment below if you have any question.

Till next time, have a great day!

The post The Creation of “Thinker” Photo Manipulation in Photoshop appeared first on PSD Vault.


Create Deep Space Text Effect in Photoshop

$
0
0

In this tutorial, I will show you the processes of creating this Deep Space Text Effect in Photoshop. We will use a handwriting font, combine it with nebula and fire textures to form the final effect. We will also be using some selection and image adjustment techniques along the way.

This is an intermediate level tutorial and some steps can be tricky, but why not have a try!

Note: The Photoshop tutorial is done in CS6 – therefore some screenshot may have slighting different layout as in the earlier version. Some brushes are exclusive to Photoshop CS6.

Here is a preview of the final effect I have for this tutorial: (click to enlarge)

space fire text flatten 550x298 Create Deep Space Text Effect in Photoshop

PSD File Download

You can download the PSD File for this tutorial via the VIP Members Area for only $6.95/Month (or less)! You will not only get this PSD File, but also 100+ other PSD Files + Extra Goodies + Exclusive Photoshop tutorials there. Signup now and get exclusive :) Find out more about the VIP Members Areas

vip sign up 250 Create Deep Space Text Effect in Photoshop

OK Let’s get started!

To complete this tutorial, you will need the following stocks:

Ground image

Font

Space image 1 by Mithgariel

Space image 2 by ex-astris1701

Fire

Step 1

Create a new document sized 1400px * 759px with black background. Load the ground image into Photoshop and copy the entire image to our document, resize and perspective it as shown below:

1 pers 550x368 Create Deep Space Text Effect in Photoshop

Use a soft eraser to remove the top edge as shown below:

1 erase2 550x314 Create Deep Space Text Effect in Photoshop

Add the following adjustment layers to this ground texture:

Black and White

1 bw2 Create Deep Space Text Effect in Photoshop

Levels

1 lvs2 Create Deep Space Text Effect in Photoshop

and here is the effect so far:

1 effect2 550x319 Create Deep Space Text Effect in Photoshop

Step 2

Type some letters onto the canvas with the font we downloaded:

2 type 550x319 Create Deep Space Text Effect in Photoshop

Load the text layer’s selection, move the selection over to the “space image 1″ stock, as shown below:

2 move 550x227 Create Deep Space Text Effect in Photoshop

Copy and paste the selection over to our document and cover the original text:

2 paste2 550x199 Create Deep Space Text Effect in Photoshop

Apply the following layer blending mode to this new space texture layer:

Stroke

2 stroke 550x408 Create Deep Space Text Effect in Photoshop

Inner Glow

2 inner glow 550x324 Create Deep Space Text Effect in Photoshop

Here is the effect so far:

2 effect2 550x243 Create Deep Space Text Effect in Photoshop

Step 3

Load the fire texture into Photoshop and select the following portion with a 40px feather setting Lasso Tool:

3 sel Create Deep Space Text Effect in Photoshop

Copy and paste to the selection to our canvas, reduce its size as shown below:

3 paste1 Create Deep Space Text Effect in Photoshop

Warp this texture with the free transform tool:

3 warp Create Deep Space Text Effect in Photoshop

Apply the following Hue/Saturation adjustment to change its colour:

3 hue 550x347 Create Deep Space Text Effect in Photoshop

Attach the texture to the letter:

3 attach 550x327 Create Deep Space Text Effect in Photoshop

Continue to add the texture to cover the entire letter, make sure your rotate, warp the texture to fit the shape of the letter:

3 more 550x414 Create Deep Space Text Effect in Photoshop

Keep going until all letters are covered with the fire texture:

3 effect 550x181 Create Deep Space Text Effect in Photoshop

Step 4

We will add some special lighting effect into the image. Create a new layer and paint a small dot:

4 paint1 550x246 Create Deep Space Text Effect in Photoshop

On the same layer, use a smaller white brush to paint another dot in the centre:

4 paint 2 550x309 Create Deep Space Text Effect in Photoshop

And use the warp tool to warp it as shown below:

4 warp Create Deep Space Text Effect in Photoshop

Attach a few of these lighting stripes to the letters as shown below:

4 highlights 550x185 Create Deep Space Text Effect in Photoshop   

Step 5

We will add some extra nebula and cloud effect into our image. Select the following portion with a 30px feather Lasso Tool from “space image 2″:

5 nebula 550x271 Create Deep Space Text Effect in Photoshop

Copy and paste the selection to our document and apply the following Hue/Saturation settings:

5 hue 550x396 Create Deep Space Text Effect in Photoshop

Add 3 of these to our document as shown below. Make sure you place the layers below the text layer:

5 neb more 550x203 Create Deep Space Text Effect in Photoshop

Add one more nebula texture from “space image 1″:

5 cosmo 550x384 Create Deep Space Text Effect in Photoshop

Copy and paste the selection to our document and apply the following Hue/Saturation settings:

5 hue 2 550x393 Create Deep Space Text Effect in Photoshop

Add 2 of these to our document as shown below. Make sure you place the layers above the text layer and set the layer blending mode to “screen”:

5 add cosmo 550x234 Create Deep Space Text Effect in Photoshop   

Add some cloud effect on the ground with a cloud brush or the cloud filter:

5 cloud 550x230 Create Deep Space Text Effect in Photoshop

Step 6

For final touches, I flattened the layers and apply this unsharp mask filter settings to the background layer in order to sharpen the image a bit:

6 unsharp Create Deep Space Text Effect in Photoshop

Apply the following selective color adjustment layer on top to fine tune the colour:

6 sel reds Create Deep Space Text Effect in Photoshop

6 sel whites Create Deep Space Text Effect in Photoshop

6 sel neu Create Deep Space Text Effect in Photoshop

6 sel blacks Create Deep Space Text Effect in Photoshop

and here is my final effect: (click to enlarge)

space fire text flatten 550x298 Create Deep Space Text Effect in Photoshop

That’s it for this tutorial! Hope you enjoy going through it and find it useful. Drop me a comment below if you have any question.

Till next time, have a great day!

The post Create Deep Space Text Effect in Photoshop appeared first on PSD Vault.

Create “Dark Power Unleashed” Surreal Digital Art in Photoshop

$
0
0

In this tutorial, I will show you the processes of creating this “Dark Power Unleashed” Surreal Digital Art in Photoshop. We will start from a simple city image, and combine it with cloud, model and several other objects to form this surreal effect. Have a try!

This is an intermediate level tutorial and some steps can be tricky.

Note: The Photoshop tutorial is done in CS6 – therefore some screenshot may have slighting different layout as in the earlier version. Some brushes are exclusive to Photoshop CS6.

Here is a preview of the final effect I have for this tutorial: (click to enlarge)

dark power unleashed art flatten 550x243 Create Dark Power Unleashed Surreal Digital Art in Photoshop

PSD File Download

You can download the PSD File for this tutorial via the VIP Members Area for only $6.95/Month (or less)! You will not only get this PSD File, but also 100+ other PSD Files + Extra Goodies + Exclusive Photoshop tutorials there. Signup now and get exclusive :) Find out more about the VIP Members Areas

vip sign up 250 Create Dark Power Unleashed Surreal Digital Art in Photoshop

OK Let’s get started!

To complete this tutorial, you will need the following stocks:

City

Cloud

Model

Rock

Debris Brush

Lightning

Crow

Step 1

Create a new document sized 1400px * 620px with black background. Load the city image into Photoshop and use the Rectangular Marquee tool to select the following city part of the image:

1 sele 550x361 Create Dark Power Unleashed Surreal Digital Art in Photoshop

Copy and paste the selection over to our document, re-size and position it as shown below:

1 resize 550x286 Create Dark Power Unleashed Surreal Digital Art in Photoshop

Use a soft eraser to fade the top of this city layer as shown below:

1 fade 550x241 Create Dark Power Unleashed Surreal Digital Art in Photoshop

Load the cloud image into Photoshop and select the top area containing the cloud, copy and paste it over to our document, re-size and position it as shown below:

1 cloud 550x275 Create Dark Power Unleashed Surreal Digital Art in Photoshop

We want to get rid of the street lamp. Use the Clone Stamp Tool with the following settings:

1 clone stamp Create Dark Power Unleashed Surreal Digital Art in Photoshop

1 clone stamp settings 550x24 Create Dark Power Unleashed Surreal Digital Art in Photoshop

Hold down your Alt key and define a cloudy area:

1 define 550x149 Create Dark Power Unleashed Surreal Digital Art in Photoshop

Then use the brush to paint over the street lamp to remove it from our image:

1 remove street lamp 550x161 Create Dark Power Unleashed Surreal Digital Art in Photoshop

Use a soft eraser to fade the cloud edges as shown below:

1 erase cloud 550x215 Create Dark Power Unleashed Surreal Digital Art in Photoshop

Add the following adjustment layers on top of all previous layers:

Black and White

1 bw Create Dark Power Unleashed Surreal Digital Art in Photoshop

Layer mask on this black and white layer:

1 bw mask 550x244 Create Dark Power Unleashed Surreal Digital Art in Photoshop

Levels

1 lvs Create Dark Power Unleashed Surreal Digital Art in Photoshop

Curves

1 curves Create Dark Power Unleashed Surreal Digital Art in Photoshop

And here is the effect so far:

1 effect 550x230 Create Dark Power Unleashed Surreal Digital Art in Photoshop

Step 2

Load the model image into Photoshop and select the model body:

2 sel Create Dark Power Unleashed Surreal Digital Art in Photoshop

Copy and paste the selection to our document, re-size and position it int the centre:

2 paste 550x427 Create Dark Power Unleashed Surreal Digital Art in Photoshop

Use a soft eraser to remove the bottom area of the model as shown below:

2 erase 550x321 Create Dark Power Unleashed Surreal Digital Art in Photoshop

Add the following adjustment layers as clipping masks to this model layer:

Black and white

2 bw Create Dark Power Unleashed Surreal Digital Art in Photoshop

Levels

2 lvs Create Dark Power Unleashed Surreal Digital Art in Photoshop

Layer mask on the levels adjustment layer:

2 lvs mask 550x394 Create Dark Power Unleashed Surreal Digital Art in Photoshop

We will add some hair for the image. To do this, use the Pen Tool draw a path as shown below:

2 pen path 550x390 Create Dark Power Unleashed Surreal Digital Art in Photoshop

Use a 3px black brush:

2 brush hair 550x35 Create Dark Power Unleashed Surreal Digital Art in Photoshop

and stroke this path as shown below:

2 stroke set 550x508 Create Dark Power Unleashed Surreal Digital Art in Photoshop

2 stroke Create Dark Power Unleashed Surreal Digital Art in Photoshop

and you will have the following effect:

2 stroke effect Create Dark Power Unleashed Surreal Digital Art in Photoshop

We will repeat this above process to add more hair, make sure you adjust the colour and size of the hair for best effect:

2 keep stroking 550x383 Create Dark Power Unleashed Surreal Digital Art in Photoshop

and here is the overall effect so far:

2 effect 550x227 Create Dark Power Unleashed Surreal Digital Art in Photoshop

Step 3

We will add some particles around canvas. Load the rock image into Photoshop and create a new layer on top of its background layer:

3 new layer Create Dark Power Unleashed Surreal Digital Art in Photoshop

Use the debris brush you download:

3 debris brush Create Dark Power Unleashed Surreal Digital Art in Photoshop

And paint some debris on the new layer:

3 paint 550x298 Create Dark Power Unleashed Surreal Digital Art in Photoshop

Ctrl+Left-click on the layer thumbnail to select this layer:

3 sel layer 550x277 Create Dark Power Unleashed Surreal Digital Art in Photoshop

Go back to the background layer while maintaining the selection:

3 sel background Create Dark Power Unleashed Surreal Digital Art in Photoshop

Copy and paste the selection over to our document, re-size and scatter the debris around model:

3 paste 550x366 Create Dark Power Unleashed Surreal Digital Art in Photoshop

Also add some more debris on the left and right side of the image:

3 paste 2 Create Dark Power Unleashed Surreal Digital Art in Photoshop

3 paste 3 347x700 Create Dark Power Unleashed Surreal Digital Art in Photoshop

We can also add some subtle cloud effect down the bottom of the canvas with a cloud brush or the cloud filter:

3 cloud 550x236 Create Dark Power Unleashed Surreal Digital Art in Photoshop

Step 4

We will add the lightning effect to our image in this step. Load the lightning image into Photoshop and select the following portion with a 30px feather Lasso Tool:

4 sel 550x420 Create Dark Power Unleashed Surreal Digital Art in Photoshop

Copy and paste the selection to our document and re-size and rotate it as shown below:

4 paste 550x426 Create Dark Power Unleashed Surreal Digital Art in Photoshop

Apply the following black and white filter to it:

4 bw Create Dark Power Unleashed Surreal Digital Art in Photoshop

Then apply the levels adjustment to it:

4 lvs 550x494 Create Dark Power Unleashed Surreal Digital Art in Photoshop

Set the layer blending mode to this layer to “Screen”:

4 screen 550x422 Create Dark Power Unleashed Surreal Digital Art in Photoshop

And here is the effect you will have:

4 effect 550x361 Create Dark Power Unleashed Surreal Digital Art in Photoshop

Repeat the above step and add more lightning effect to the image:

4 effect 2 550x393 Create Dark Power Unleashed Surreal Digital Art in Photoshop

Step 5

We will add this crow image into the mix in this step. Load the image into Photoshop and select it:

5 sel 550x301 Create Dark Power Unleashed Surreal Digital Art in Photoshop

Copy and paste it over to our document and set its layer blending mode to “Multiply”:

5 mul 550x430 Create Dark Power Unleashed Surreal Digital Art in Photoshop

Re-size and position this layer to the location shown below:

5 paste 550x318 Create Dark Power Unleashed Surreal Digital Art in Photoshop

Add a few more crows to the image as shown below:

5 more crows 550x322 Create Dark Power Unleashed Surreal Digital Art in Photoshop

We can also utilise the black lines from the crow image and attach them to the model to form this effect as shown below:

5 lines 550x419 Create Dark Power Unleashed Surreal Digital Art in Photoshop

Step 6

We’re almost done! For final touches, we will flatten the image and duplicate the background layer, apply the following “Accented Edges” filter to this duplicated layer:

6 accent 550x421 Create Dark Power Unleashed Surreal Digital Art in Photoshop

Set the layer blending mode of this duplicated layer to “Pin Light”:

6 pin light 550x423 Create Dark Power Unleashed Surreal Digital Art in Photoshop

And you will see the edges is now highlighted:

6 highlights 550x213 Create Dark Power Unleashed Surreal Digital Art in Photoshop

Add the following Selective Color adjustment layer on top to add some colours to the image:

6 sel cyans Create Dark Power Unleashed Surreal Digital Art in Photoshop

6 sel whites Create Dark Power Unleashed Surreal Digital Art in Photoshop

6 sel neu Create Dark Power Unleashed Surreal Digital Art in Photoshop

6 sel blacks Create Dark Power Unleashed Surreal Digital Art in Photoshop

and here is my final effect: (click to enlarge)

dark power unleashed art flatten 550x243 Create Dark Power Unleashed Surreal Digital Art in Photoshop

That’s it for this tutorial! Hope you enjoy going through it and find it useful. Drop me a comment below if you have any question.

Till next time, have a great day!

The post Create “Dark Power Unleashed” Surreal Digital Art in Photoshop appeared first on PSD Vault.

The Creation of “Diminishing Figure” Digital Art in Photoshop

$
0
0

In this tutorial, I will show you the processes of creating this “Diminishing Figure” Digital Art in Photoshop. We will build the effect around a human portrait image with metal, fire and abstract brushes. We will also be using image adjustments to fine tune the effect.

This is an intermediate level tutorial and some steps can be tricky.

Note: The Photoshop tutorial is done in CS6 – therefore some screenshot may have slighting different layout as in the earlier version. Some brushes are exclusive to Photoshop CS6.

Here is a preview of the final effect I have for this tutorial: (click to enlarge)

diminish flatten 550x305 The Creation of Diminishing Figure Digital Art in Photoshop

PSD File Download

You can download the PSD File for this tutorial via the VIP Members Area for only $6.95/Month (or less)! You will not only get this PSD File, but also 100+ other PSD Files + Extra Goodies + Exclusive Photoshop tutorials there. Signup now and get exclusive :) Find out more about the VIP Members Areas

vip sign up 250 The Creation of Diminishing Figure Digital Art in Photoshop

OK Let’s get started!

To complete this tutorial, you will need the following stocks:

Background texture

Model by eric-karr

Fire

Glitter

Step 1

Create a new document sized 1440px * 880px with black background. Load the metal texture into Photoshop and select a portion of it with the rectangular marquee tool:

1 sel 550x397 The Creation of Diminishing Figure Digital Art in Photoshop

Copy and paste the selection over to our document, resize and position it as shown below:

1 paste 550x413 The Creation of Diminishing Figure Digital Art in Photoshop

Use a big soft eraser tool, remove the following parts from the texture as shown below:

1 erase 550x298 The Creation of Diminishing Figure Digital Art in Photoshop

Add the following image adjustment layers on top of the texture:

Black and White

1 bw1 The Creation of Diminishing Figure Digital Art in Photoshop

Levels

1 lvs1 The Creation of Diminishing Figure Digital Art in Photoshop

and here is the effect so far:

1 effect1 550x306 The Creation of Diminishing Figure Digital Art in Photoshop     

Step 2

We will add the model image into our document. Load the image into Photoshop and select the model figure:

2 sel1 550x365 The Creation of Diminishing Figure Digital Art in Photoshop

Copy and paste the selection over to our document, re-size and position it as shown below:

2 paste1 550x321 The Creation of Diminishing Figure Digital Art in Photoshop

Apply the following “Watercolor” filter settings to this model layer:

2 watercolor 550x387 The Creation of Diminishing Figure Digital Art in Photoshop

Then add a layer mask to this model layer, use a grunge brush (you can find plenty of those on the internet) to remove the right side of the face:

2 eraser 550x165 The Creation of Diminishing Figure Digital Art in Photoshop

2 erase after 550x415 The Creation of Diminishing Figure Digital Art in Photoshop

Add the following adjustment layers as clipping masks to this model layer:

Black and white

2 bw1 The Creation of Diminishing Figure Digital Art in Photoshop

Levels

2 lvs1 The Creation of Diminishing Figure Digital Art in Photoshop

Curves

2 curves The Creation of Diminishing Figure Digital Art in Photoshop

and here is the effect so far:

2 effect1 550x349 The Creation of Diminishing Figure Digital Art in Photoshop

Step 3

We add a fiery eye for this model in this step. Load the fire spark image into Photoshop, select the following portion with an elliptical marquee tool:

Hint: make sure you set the feather of the marquee tool to around 15

3 sel 550x300 The Creation of Diminishing Figure Digital Art in Photoshop

Copy and paste the selection over to our document, re-size and position it as shown below, and set this new layer blending mode to “Hard Light”:

3 hard light 550x238 The Creation of Diminishing Figure Digital Art in Photoshop

Duplicate this fiery eye layer twice, you will see fiery effect become more visible:

3 dup 550x243 The Creation of Diminishing Figure Digital Art in Photoshop

On the topmost fiery eye layer, use the Free Transform tool to warp the fire as shown below:

3 warp 550x383 The Creation of Diminishing Figure Digital Art in Photoshop

Then go back to the spark image, select the following area:

3 sel fire The Creation of Diminishing Figure Digital Art in Photoshop

Copy and paste the selection to our document, re-size, rotate and position it as shown below:

3 attach 550x347 The Creation of Diminishing Figure Digital Art in Photoshop

Step 4

We will continue working on the fire in this step. Use the Warp tool to warp this fire line as shown below:

4 warp 550x313 The Creation of Diminishing Figure Digital Art in Photoshop

Go back to the spark image, use the lasso tool to select the spark portion:

4 lasso The Creation of Diminishing Figure Digital Art in Photoshop

Copy and paste the selection to our document, set its blending mode to “Screen”:

4 screen1 550x422 The Creation of Diminishing Figure Digital Art in Photoshop

Move the sparks over to the fire layer and re-size it as shown below:

4 resize 550x337 The Creation of Diminishing Figure Digital Art in Photoshop

Repeat this process and add more fire sparks along the line, and here is my effect so far:

4 effect1 550x284 The Creation of Diminishing Figure Digital Art in Photoshop

Step 5

We will add some final touches in this step. Load the Glitter image into Photoshop and select the entire canvas:

5 sel1 550x657 The Creation of Diminishing Figure Digital Art in Photoshop

Copy and paste the selection to our document and place this new layer on top of all previous layers, set the blending mode to “Exclusion” and opacity to 40%:

5 exclu 550x416 The Creation of Diminishing Figure Digital Art in Photoshop

and here is the effect you will have:

5 paste1 550x348 The Creation of Diminishing Figure Digital Art in Photoshop

We can play with the liquify filter and add some liquid effect to the fire:

5 liq set 550x386 The Creation of Diminishing Figure Digital Art in Photoshop

5 liq 550x249 The Creation of Diminishing Figure Digital Art in Photoshop

and this is my final effect: (click to enlarge)

diminish flatten 550x305 The Creation of Diminishing Figure Digital Art in Photoshop

That’s it for this tutorial! Hope you enjoy going through it and find it useful. Drop me a comment below if you have any question.

Till next time, have a great day!

The post The Creation of “Diminishing Figure” Digital Art in Photoshop appeared first on PSD Vault.

VIP Exclusive Photoshop Tutorial – Portrait Manipulation with Great Lighting and Abstract Effect

$
0
0

Welcome to another Exclusive Photoshop tutorial for the PSD Vault VIP Members! In this tutorial, we will walk you through the creation process of this fantastic portrait manipulation work with great lighting and abstract effect. This effect will work wonders in any fashion/retail promotion campaign artworks and will surely grab people’s attention.

This tutorial is written by Kris Shields exclusively for PSD Vault.

Final Image Preview

This is the image you will be creating: (click to enlarge)

portrait manipulation superfix vip full 550x309 VIP Exclusive Photoshop Tutorial   Portrait Manipulation with Great Lighting and Abstract Effect

What You Will Learn

This Photoshop tutorial will cover:

  1. Selection techniques with Pen Tool
  2. Non-destructive editing with layer masks
  3. Advanced Light Effect Creation
  4. Adding abstract elements into image
  5. Retouch techniques

VIP Exclusive Tutorial

If you’re a VIP member, you can log in to the VIP Members Area and click on Exclusive Tutorial button to download the tutorial. If you’re yet to become a VIP member, you can simply click on the banner below to signup:

vip sign up 250 VIP Exclusive Photoshop Tutorial   Portrait Manipulation with Great Lighting and Abstract Effect

Tutorial Spotlights

Here are some sample screenshots in this tutorial:

11 550x309 VIP Exclusive Photoshop Tutorial   Portrait Manipulation with Great Lighting and Abstract Effect

3 550x309 VIP Exclusive Photoshop Tutorial   Portrait Manipulation with Great Lighting and Abstract Effect

16 550x309 VIP Exclusive Photoshop Tutorial   Portrait Manipulation with Great Lighting and Abstract Effect

Interested? Log in to your VIP members area to download it now!

Not a member yet? Click on the banner below to sign up now:

vip sign up 250 VIP Exclusive Photoshop Tutorial   Portrait Manipulation with Great Lighting and Abstract Effect

Hope you enjoy it and find it useful! Thank you for your support and have a nice day!

The post VIP Exclusive Photoshop Tutorial – Portrait Manipulation with Great Lighting and Abstract Effect appeared first on PSD Vault.

Create Unique Photo Effect with Abstract Brushes and Coloring Techniques in Photoshop

$
0
0

In this tutorial, I will show you the processes I used to create this unique photo effect with abstract brushes and coloring techniques in Photoshop. We will also go through some interesting layer blending and filter tricks, to achieve the final effect. Have a try!

This is an intermediate level tutorial and some steps can be tricky.

Note: The Photoshop tutorial is done in CS6 – therefore some screenshot may have slighting different layout as in the earlier version. Some brushes are exclusive to Photoshop CS6.

Here is a preview of the final effect I have for this tutorial: (click to enlarge)

light color photo manip 493x700 Create Unique Photo Effect with Abstract Brushes and Coloring Techniques in Photoshop

PSD File Download

You can download the PSD File for this tutorial via the VIP Members Area for only $6.95/Month (or less)! You will not only get this PSD File, but also 100+ other PSD Files + Extra Goodies + Exclusive Photoshop tutorials there. Signup now and get exclusive :) Find out more about the VIP Members Areas

vip sign up 250 Create Unique Photo Effect with Abstract Brushes and Coloring Techniques in Photoshop

OK Let’s get started!

To complete this tutorial, you will need the following stocks:

Wall Texture

Model

Ice Texture

Hair Brushes

Deharme Brushes

Step 1

Create a new document sized 800px * 1135px with white background. Load the wall texture image into Photoshop and select the following portion with the rectangular marquee tool:

1 sel1 550x390 Create Unique Photo Effect with Abstract Brushes and Coloring Techniques in Photoshop

Copy and paste the selection over to our document. Re-size the texture to fit the width and height of the canvas, reduce the layer opacity to around 70%, and use a big soft eraser to remove the following portion: (this will be add variety and depth for our background)

1 erase 491x700 Create Unique Photo Effect with Abstract Brushes and Coloring Techniques in Photoshop

Step 2

We will work on the model in this step. Load the model image into Photoshop and cut out the head/neck/shoulder portion of the model, and paste it over to our document.

Re-size this new layer and position it to the centre of the canvas, then use a grunge brush from the Deharme Brushes set we downloaded as an eraser, work on the edge of the model. You will have the following effect:

2 model erase 519x700 Create Unique Photo Effect with Abstract Brushes and Coloring Techniques in Photoshop

Add the following adjustment layers as clipping mask to this model layer:

Black and White

2 bw Create Unique Photo Effect with Abstract Brushes and Coloring Techniques in Photoshop

Apply the following layer mask on this black and white adjustment layer to reveal the eyes:

2 bw mask 550x154 Create Unique Photo Effect with Abstract Brushes and Coloring Techniques in Photoshop

and here is the effect:

2 after bw 550x165 Create Unique Photo Effect with Abstract Brushes and Coloring Techniques in Photoshop

Levels

2 lvs Create Unique Photo Effect with Abstract Brushes and Coloring Techniques in Photoshop

Curves

2 curves Create Unique Photo Effect with Abstract Brushes and Coloring Techniques in Photoshop

Add some splatter effect around edge as shown below:

2 effect1 491x700 Create Unique Photo Effect with Abstract Brushes and Coloring Techniques in Photoshop

and paint some hair with the hair brush you download over the model’s face:

2 paint hair 550x538 Create Unique Photo Effect with Abstract Brushes and Coloring Techniques in Photoshop

Step 3

We will add some abstract patterns into our image. I found this great ice texture image and thought I could do something with it. So let’s select a portion from the image:

3 sel 550x407 Create Unique Photo Effect with Abstract Brushes and Coloring Techniques in Photoshop

Copy and paste the selection over to our document, place the layer below the original model layer and distort it as shown below:

3 erase rotate 550x296 Create Unique Photo Effect with Abstract Brushes and Coloring Techniques in Photoshop

Apply the following image adjustments to this layer:

Black and White

3 bw Create Unique Photo Effect with Abstract Brushes and Coloring Techniques in Photoshop

Levels

3 lvs Create Unique Photo Effect with Abstract Brushes and Coloring Techniques in Photoshop

and here is the effect:

3 after bw rotate 550x403 Create Unique Photo Effect with Abstract Brushes and Coloring Techniques in Photoshop

We can duplicate this layer once the reduce its size to a smaller scale, and move it to a lower position to add some variety to this abstract pattern:

3 smaller 550x468 Create Unique Photo Effect with Abstract Brushes and Coloring Techniques in Photoshop

We can use the set method to add another one of the left side, as shown below:

3 effect1 550x446 Create Unique Photo Effect with Abstract Brushes and Coloring Techniques in Photoshop

Step 4

We will apply some brush painting effect in this step. Use this brush from the Deharme Brushes we downloaded:

4 glace 550x301 Create Unique Photo Effect with Abstract Brushes and Coloring Techniques in Photoshop

Paint some abstract pattern around as shown below:

4 paint1 550x330 Create Unique Photo Effect with Abstract Brushes and Coloring Techniques in Photoshop

Add some particle effect to the top and bottom of the model as shown below, make sure you use a soft eraser to fade the edges to create some depth for the image:

4 paint 2 534x700 Create Unique Photo Effect with Abstract Brushes and Coloring Techniques in Photoshop

and here is the effect so far:

4 effect1 550x650 Create Unique Photo Effect with Abstract Brushes and Coloring Techniques in Photoshop


5 erase model 550x374 Create Unique Photo Effect with Abstract Brushes and Coloring Techniques in Photoshop

Step 5

We’re almost done! For final touches, we can flatten the image and duplicate the background layer, apply the following Oil Paint (CS6 only) filter on the duplicated layer:

5 oil paint Create Unique Photo Effect with Abstract Brushes and Coloring Techniques in Photoshop

Apply the following layer mask on this duplicate layers to reveal the original layer below:

5 mask 550x671 Create Unique Photo Effect with Abstract Brushes and Coloring Techniques in Photoshop

Create a new layer mask on top and use a light blue soft brush to paint some blue colour over the face area as shown below, make sure you set the layer opacity to around 30% for this new layer:

5 after oil paint 545x700 Create Unique Photo Effect with Abstract Brushes and Coloring Techniques in Photoshop

Let’s add some more colors for the image with the following image adjustment layers:

Selective Color

5 sel white Create Unique Photo Effect with Abstract Brushes and Coloring Techniques in Photoshop

5 sel neu Create Unique Photo Effect with Abstract Brushes and Coloring Techniques in Photoshop

Vibrance

5 vib Create Unique Photo Effect with Abstract Brushes and Coloring Techniques in Photoshop

and here is the effect so far:

5 effect1 550x547 Create Unique Photo Effect with Abstract Brushes and Coloring Techniques in Photoshop

We can further utilise the ice texture to create an overlay for our image. Go back to the ice texture image and select a piece, copy and paste the selection over to our document as shown below, make sure you place it in an angel like this:

5 paste 513x700 Create Unique Photo Effect with Abstract Brushes and Coloring Techniques in Photoshop

Change the blending mode of this new ice layer to “Hard Light” and reduce its opacity to 60%:

5 hard light 504x700 Create Unique Photo Effect with Abstract Brushes and Coloring Techniques in Photoshop

and this is my final effect: (click to enlarge)

light color photo manip 493x700 Create Unique Photo Effect with Abstract Brushes and Coloring Techniques in Photoshop

That’s it for this tutorial! Hope you enjoy going through it and find it useful. Drop me a comment below if you have any question.

Till next time, have a great day!

The post Create Unique Photo Effect with Abstract Brushes and Coloring Techniques in Photoshop appeared first on PSD Vault.

Viewing all 248 articles
Browse latest View live


Latest Images