Quantcast
Channel: Photo Effect Archives - PSD Vault
Viewing all 245 articles
Browse latest View live

Create Photo Manipulation with “Alice in Wonderland” Theme in Photoshop

$
0
0

In this Photoshop tutorial, you will learn the processes of creating a “Alice in Wonderland” themed photo manipulation, by using smart filters, stock blending. The tutorial will show you how to mix stock, create lights, change weather on image, draw hair, eyes, make up and skin, and how to get depth of field on your manip.

This tutorial is written exclusively for PSD Vault by Monika Nowakowska, who is a fantastic graphic artist from Poland.

Here is a preview of the final effect for this tutorial: (click to enlarge)

photo manip alice in wonderland final 469x700 Create Photo Manipulation with Alice in Wonderland Theme in Photoshop

PSD File Download

You can download the PSD File for this tutorial via the VIP Members Area for only $6.95/Month (or less)! You will not only get this PSD File, but also 100+ other PSD Files + Extra Goodies + Exclusive Photoshop tutorials there. Signup now and get exclusive :) Find out more about the VIP Members Areas

vip sign up 250 Create Photo Manipulation with Alice in Wonderland Theme in Photoshop

OK Let’s get started!

To complete this tutorial, you will need the following stocks:

Step 1

Let’s start. Create new file (File > New… or Ctrl+N) 900×1341 px.

photo manip alice in wonderland 1 550x458 Create Photo Manipulation with Alice in Wonderland Theme in Photoshop

Step 2

Place “Into the rose garden” stock into bottom of your file.

photo manip alice in wonderland 2 550x458 Create Photo Manipulation with Alice in Wonderland Theme in Photoshop

Step 3

Choose from top menu Filter > Blur > Gaussian blur… set it to 2,2 px.

photo manip alice in wonderland 3 550x458 Create Photo Manipulation with Alice in Wonderland Theme in Photoshop

Step 4

Place “Clouds on a beautiful day 1″ stock into top of your image. Change blending mode to Multiply.

photo manip alice in wonderland 4 550x458 Create Photo Manipulation with Alice in Wonderland Theme in Photoshop

Step 5

Now add mask on this layer, by choosing from top menu Layer > Layer mask > Reveal all or by clicking shortcut.

photo manip alice in wonderland 5 550x458 Create Photo Manipulation with Alice in Wonderland Theme in Photoshop

Step 6

You should erase “Clouds on a beautiful day 1″ layer on the bottom. You can do it with soft, big brush.

photo manip alice in wonderland 6 550x641 Create Photo Manipulation with Alice in Wonderland Theme in Photoshop

Step 7

Now add adjustment layer with vibrance (Layer > New Adjustment Layer > Vibrance or use shortcut). Set it as is shown:

photo manip alice in wonderland 7 550x376 Create Photo Manipulation with Alice in Wonderland Theme in Photoshop

Step 8

Becouse of the image is too dark, use Brightness and Contrast adjustment layer. Repeat last step (Layer > New Adjustment Layer > Brightness/Contrast ), set it:

photo manip alice in wonderland 8 550x376 Create Photo Manipulation with Alice in Wonderland Theme in Photoshop

Step 9

Next, add Color/Balance layer. It gives a spring, fresh look.

photo manip alice in wonderland 9 550x376 Create Photo Manipulation with Alice in Wonderland Theme in Photoshop

Step 10

It’s time to place “Flowered garden png” stock. Set it at the bottom of the image. Don’t be afraid of empty space. You will take care of it, soon :).

photo manip alice in wonderland 10 550x376 Create Photo Manipulation with Alice in Wonderland Theme in Photoshop

Step 11

Add Brightness and Contrast adjustment layer (Layer > New Adjustment Layer > Brightness/Contrast ) and make it clipping (RMB > Create clipping mask).

photo manip alice in wonderland 11 550x376 Create Photo Manipulation with Alice in Wonderland Theme in Photoshop

Step 12

Now add vibrance (Layer > New Adjustment Layer > Vibrance) and make it clipping (RMB > Create clipping mask). Set it as is shown:

photo manip alice in wonderland 12 550x376 Create Photo Manipulation with Alice in Wonderland Theme in Photoshop

Step 13

Background is nearly finished! Choose Layer > New Adjustment Layer > Brightness/Contrast and set it:

photo manip alice in wonderland 13 550x376 Create Photo Manipulation with Alice in Wonderland Theme in Photoshop

Step 14

Now you will add light source. Add new layer (Shift + Ctrl + N, or Layer > New > Layer…). Choose Brush Tool (B), set big (I used 765px wide), soft, #f6a313 color brush and draw dot on the top of the image.

photo manip alice in wonderland 14 550x376 Create Photo Manipulation with Alice in Wonderland Theme in Photoshop

Step 15

At the same layer, draw dot, on the center of earlier dot, with smaller (245px wide), soft, #fff200 color brush. If you think, that it’s so small, try duplicate this layer (Layer > Duplicate layer…)

photo manip alice in wonderland 15 550x376 Create Photo Manipulation with Alice in Wonderland Theme in Photoshop

Step 16

Now change blending mode of this layer to Screen and set opacity to 58%.

photo manip alice in wonderland 16 550x376 Create Photo Manipulation with Alice in Wonderland Theme in Photoshop

Step 17

Time to model! Place 188 stock into the bottom of the picture.

photo manip alice in wonderland 17 550x376 Create Photo Manipulation with Alice in Wonderland Theme in Photoshop

Step 18

Add mask to this layer by choosing from top menu Layer > Layer mask > Reveal all or by shortcut. Then erase background.

photo manip alice in wonderland 18 550x376 Create Photo Manipulation with Alice in Wonderland Theme in Photoshop

Step 19

As you can see I left the fragment of strange green box. Now you should fix it. Create new layer and make it clippy by RMB > Create clipping mask. Then choose Clone Stamp Tool (S). Use big, soft rounded brush and set Aligned Sample to Current and below.

photo manip alice in wonderland 19 550x392 Create Photo Manipulation with Alice in Wonderland Theme in Photoshop

Step 20

You can fix her hand by holding alt and copying skin from arm, as is shown. Then click like with brush, where you want to place the skin.

photo manip alice in wonderland 20 550x392 Create Photo Manipulation with Alice in Wonderland Theme in Photoshop

Step 21

Add adjustment layer with color/balance (Layer > New Adjustment Layer > Brightness/Contrast). Make it clippy.

photo manip alice in wonderland 21 550x392 Create Photo Manipulation with Alice in Wonderland Theme in Photoshop

Step 22

I think, that model layer is too dark. Add adjustment layer with brightness/contrast (Layer > New Adjustment Layer > Brightness/Contrast). Make it clippy (RMB > Create clipping mask).

photo manip alice in wonderland 22 550x392 Create Photo Manipulation with Alice in Wonderland Theme in Photoshop

Step 23

Make New clipping layer. (Shitf + Ctrl + N, then RMB > Create clipping mask). Choose soft rounded brush and set color to yellow. Draw light contour on model. Follow arrows. It shows you how goes the light source.

photo manip alice in wonderland 23 550x392 Create Photo Manipulation with Alice in Wonderland Theme in Photoshop

Step 24

Then change blending mode of this layer to soft light.

photo manip alice in wonderland 24 550x392 Create Photo Manipulation with Alice in Wonderland Theme in Photoshop

Step 25

Now you will fix hair. Create new layer – also clippy – choose small soft brush and set #750702 color. Add red strokes on bangs – it shouldn’t be darker than rest of the hair.

photo manip alice in wonderland 25 550x392 Create Photo Manipulation with Alice in Wonderland Theme in Photoshop

Step 26

Add new layer – again clippy. Repeat step 23 – add yellow contour on the model.

photo manip alice in wonderland 26 550x392 Create Photo Manipulation with Alice in Wonderland Theme in Photoshop

Step 27

Change layer opacity to 37%.

photo manip alice in wonderland 27 550x392 Create Photo Manipulation with Alice in Wonderland Theme in Photoshop

Step 28

Add new cliping layer (Shitf + Ctrl + N, then RMB > Create clipping mask). Choose brush tool and set it to big, soft rounded. Pick #262207 color and change opacity of brush to 50%. Follow arrows and make shadows.

photo manip alice in wonderland 28 550x392 Create Photo Manipulation with Alice in Wonderland Theme in Photoshop

Step 29

Again add cliping layer. Choose brush tool like earlier. Pick #dcbc83 color. Draw skin tone on her hand.

photo manip alice in wonderland 29 550x392 Create Photo Manipulation with Alice in Wonderland Theme in Photoshop

Step 30

On new cliping layer draw small brush strokes. Pick yellow color. Draw over skin and hair. Remember about neutral lights, follow arrows.

photo manip alice in wonderland 30 550x392 Create Photo Manipulation with Alice in Wonderland Theme in Photoshop

Step 31

Add new layer (Shift + Ctrl +N) and choose the same brush settings. Draw hair strands.

photo manip alice in wonderland 31 550x392 Create Photo Manipulation with Alice in Wonderland Theme in Photoshop

Step 32

Place to your file 281 bunny from the top. Marquee his nose and create Layer via copy (RMB > Layer via copy)

photo manip alice in wonderland 32 550x392 Create Photo Manipulation with Alice in Wonderland Theme in Photoshop

Step 33

Transform it as is shown. You will replace her nose to nose of bunny. By changing blending mode to screen you can mach noses easier.

photo manip alice in wonderland 33 550x392 Create Photo Manipulation with Alice in Wonderland Theme in Photoshop

Step 34

Add layer mask and erase as is shown:

photo manip alice in wonderland 34 550x392 Create Photo Manipulation with Alice in Wonderland Theme in Photoshop

Step 35

Add new layer (Shift + Ctrl +N), choose Brush tool. Set soft round brush and pick #f26d7d color. Draw dot below the nose.

photo manip alice in wonderland 35 550x392 Create Photo Manipulation with Alice in Wonderland Theme in Photoshop

Change blending mode of this layer to Multiply.

photo manip alice in wonderland 36 550x392 Create Photo Manipulation with Alice in Wonderland Theme in Photoshop

Step 36

On new layer (Shift + Ctrl +N), set small soft round brush and pick #fff200 color. Draw light countour on nose.

photo manip alice in wonderland 37 550x392 Create Photo Manipulation with Alice in Wonderland Theme in Photoshop

Step 37

If you want you cn fix nose with rest of her face. Just create new layer, below nose base, then draw with the same brush (change color to #ecbd7b) a dot as shown.

photo manip alice in wonderland 38 550x392 Create Photo Manipulation with Alice in Wonderland Theme in Photoshop

Step 38

Add one more layer below nose. Choose Clone stamp tool. Fix hair on the right side as shown.

photo manip alice in wonderland 39 550x392 Create Photo Manipulation with Alice in Wonderland Theme in Photoshop

Step 39

On new layer draw eyes. Instruction on the right side will help you.

photo manip alice in wonderland 40 550x392 Create Photo Manipulation with Alice in Wonderland Theme in Photoshop

Step 40

Add make up – draw strokes on her eye lashes and make eye line longer. Add also yellow strokes on the edges of lashes – it will look more natural.

photo manip alice in wonderland 41 550x392 Create Photo Manipulation with Alice in Wonderland Theme in Photoshop

Step 41

On new layer, with small white brush you can draw over tooth.

photo manip alice in wonderland 42 550x392 Create Photo Manipulation with Alice in Wonderland Theme in Photoshop

Step 42

With small black brush strokes draw lace on ring.

photo manip alice in wonderland 43 550x392 Create Photo Manipulation with Alice in Wonderland Theme in Photoshop

Step 43

Place bunny stock and mask it as is shown. I think orginal model ears will guide you.

photo manip alice in wonderland 44 550x392 Create Photo Manipulation with Alice in Wonderland Theme in Photoshop

Step 44

Add Color/Balance adjustment layer and make it clipping by RMB > Create clipping mask

photo manip alice in wonderland 45 550x392 Create Photo Manipulation with Alice in Wonderland Theme in Photoshop

Step 45

On new layer (Shift+Ctrl+N) add strands on the ear. Use small soft round brush with #e1d2b7 color.

photo manip alice in wonderland 46 550x392 Create Photo Manipulation with Alice in Wonderland Theme in Photoshop

Step 46

Again add new layer. Use soft big brush, pick #f26d7d color. Draw dot on her cheek. Then change opacity of this layer to 66%.

photo manip alice in wonderland 47 550x392 Create Photo Manipulation with Alice in Wonderland Theme in Photoshop

Step 47

Create new layer and choose 1px soft brush. At first draw some dots. Then draw some strands.

photo manip alice in wonderland 48 550x392 Create Photo Manipulation with Alice in Wonderland Theme in Photoshop

Step 48

Back to sun layer (last step of making background). Place there ear of bunny. I used photo from the left bottom.

photo manip alice in wonderland 49 550x392 Create Photo Manipulation with Alice in Wonderland Theme in Photoshop

Step 49

Mask ear so badly ^^.

photo manip alice in wonderland 50 550x392 Create Photo Manipulation with Alice in Wonderland Theme in Photoshop

Step 50

Add Color/Balance layer and set it as shown. Make it clippy (RMB > Create clipping mask).

photo manip alice in wonderland 51 550x392 Create Photo Manipulation with Alice in Wonderland Theme in Photoshop

Step 51

Add new layer (Shift+Ctrl+N) and create clipping mask. Choose big, soft brush and pick #fdda07 color.

photo manip alice in wonderland 52 550x392 Create Photo Manipulation with Alice in Wonderland Theme in Photoshop

Change blending mode of this layer to Screen

photo manip alice in wonderland 53 550x392 Create Photo Manipulation with Alice in Wonderland Theme in Photoshop

Then on new layer draw strands on ear. Use small soft brush, pick #fff color.

photo manip alice in wonderland 54 550x392 Create Photo Manipulation with Alice in Wonderland Theme in Photoshop

Step 52

Place pocket watch as is shown. Mask it by using shortcut.

photo manip alice in wonderland 55 550x392 Create Photo Manipulation with Alice in Wonderland Theme in Photoshop

Add adjustment layer with Brightness/contrast. Make it clippy (RMB > Create clipping mask).

photo manip alice in wonderland 56 550x392 Create Photo Manipulation with Alice in Wonderland Theme in Photoshop

Add again the same adjustment layer.

photo manip alice in wonderland 57 550x392 Create Photo Manipulation with Alice in Wonderland Theme in Photoshop

Mask this layer, as shown.

photo manip alice in wonderland 58 550x392 Create Photo Manipulation with Alice in Wonderland Theme in Photoshop

Add adjustment layer with color/balance. Change opacity to 40%.

photo manip alice in wonderland 59 550x392 Create Photo Manipulation with Alice in Wonderland Theme in Photoshop

Then add Vibrance adjustment layer (last of the clipping mask on this layer). Change blending mode to Screen and opacity to 49%.

photo manip alice in wonderland 60 550x392 Create Photo Manipulation with Alice in Wonderland Theme in Photoshop

Step 53

Add new layer and with small brush yellow strokes draw lights on the watch.

photo manip alice in wonderland 61 550x392 Create Photo Manipulation with Alice in Wonderland Theme in Photoshop

Step 54

Back to the top of layers. Place lemon tree on the left bottom of the picture.

photo manip alice in wonderland 62 550x392 Create Photo Manipulation with Alice in Wonderland Theme in Photoshop

From top menu choose Filter > Blur > Gaussian blur… and set it:

photo manip alice in wonderland 63 550x392 Create Photo Manipulation with Alice in Wonderland Theme in Photoshop

Step 55

Add Color/Balance layer. Make it clippy (RMB > Create clipping mask). Then change blending option to Screen.

photo manip alice in wonderland 64 550x392 Create Photo Manipulation with Alice in Wonderland Theme in Photoshop

Mask Color/Balance layer as is shown:

photo manip alice in wonderland 65 550x392 Create Photo Manipulation with Alice in Wonderland Theme in Photoshop

Add Brightness/Contrast layer. Create clipping mask.

photo manip alice in wonderland 66 550x392 Create Photo Manipulation with Alice in Wonderland Theme in Photoshop

Step 56

Place Flare (6) into your image. Then change layer blending mode to Screen.

photo manip alice in wonderland 67 550x392 Create Photo Manipulation with Alice in Wonderland Theme in Photoshop

Add mask to flare as is shown.

photo manip alice in wonderland 68 550x392 Create Photo Manipulation with Alice in Wonderland Theme in Photoshop

Step 57 – finish!

Add adjustment layer with Brightness/Contrast.

photo manip alice in wonderland 69 550x392 Create Photo Manipulation with Alice in Wonderland Theme in Photoshop

At the end add Color/Balance layer.

photo manip alice in wonderland 70 550x377 Create Photo Manipulation with Alice in Wonderland Theme in Photoshop

Final image (click to enlarge)

photo manip alice in wonderland final 469x700 Create Photo Manipulation with Alice in Wonderland Theme in Photoshop

That’s it for this tutorial! Hope you enjoy going through it and find it useful. Drop me a comment below if you have any question.

Till next time, have a great day!

The post Create Photo Manipulation with “Alice in Wonderland” Theme in Photoshop appeared first on PSD Vault.


Create Leafy Face Photo Manipulation in Photoshop

$
0
0

In this tutorial, I will show you the steps I took to create this “Leafy Face” manipulation in Photoshop. We will go through techniques such as layer blending, layer masks, filter effects, and the use of adjustment layers. Have a try!

This is an intermediate level tutorial and some steps can be tricky.

Note: The Photoshop tutorial is done in CS6 – therefore some screenshot may have slighting different layout as in the earlier version. Some brushes are exclusive to Photoshop CS6.

Here is a preview of the final effect I have for this tutorial: (click to enlarge)

leaf face flatten 550x684 Create Leafy Face Photo Manipulation in Photoshop

PSD File Download

You can download the PSD File for this tutorial via the VIP Members Area for only $6.95/Month (or less)! You will not only get this PSD File, but also 100+ other PSD Files + Extra Goodies + Exclusive Photoshop tutorials there. Signup now and get exclusive :) Find out more about the VIP Members Areas

vip sign up 250 Create Leafy Face Photo Manipulation in Photoshop

OK Let’s get started!

To complete this tutorial, you will need the following stocks:

Background texture

Face by faestock

Leaf stock 1

Leaf stock 2

Step 1

Create a new document sized 800px * 995px with white background. Load the background texture image into Photoshop and select the following portion:

1 sel 550x407 Create Leafy Face Photo Manipulation in Photoshop

Copy and paste the selection over to document and resize it to fit our canvas:

1 paste 550x628 Create Leafy Face Photo Manipulation in Photoshop

Apply the following “Watercolor” filter to this texture layer:

1 water 550x382 Create Leafy Face Photo Manipulation in Photoshop

Use a big soft eraser to remove the following portions of the texture layer to create some depths:

1 erase 550x691 Create Leafy Face Photo Manipulation in Photoshop

Step 2

We will work on the face part of the manipulation in this step. Load the model image into Photoshop and cut out the head and neck part and paste it over to our document. Re-size and place it to the centre as shown below:

2 paste 550x666 Create Leafy Face Photo Manipulation in Photoshop

Use a rough eraser (grunge or splatter), remove the edges as shown below: (Make sure you set the eraser flow and opacity to around 30%, so you can gradually work through the edges without overdoing them, also make sure you adjust the eraser size)

2 erase 550x513 Create Leafy Face Photo Manipulation in Photoshop

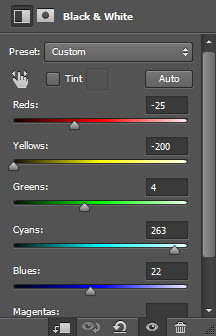
Add the following adjustment layers as clipping masks to this face layer:

2 bw Create Leafy Face Photo Manipulation in Photoshop

Layer mask on the black and white adjustment layer:

2 bw mask 550x550 Create Leafy Face Photo Manipulation in Photoshop

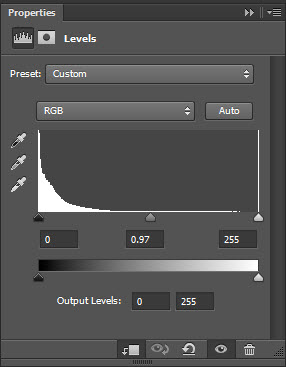
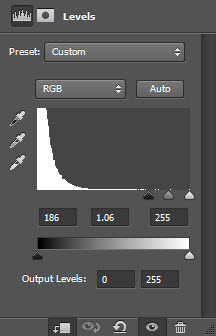
Levels

2 lvs Create Leafy Face Photo Manipulation in Photoshop

Layer mask on the levels adjustment layer:

2 lvs mask 550x542 Create Leafy Face Photo Manipulation in Photoshop

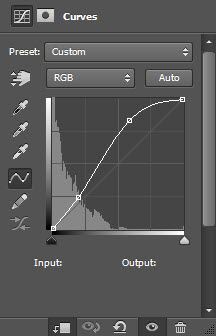
Curves

2 curves Create Leafy Face Photo Manipulation in Photoshop

and here is the effect so far:

2 effect 550x529 Create Leafy Face Photo Manipulation in Photoshop

Step 3

We will start adding the leaves in. Load the left stock 1 image into Photoshop and use the lasso tool to select the following portion:

3 sel 550x306 Create Leafy Face Photo Manipulation in Photoshop

Copy and paste the selection to our image and resize it as shown below:

3 resize 550x498 Create Leafy Face Photo Manipulation in Photoshop

Change the layer blending mode to “Screen” for this new leaf layer:

3 screen 550x394 Create Leafy Face Photo Manipulation in Photoshop

Repeat this process and add some more leaves to the areas shown below:

3 more 550x450 Create Leafy Face Photo Manipulation in Photoshop

Step 4

Load the leaf stock 2 into Photoshop and select the following piece:

4 big leaf Create Leafy Face Photo Manipulation in Photoshop

Copy and paste the selection over to our document, and apply the following Paint Daubs filter:

4 paint daubs 550x273 Create Leafy Face Photo Manipulation in Photoshop

Change the layer blending mode of this leaf layer to “Multiply”. Repeat this process and add 2 leaves on both sides of the face:

4 effect 550x550 Create Leafy Face Photo Manipulation in Photoshop

Go back to the leaf stock 2 image and select another different piece. Again we copy and paste the selection to our document and reduce its size, then apply the following black and white adjustment to this layer:

4 bw 550x357 Create Leafy Face Photo Manipulation in Photoshop

And change the blending mode to “screen” for this leaf layer:

4 screen 550x394 Create Leafy Face Photo Manipulation in Photoshop

And here is the effect you will have:

4 effec 2t 550x411 Create Leafy Face Photo Manipulation in Photoshop

Step 5

We will duplicate the new leaf layer we created in the previous step a few times. Keep their blending mode as “screen” and use the free transform tool to rotate, resize the layers, to form a line as shown below:

5 line 550x443 Create Leafy Face Photo Manipulation in Photoshop

Add a few more transparent leaf layers to the top as shown below:

5 line 2 550x383 Create Leafy Face Photo Manipulation in Photoshop

You can change the layer blending mode to “overlay” for those leaf layer and see what effect that brings you:

5 more leaves 550x627 Create Leafy Face Photo Manipulation in Photoshop

Step 6

We’re almost done! We will fine-tune the colours of the image by adding a new Vibrance adjustment layer on top:

6 vib Create Leafy Face Photo Manipulation in Photoshop

And this is the final effect I have for this image: (click to enlarge)

leaf face flatten 550x684 Create Leafy Face Photo Manipulation in Photoshop

That’s it for this tutorial! Hope you enjoy going through it and find it useful. Drop me a comment below if you have any question.

Till next time, have a great day!

The post Create Leafy Face Photo Manipulation in Photoshop appeared first on PSD Vault.

Create Distorted Lady Figure Effect in Photoshop

$
0
0

In this tutorial, I will show you the steps used to create this distorted lady figure effect in Photoshop. We will use metal and rock texture over a female body to create the main effect, and use various image adjustments, layer masks and filter to fine-tune the effect.

This is an intermediate level tutorial.

Note: The Photoshop tutorial is done in Photoshop CC – therefore some screenshot may have slighting different layout as in the earlier version. Some brushes are exclusive to Photoshop CS6.

Here is a preview of the final effect I have for this tutorial: (click to enlarge)

distorted lady manip flatten 474x700 Create Distorted Lady Figure Effect in Photoshop

PSD File Download

You can download the PSD File for this tutorial via the VIP Members Area for only $6.95/Month (or less)! You will not only get this PSD File, but also 100+ other PSD Files + Extra Goodies + Exclusive Photoshop tutorials there. Signup now and get exclusive :) Find out more about the VIP Members Areas

vip sign up 250 Create Distorted Lady Figure Effect in Photoshop

OK Let’s get started!

To complete this tutorial, you will need the following stocks:

Model by mariaamanda

Metal texture

Rock texture (image 1)

Step 1

Create a new document sized 800px * 1180px with black background. Load the rock stock image into Photoshop and select the following portion:

1 sel 550x368 Create Distorted Lady Figure Effect in Photoshop

Copy and paste the selection to our document, rotate it 90 degrees and re-size it to fit our canvas size. Use a soft eraser to fade the edges as shown below:

1 paste1 468x700 Create Distorted Lady Figure Effect in Photoshop

Use a solid eraser, dig some holes on the rock texture as shown below:

1 erase 2 464x700 Create Distorted Lady Figure Effect in Photoshop

Add the following levels adjustment layer on top:

1 lvs Create Distorted Lady Figure Effect in Photoshop

and here is the effect so far:

1 effect1 465x700 Create Distorted Lady Figure Effect in Photoshop

Step 2

We will work on the lady figure in this step. Load the model image into Photoshop and cut out the body, paste it over to our document as shown below. You will have to re-size the model layer to fit our canvas size.

2 paste1 490x700 Create Distorted Lady Figure Effect in Photoshop

Use a combination of soft and hard eraser, remove the edges of the body as shown below:

2 erase1 Create Distorted Lady Figure Effect in Photoshop

Add the following adjustment layers as clipping masks to this model layer:

Black and White

2 bw Create Distorted Lady Figure Effect in Photoshop

Layer mask (in red) on the black and white adjustment layer:

2 mask Create Distorted Lady Figure Effect in Photoshop

Levels

2 lvs Create Distorted Lady Figure Effect in Photoshop

Layer mask (in red) on the levels adjustment layer:

2 lvs mask Create Distorted Lady Figure Effect in Photoshop

and here is the effect so far:

2 effect1 Create Distorted Lady Figure Effect in Photoshop

Step 3

We will apply the metal texture over the model in this step. Load the metal stock into Photoshop and select a portion with Lasso Tool as shown below:

3 sel1 Create Distorted Lady Figure Effect in Photoshop

Copy and paste the selection to our document, set it as a clipping mask to the model layer (place it above all those adjustment layers in step 2). Apply the following Black and White adjustment to it:

3 bw Create Distorted Lady Figure Effect in Photoshop

Add the following layer mask (in red) to this metal texture layer to hide some parts:

3 mask 520x700 Create Distorted Lady Figure Effect in Photoshop

and here is the effect so far:

3 paste Create Distorted Lady Figure Effect in Photoshop

Change the layer blend mode of this metal layer to “color burn”:

3 col burn 550x418 Create Distorted Lady Figure Effect in Photoshop

and here is the effect so far:

3 effect Create Distorted Lady Figure Effect in Photoshop

Step 4

We will add some rock patterns to our image. Go back to our rock image and select the following portion on the top left:

4 se 550x206 Create Distorted Lady Figure Effect in Photoshop

Copy and paste the selection over to document and remove the edges as shown below with a soft eraser:

4 mask 550x298 Create Distorted Lady Figure Effect in Photoshop

Add the following adjustment layers to this rock texture layer:

Black and White

4 bw Create Distorted Lady Figure Effect in Photoshop

Levels

4 lvs Create Distorted Lady Figure Effect in Photoshop

Add some splatter brush effect around the rock, and here is the effect so far:

4 splatter 518x700 Create Distorted Lady Figure Effect in Photoshop

Step 5

We’re almost done! We can now flatten the image (make sure you save a layered copy just in case you want to go back to it later on), duplicate the background layer and apply the following Accented Edges filter to the duplicated layer:

5 accent edges Create Distorted Lady Figure Effect in Photoshop

and you will see this filter adds some extra black lines around the rock texture:

5 after ac 550x442 Create Distorted Lady Figure Effect in Photoshop

5 after ac 2 550x250 Create Distorted Lady Figure Effect in Photoshop

Add the layer mask onto this layer to reveal the background layer:

5 mask1 452x700 Create Distorted Lady Figure Effect in Photoshop

Step 6

I decided to add some colours to our image. To do this, let’s add the following adjustment layers on top:

Levels

6 lvs Create Distorted Lady Figure Effect in Photoshop

Layer mask on the levels adjustment layer:

6 lv mask1 467x700 Create Distorted Lady Figure Effect in Photoshop

Color Balance

6 col sha Create Distorted Lady Figure Effect in Photoshop

6 col mid Create Distorted Lady Figure Effect in Photoshop

Layer mask on the color balance adjustment layer

6 col mask 469x700 Create Distorted Lady Figure Effect in Photoshop

Curves

6 curvs Create Distorted Lady Figure Effect in Photoshop

Layer mask on the curves adjustment layer:

6 cur mask Create Distorted Lady Figure Effect in Photoshop

Vibrance

6 vib Create Distorted Lady Figure Effect in Photoshop

and here is my final effect: (click to enlarge)

distorted lady manip flatten 474x700 Create Distorted Lady Figure Effect in Photoshop

That’s it for this tutorial! Hope you enjoy going through it and find it useful. Drop me a comment below if you have any question.

Till next time, have a great day!

The post Create Distorted Lady Figure Effect in Photoshop appeared first on PSD Vault.

VIP Exclusive Photoshop Tutorial – Create Exploding 3D Planet in Cinema 4D and Photoshop

$
0
0

Welcome to another Exclusive Photoshop tutorial written specifically for the PSD Vault VIP Members! In this tutorial, author Kgaogelo Mphela will show you detailed steps to create this Exploding 3D Planet in Cinema 4D and Photoshop.

Final Image Preview

This is the image you will be creating: (click to enlarge)

break apart sphere 500x700 VIP Exclusive Photoshop Tutorial   Create Exploding 3D Planet in Cinema 4D and Photoshop

What You Will Learn

This Photoshop tutorial will cover:

  1. Create the exploding 3D planet in Cinema 4D
  2. Mix and blend elements in Photoshop
  3. Lighting and colouring techniques in Photoshop

VIP Exclusive Tutorial

If you’re a VIP member, you can log in to the VIP Members Area and click on Exclusive Tutorial button to download the tutorial. If you’re yet to become a VIP member, you can simply click on the banner below to signup: vip sign up 250 VIP Exclusive Photoshop Tutorial   Create Exploding 3D Planet in Cinema 4D and Photoshop

About the Author

Kgaogelo Mphela is a graphic artist from Pretoria, South Africa with the passion for graphics since a young age, mostly working on Photoshop.

Tutorial Spotlights

Here are some sample screenshots in this tutorial: exploding 3d 1 VIP Exclusive Photoshop Tutorial   Create Exploding 3D Planet in Cinema 4D and Photoshop exploding 3d 2 VIP Exclusive Photoshop Tutorial   Create Exploding 3D Planet in Cinema 4D and Photoshop exploding 3d 3 VIP Exclusive Photoshop Tutorial   Create Exploding 3D Planet in Cinema 4D and Photoshop exploding 3d 4 VIP Exclusive Photoshop Tutorial   Create Exploding 3D Planet in Cinema 4D and Photoshop Interested? Log in to your VIP members area to download it now! Not a member yet? Click on the banner below to sign up now: vip sign up 250 VIP Exclusive Photoshop Tutorial   Create Exploding 3D Planet in Cinema 4D and Photoshop Hope you enjoy it and find it useful! Thank you for your support and have a nice day!

The post VIP Exclusive Photoshop Tutorial – Create Exploding 3D Planet in Cinema 4D and Photoshop appeared first on PSD Vault.

Create “Fury Unleashed” Digital Art in Photoshop

$
0
0

In this tutorial, I will show you how to create this “Fury Unleashed” digital art in Photoshop. We will combine several objects such as tree roots, cracked ground and fire with a model, as well as to use some photo manipulation techniques to form the final effect.

This is a beginner to intermediate level tutorial.

Note: The Photoshop tutorial is done in Photoshop CC – therefore some screenshot may have slighting different layout as in the earlier version. Some brushes are exclusive to Photoshop CS6.

Here is a preview of the final effect I have for this tutorial: (click to enlarge)

tree root man flatten 550x300 Create Fury Unleashed Digital Art in Photoshop

PSD File Download

You can download the PSD File for this tutorial via the VIP Members Area for only $6.95/Month (or less)! You will not only get this PSD File, but also 100+ other PSD Files + Extra Goodies + Exclusive Photoshop tutorials there. Signup now and get exclusive :) Find out more about the VIP Members Areas

vip sign up 250 Create Fury Unleashed Digital Art in Photoshop

OK Let’s get started!

To complete this tutorial, you will need the following stocks:

Cracked Ground

Model

Tree Root Stock 1

Tree Root Stock 2

Tree Root Stock 3

Ring of Fire Stock

Step 1

Create a new document sized 1440px * 788px with black background. Load the cracked ground stock image into Photoshop and select a portion of the ground texture as shown below:

1 sel 550x332 Create Fury Unleashed Digital Art in Photoshop

Copy and paste the selection over to our document, re-size and apply perspective to the selection as shown below:

1 persp 550x257 Create Fury Unleashed Digital Art in Photoshop

Use a big soft eraser, remove parts of the ground as shown below:

1 erase 550x155 Create Fury Unleashed Digital Art in Photoshop

Add the following adjustment layers as clipping masks to this ground layer:

Black and White

1 bw Create Fury Unleashed Digital Art in Photoshop

Layer mask on the above black and white adjustment layer:

1 bw mask 550x281 Create Fury Unleashed Digital Art in Photoshop

Levels

1 lvs Create Fury Unleashed Digital Art in Photoshop

Curves

1 curves Create Fury Unleashed Digital Art in Photoshop

and here is the effect so far:

1 effect 550x109 Create Fury Unleashed Digital Art in Photoshop

Step 2

We will add the model in this step. Load the model image into Photoshop and cut out of body portion from the stock, copy and paste it over to our document and re-size it as shown below:

2 mod 550x290 Create Fury Unleashed Digital Art in Photoshop

Add the following adjustment layers as clipping masks to this model layer:

Black and White

2 bw Create Fury Unleashed Digital Art in Photoshop

Layer mask on the above black and white adjustment layer (in red):

2 bw mask 550x255 Create Fury Unleashed Digital Art in Photoshop

Levels

2 lvs Create Fury Unleashed Digital Art in Photoshop

Layer mask on the above levels adjustment layer (in red):

2 lv mask 550x390 Create Fury Unleashed Digital Art in Photoshop

and here is the effect so far:

2 effect 550x372 Create Fury Unleashed Digital Art in Photoshop

Step 3

We will add some tree root patterns around the legs of the model. Load the tree root stock 1 image into Photoshop and select the following portion:

3 sel 550x429 Create Fury Unleashed Digital Art in Photoshop

Copy and paste the selection over to our document, re-size and cover the left leg as shown below. Use a soft eraser to tidy up the edges of the roots:

3 erase 550x328 Create Fury Unleashed Digital Art in Photoshop

Add the following adjustment layers as clipping masks to this root layer:

Black and White

3 bw Create Fury Unleashed Digital Art in Photoshop

Levels

3 lvs Create Fury Unleashed Digital Art in Photoshop

Curves

3 curves Create Fury Unleashed Digital Art in Photoshop

and here is the effect so far:

3 effect 550x256 Create Fury Unleashed Digital Art in Photoshop

Load the tree root stock 2 image into Photoshop. Select the left portion and paste it over to our document, re-size and place it the following position:

3 root 2 550x158 Create Fury Unleashed Digital Art in Photoshop

Add the following adjustment layer as clipping masks to this tree root layer:

Black and White

3 root 2 bw Create Fury Unleashed Digital Art in Photoshop

Levels

3 root 2 lvs Create Fury Unleashed Digital Art in Photoshop

Curves

3 root 2 curves Create Fury Unleashed Digital Art in Photoshop

and here is the effect so far:

3 effect 2 550x168 Create Fury Unleashed Digital Art in Photoshop

Step 4

Load the tree root stock 3 image into Photoshop and select the following portion on the left side of the image:

4 sel Create Fury Unleashed Digital Art in Photoshop

Copy and paste the selection over to our image and place it over the lower body area as shown below:

4 paste 550x422 Create Fury Unleashed Digital Art in Photoshop

Add the following adjustment layer to this new root layer:

Black and White

4 bw Create Fury Unleashed Digital Art in Photoshop

Levels

4 lvs Create Fury Unleashed Digital Art in Photoshop

and here is the effect so far:

4 effect 550x267 Create Fury Unleashed Digital Art in Photoshop

Repeat the above process, and add another piece of root below it:

4 effect 2 550x248 Create Fury Unleashed Digital Art in Photoshop

Step 5

We can add a ring of fire from the fire stock image into our design. Load the fire stock into Photoshop and select the fire, copy and past it over the document. Place the fire layer below the model layer:

5 fire 550x407 Create Fury Unleashed Digital Art in Photoshop

We can apply the following black and white adjustment settings to this fire layer:

5 bw Create Fury Unleashed Digital Art in Photoshop

and here is the effect so far:

5 effect 550x352 Create Fury Unleashed Digital Art in Photoshop

Step 6

Add some particles and clouds with a particle and cloud brush – you should be able to find lots of those over the web:

6 particle 550x230 Create Fury Unleashed Digital Art in Photoshop

Optionally, you can add some additional fire patterns into the design, by going back to the fire stock and select a few more pieces from it:

6 fire stripe 550x243 Create Fury Unleashed Digital Art in Photoshop

Step 7

We’re almost done! For final touch-ups, we can apply the following selective color adjustment layer to add some colour/mood to this image:

7 sel red Create Fury Unleashed Digital Art in Photoshop

7 sel whites Create Fury Unleashed Digital Art in Photoshop

7 sel neu Create Fury Unleashed Digital Art in Photoshop

7 sel black Create Fury Unleashed Digital Art in Photoshop

and here is the effect so far:

7 effect 550x253 Create Fury Unleashed Digital Art in Photoshop

We can also add some fire colour into the image with the following colour balance adjustment layer:

7 col high Create Fury Unleashed Digital Art in Photoshop

7 col sha Create Fury Unleashed Digital Art in Photoshop

7 col mid Create Fury Unleashed Digital Art in Photoshop

Make sure you mask out the left, right, bottom parts of this above colour balance adjustment layer, so the red only remain in the centre and top parts of the image.

And here is my final effect: (click to enlarge)

tree root man flatten 550x300 Create Fury Unleashed Digital Art in Photoshop

That’s it for this tutorial! Hope you enjoy going through it and find it useful. Drop me a comment below if you have any question.

Till next time, have a great day!

The post Create “Fury Unleashed” Digital Art in Photoshop appeared first on PSD Vault.

Create “Queen of Ice” Photo Manipulation in Photoshop

$
0
0

In this tutorial, I will show you the process I used to create a “Queen of Ice” Photo Manipulation. We will manipulate several ice textures to achieve this effect, as well as using a number of layer blending options and image adjustment layers along the way.

This is an intermediate level tutorial so some steps can be challenging.

Note: The Photoshop tutorial is done in Photoshop CC – therefore some screenshot may have slighting different layout as in the earlier version. Some brushes are exclusive to Photoshop CS6.

Here is a preview of the final effect I have for this tutorial: (click to enlarge)

frost queen flatten 480x700 Create Queen of Ice Photo Manipulation in Photoshop

PSD File Download

You can download the PSD File for this tutorial via the VIP Members Area for only $6.95/Month (or less)! You will not only get this PSD File, but also 100+ other PSD Files + Extra Goodies + Exclusive Photoshop tutorials there. Signup now and get exclusive :) Find out more about the VIP Members Areas

vip sign up 250 Create Queen of Ice Photo Manipulation in Photoshop

OK Let’s get started!

To complete this tutorial, you will need the following stocks:

Model

Icebergs

Ice Texture Pack

Step 1

Create a new document sized 700px * 1020px. Un-zip the Ice Texture Pack and load the following pick texture into Photoshop, select a portion of it as shown below:

1 sel1 550x339 Create Queen of Ice Photo Manipulation in Photoshop

Copy and paste the selection to our document:

1 paste 476x700 Create Queen of Ice Photo Manipulation in Photoshop

Apply the following black and white adjustment to this texture:

1 bw1 Create Queen of Ice Photo Manipulation in Photoshop

and we will have the following background effect so far:

1 effect1 479x700 Create Queen of Ice Photo Manipulation in Photoshop

Step 2

Load the model image into Photoshop and select the upper body. Copy and paste the selection over to our document, re-size and position it to the centre of the canvas:

2 paste 550x548 Create Queen of Ice Photo Manipulation in Photoshop

Add the following adjustment layer as clipping mask to this model layer:

Black and White

2 bw1 Create Queen of Ice Photo Manipulation in Photoshop

Levels

2 lvs1 Create Queen of Ice Photo Manipulation in Photoshop

Curves

2 curves Create Queen of Ice Photo Manipulation in Photoshop

and here is the effect so far:

2 effect1 Create Queen of Ice Photo Manipulation in Photoshop

Step 3

We will starting adding some ice around the model. Load the iceberg image into Photoshop and select the following portion:

3 sel1 550x490 Create Queen of Ice Photo Manipulation in Photoshop

Copy and paste the selection over to our document, reduce its size and rotate it as shown below. Make sure it covers the model’s legs:

3 paste Create Queen of Ice Photo Manipulation in Photoshop

Set this ice texture layer as clipping mask to the model layer, and apply the following image adjustments to it:

Black and white

3 bw1 Create Queen of Ice Photo Manipulation in Photoshop

Levels

3 lvs1 Create Queen of Ice Photo Manipulation in Photoshop

Use a small eraser to remove the top edge of the ice texture and make it blend into the rest of the model, as shown below:

3 erase1 550x311 Create Queen of Ice Photo Manipulation in Photoshop

Step 4

We will add another ice piece down the bottom of the model. Go back to the ice image and copy another piece of the ice over our document, reduce its size and flip it vertically, add it to the bottom of the model:

4 place 550x463 Create Queen of Ice Photo Manipulation in Photoshop

Add the following adjustment layers to this ice texture layer:

Black and White

4 bw1 Create Queen of Ice Photo Manipulation in Photoshop

Levels

4 lvs1 Create Queen of Ice Photo Manipulation in Photoshop

and here is the effect you will have:

4 effect1 550x283 Create Queen of Ice Photo Manipulation in Photoshop

Step 5

We will add some smaller ice particles flying around the model. To do this, we will:

  1. Go back to the ice stock image and select small parts from it
  2. Copy and paste the selection to our document. Use the free transform tool to rotate, re-size them
  3. Use black and white adjustment to remove their colour
  4. Scatter the ice pieces around the canvas

5 flying Create Queen of Ice Photo Manipulation in Photoshop

5 flying 3 550x310 Create Queen of Ice Photo Manipulation in Photoshop

5 flying 2 550x364 Create Queen of Ice Photo Manipulation in Photoshop

Step 6

We will add more variety of ice into our design. Load the following ice texture from ice texture pack, select a small portion of it as shown below:

6 sel 550x328 Create Queen of Ice Photo Manipulation in Photoshop

Copy and paste the selection over to our document, re-size and place it to following position:

6 paste 550x314 Create Queen of Ice Photo Manipulation in Photoshop

Apply the following levels adjustment to this layer:

6 lvs Create Queen of Ice Photo Manipulation in Photoshop

and here is the effect so far:

6 effect 550x370 Create Queen of Ice Photo Manipulation in Photoshop

Step 7

Let’s go back the ice stock used in Step 6 and use the polygon selection tool to select a piece from it:

7 poly 550x190 Create Queen of Ice Photo Manipulation in Photoshop

Copy and paste the selection to our document, apply the following levels adjustment:

7 lvs Create Queen of Ice Photo Manipulation in Photoshop

Place this new ice layer as shown below: (make sure you put this layer below the model layer)

7 paste Create Queen of Ice Photo Manipulation in Photoshop

Add two more ice shapes as shown below:

7 more Create Queen of Ice Photo Manipulation in Photoshop

Optionally, use a particle brush to paint some particles around the ice shapes:

7 particles 550x449 Create Queen of Ice Photo Manipulation in Photoshop

Repeat the above process, add some ice shapes on the opposite side as well:

7 dup 550x357 Create Queen of Ice Photo Manipulation in Photoshop

and here is the overall effect so far:

7 effect1 476x700 Create Queen of Ice Photo Manipulation in Photoshop

Step 8

For final touch-ups, I added some hair on the left with some brush painting and Pen Tool. You can check out this video tutorials here on how to paint hair in Photoshop:

8 hair Create Queen of Ice Photo Manipulation in Photoshop

I also add some some lighting effect on the arms, this can be done with a soft white brush and the warp tool:

8 lighting 550x356 Create Queen of Ice Photo Manipulation in Photoshop

and here is my final effect: (click to enlarge)

frost queen flatten 480x700 Create Queen of Ice Photo Manipulation in Photoshop

That’s it for this tutorial! Hope you enjoy going through it and find it useful. Drop me a comment below if you have any question.

Till next time, have a great day!

The post Create “Queen of Ice” Photo Manipulation in Photoshop appeared first on PSD Vault.

Create Unique Lady Portrait Manipulation with Flower Patterns in Photoshop

$
0
0

In this tutorial, I will show you the steps to create this awesome photo manipulation of a lady portrait shot with flower patterns in Photoshop. Have a try!

This is an intermediate level tutorial so some steps can be challenging.

Note: The Photoshop tutorial is done in Photoshop CC – therefore some screenshot may have slighting different layout as in the earlier version. Some brushes are exclusive to Photoshop CS6.

Here is a preview of the final effect I have for this tutorial: (click to enlarge)

flower pattern manip 543x700 Create Unique Lady Portrait Manipulation with Flower Patterns in Photoshop

PSD File Download

You can download the PSD File for this tutorial via the VIP Members Area for only $6.95/Month (or less)! You will not only get this PSD File, but also 100+ other PSD Files + Extra Goodies + Exclusive Photoshop tutorials there. Signup now and get exclusive :) Find out more about the VIP Members Areas

vip sign up 250 Create Unique Lady Portrait Manipulation with Flower Patterns in Photoshop

OK Let’s get started!

To complete this tutorial, you will need the following stocks:

Model by faestock

Background texture

Flower stock image

Various Crack Brushes and Grunge Brushes (Google and you should be able to find lots of these)

Note: If you have difficulty with Step 3 – 5 of this tutorial, please check out this video tutorial below:

Step 1

Create a new document sized 800px * 1030px with black background. Load the background texture into Photoshop and select the following piece:

1 sel 550x373 Create Unique Lady Portrait Manipulation with Flower Patterns in Photoshop

Copy and paste the selection over to our document and cover the entire canvas:

1 paste 550x681 Create Unique Lady Portrait Manipulation with Flower Patterns in Photoshop

Use a combination of grunge and crack brushes as eraser, remove parts of the texture as shown below:

1 erase 547x700 Create Unique Lady Portrait Manipulation with Flower Patterns in Photoshop

Add the following adjustment layers as clipping masks to this texture:

Black and White

1 bw Create Unique Lady Portrait Manipulation with Flower Patterns in Photoshop

Layer mask for the above black and white adjustment layer:

1 bw mask 540x700 Create Unique Lady Portrait Manipulation with Flower Patterns in Photoshop

Levels

1 lvs Create Unique Lady Portrait Manipulation with Flower Patterns in Photoshop

Curves

1 curves Create Unique Lady Portrait Manipulation with Flower Patterns in Photoshop

and here is the effect so far:

1 effect 542x700 Create Unique Lady Portrait Manipulation with Flower Patterns in Photoshop

Step 2

We will work on the model in this step. Load the model image into Photoshop and select the following portion:

2 sel 550x695 Create Unique Lady Portrait Manipulation with Flower Patterns in Photoshop

Copy and paste the selection over to our document, re-size and position it as shown below:

2 paste 550x654 Create Unique Lady Portrait Manipulation with Flower Patterns in Photoshop

Apply the following layer mask on the model layer (in red), you can use a combination of grunge or splatter brush to achieve this:

2 mask 550x686 Create Unique Lady Portrait Manipulation with Flower Patterns in Photoshop

And here is my effect after the layer mask:

2 after erase 550x491 Create Unique Lady Portrait Manipulation with Flower Patterns in Photoshop

Add the following adjustment layer as clipping masks to this model layer:

Black and White

2 bw Create Unique Lady Portrait Manipulation with Flower Patterns in Photoshop

Apply layer mask on the above black and white adjustment layer to reveal the lips area:

2 bw mask Create Unique Lady Portrait Manipulation with Flower Patterns in Photoshop

Levels

2 lvs Create Unique Lady Portrait Manipulation with Flower Patterns in Photoshop

and here is my effect so far:

2 effect 550x633 Create Unique Lady Portrait Manipulation with Flower Patterns in Photoshop

Step 3

We will add some green pattern over the face area in this step. Load the flower image into Photoshop and select the following area with Lasso Tool (40px feather):

3 sel 550x344 Create Unique Lady Portrait Manipulation with Flower Patterns in Photoshop

Copy and paste the selection over to our document, resize as shown below:

3 paste 550x632 Create Unique Lady Portrait Manipulation with Flower Patterns in Photoshop

Set it as clipping mask to the face layer (put this layer above the previous adjustment layers):

3 clipping mask 550x511 Create Unique Lady Portrait Manipulation with Flower Patterns in Photoshop

Use a small, hard eraser, remove the following parts from this green layer and reveal the face below:

3 erase 550x398 Create Unique Lady Portrait Manipulation with Flower Patterns in Photoshop

Step 4

We will add the flower patterns over to our image. Again we use the Lasso Tool (40px feather) to select a portion as shown below:

4 lasso 550x295 Create Unique Lady Portrait Manipulation with Flower Patterns in Photoshop

Copy and paste the selection over to our document and place it below the model layer. Use a small, hard eraser to remove all parts except the pink flower bits:

4 erase 550x368 Create Unique Lady Portrait Manipulation with Flower Patterns in Photoshop

Apply the following levels adjustment to this flower layer:

4 lvs Create Unique Lady Portrait Manipulation with Flower Patterns in Photoshop

and here is the effect so far:

4 effect Create Unique Lady Portrait Manipulation with Flower Patterns in Photoshop

Duplicate this flower a few times and move them to the top as shown below:

4 effect 2 536x700 Create Unique Lady Portrait Manipulation with Flower Patterns in Photoshop

Step 5

We’re almost done! To add some final touch-ups for our design, we can paint some splatters around the flower as shown below:

5 particle 550x392 Create Unique Lady Portrait Manipulation with Flower Patterns in Photoshop

Add some cloud/smoke effect around the canvas:

5 cloud 550x373 Create Unique Lady Portrait Manipulation with Flower Patterns in Photoshop

Use the blur tool the blur-out some flowers on the top:

5 blur 550x299 Create Unique Lady Portrait Manipulation with Flower Patterns in Photoshop

We’re then flatten the image, duplicate the background layer and apply the following Accented Edges filter to the duplicated layer:

5 acce 550x399 Create Unique Lady Portrait Manipulation with Flower Patterns in Photoshop

Add the following layer mask to this duplicate layer:

5 mask 536x700 Create Unique Lady Portrait Manipulation with Flower Patterns in Photoshop

and this is effect I have so far:

5 effect 546x700 Create Unique Lady Portrait Manipulation with Flower Patterns in Photoshop

I further added some colours with a number of adjustment layer (selective color, curves, vibrance), I will leave this for you to experiment!

Here is the final effect: (click to enlarge)

flower pattern manip 543x700 Create Unique Lady Portrait Manipulation with Flower Patterns in Photoshop

That’s it for this tutorial! Hope you enjoy going through it and find it useful. Drop me a comment below if you have any question.

Till next time, have a great day!

The post Create Unique Lady Portrait Manipulation with Flower Patterns in Photoshop appeared first on PSD Vault.

VIP Exclusive Photoshop Tutorial – Create Burnt Lady Photo Manipulation in Photoshop

$
0
0

Welcome to another Exclusive Photoshop tutorial written specifically for the PSD Vault VIP Members! In this tutorial, author Kris Shields will explain in detail how to create this Burnt Lady Photo Manipulation in Photoshop.

Final Image Preview

This is the image you will be creating: (click to enlarge)

burn baby psdvault web res 550x366 VIP Exclusive Photoshop Tutorial   Create Burnt Lady Photo Manipulation in Photoshop

What You Will Learn

This Photoshop tutorial will cover:

  1. Mixing fire elements with a lady portrait
  2. Creating burnt effect on skin
  3. Colour adjustments

VIP Exclusive Tutorial

If you’re a VIP member, you can log in to the VIP Members Area and click on Exclusive Tutorial button to download the tutorial. If you’re yet to become a VIP member, you can simply click on the banner below to signup:

vip sign up 250 VIP Exclusive Photoshop Tutorial   Create Burnt Lady Photo Manipulation in Photoshop

About the Author

Kris Shields (Colour Drip) is a Digital Artist/ Graphic Designer from the United Kingdom who aims to work with different styles and elements, blending reality with a range of colour and shinny goodness. He is currently working on a range of projects including digital illustrations, 3D renders, typography and collaborations with other young creative minds.

Kris on Behance

Interested? Log in to your VIP members area to download it now! Not a member yet? Click on the banner below to sign up now:

vip sign up 250 VIP Exclusive Photoshop Tutorial   Create Burnt Lady Photo Manipulation in Photoshop

Hope you enjoy it and find it useful! Thank you for your support and have a nice day!

The post VIP Exclusive Photoshop Tutorial – Create Burnt Lady Photo Manipulation in Photoshop appeared first on PSD Vault.


Manipulate a Man Portrait into Dark Wizard in Photoshop

$
0
0

In this tutorial, I will show you the steps I took to manipulate a man portrait into dark wizard in Photoshop. We will use some bare metal texture and fire stock images, plus a number of image adjustment techniques to form this effect. Have a try!

This is an intermediate level tutorial so some steps can be challenging.

Note: The Photoshop tutorial is done in Photoshop CC – therefore some screenshot may have slighting different layout as in the earlier version. Some brushes are exclusive to Photoshop CS6.

Here is a preview of the final effect I have for this tutorial: (click to enlarge)

dark wizard flatten 550x653 Manipulate a Man Portrait into Dark Wizard in Photoshop

PSD File Download

You can download the PSD File for this tutorial via the VIP Members Area for only $6.95/Month (or less)! You will not only get this PSD File, but also 100+ other PSD Files + Extra Goodies + Exclusive Photoshop tutorials there. Signup now and get exclusive :) Find out more about the VIP Members Areas

vip sign up 250 Manipulate a Man Portrait into Dark Wizard in Photoshop

OK Let’s get started!

To complete this tutorial, you will need the following stocks:

Model Stock Image (Photo by Portia ShaoModel Jason Aaron Baca)

Metal

Fire

Step 1

Load the model image into Photoshop. Firstly we can make some adjustments to his face and make a gap appear in the middle. Use the Pen Tool to select the left side of face as shown below:

1 sel 550x309 Manipulate a Man Portrait into Dark Wizard in Photoshop

Make a selection of this work path:

1 make sel 550x261 Manipulate a Man Portrait into Dark Wizard in Photoshop

Duplicate this selection and move the left side of the face slightly to the left. Use the Burn Tool to darken the inside edge of the face:

1 move 550x368 Manipulate a Man Portrait into Dark Wizard in Photoshop

Repeat the above process with the right side of the face, and move it slightly to the right:

1 move 2 550x366 Manipulate a Man Portrait into Dark Wizard in Photoshop

Step 2

We will add the following image adjustment layers on top of the previous layers:

Black and White

2 bw Manipulate a Man Portrait into Dark Wizard in Photoshop

Levels

2 lvs Manipulate a Man Portrait into Dark Wizard in Photoshop

Layer mask on the levels adjustment layer:

2 lvs mask 550x662 Manipulate a Man Portrait into Dark Wizard in Photoshop

Curves

2 curves Manipulate a Man Portrait into Dark Wizard in Photoshop

Layer mask on the curves adjustment layer:

2 curves mask 550x658 Manipulate a Man Portrait into Dark Wizard in Photoshop

Create a new layer and draw a selection as shown below and fill it with black:

2 fill black 550x355 Manipulate a Man Portrait into Dark Wizard in Photoshop

Use a soft eraser tool to fade the edges of this black strip, and here is my effect so far:

2 effect 550x309 Manipulate a Man Portrait into Dark Wizard in Photoshop

Step 3

We will apply some texture over the model. Load the metal texture into Photoshop and select a portion of it. Copy the selection and paste it to cover the model’s face. Make sure you reveal the eyes and the middle part of the face:

3 metal cover 550x376 Manipulate a Man Portrait into Dark Wizard in Photoshop

Add the following adjustment layer as clipping mask to this texture layer:

Black and White

3 bw Manipulate a Man Portrait into Dark Wizard in Photoshop

Levels

3 lvs Manipulate a Man Portrait into Dark Wizard in Photoshop

and here is my effect so far:

3 effect 550x328 Manipulate a Man Portrait into Dark Wizard in Photoshop

Repeat the above process and attach more texture around the arms and neck:

3 effect 2 550x282 Manipulate a Man Portrait into Dark Wizard in Photoshop

Step 4

We will add some fire sparks into the image. Load the fire stock image into Photoshop and select the following portion:

4 sel Manipulate a Man Portrait into Dark Wizard in Photoshop

Copy and paste the selection over to our document, compress it as shown below:

4 compress 550x501 Manipulate a Man Portrait into Dark Wizard in Photoshop

Add more fire textures as shown below:

4 effect 550x693 Manipulate a Man Portrait into Dark Wizard in Photoshop

Step 5

We can go back to the fire stock image and select the following portion:

5 sel 550x322 Manipulate a Man Portrait into Dark Wizard in Photoshop

Copy and paste the selection to our document. Set the blending mode of this new layer to “Screen”:

5 screen 550x394 Manipulate a Man Portrait into Dark Wizard in Photoshop

Duplicate this new spark layer a few times and scatter them around the canvas as shown below:

5 scatter 550x454 Manipulate a Man Portrait into Dark Wizard in Photoshop

Step 6

We’re almost done! To finalise the effect, we can add some particles around the model as shown below:

6 particle 550x309 Manipulate a Man Portrait into Dark Wizard in Photoshop

Use a cloud brush or cloud filter to render some cloud around the model:

6 cloud 550x684 Manipulate a Man Portrait into Dark Wizard in Photoshop

We can also some extra fire sparks around the arms as shown below:

6 sparks 550x252 Manipulate a Man Portrait into Dark Wizard in Photoshop

I apply some colour effect with the colour balance adjustment layer, and here is my final effect: (click to enlarge)

dark wizard flatten 550x653 Manipulate a Man Portrait into Dark Wizard in Photoshop

That’s it for this Photoshop tutorial! Hope you enjoy it and find it somehow useful. Drop me a comment if you have any questions. Till next time, have a great day!

The post Manipulate a Man Portrait into Dark Wizard in Photoshop appeared first on PSD Vault.

Create Unique Hair Style with Leaves Texture in Photoshop

$
0
0

In this tutorial, I will show you the steps I took to create this unique hair style with leaves texture in Photoshop. We will combine several stock images and use a number of custom brushes along the way, and use filters and layer blending modes to spice up our effect.

This is an intermediate level tutorial so some steps can be challenging.

Note: The Photoshop tutorial is done in Photoshop CC – therefore some screenshot may have slighting different layout as in the earlier version. Some brushes are exclusive to Photoshop CS6.

Here is a preview of the final effect I have for this tutorial: (click to enlarge)

Version 1

unique hair manipulation psdvault version1 494x700 Create Unique Hair Style with Leaves Texture in Photoshop

Version 2

unique hair manipulation psdvault version2 494x700 Create Unique Hair Style with Leaves Texture in Photoshop

PSD File Download

You can download the PSD File for this tutorial via the VIP Members Area for only $6.95/Month (or less)! You will not only get this PSD File, but also 100+ other PSD Files + Extra Goodies + Exclusive Photoshop tutorials there. Signup now and get exclusive :) Find out more about the VIP Members Areas

vip sign up 250 Create Unique Hair Style with Leaves Texture in Photoshop

OK Let’s get started!

To complete this tutorial, you will need the following stocks:

Forest Image

Model

Pink Leaves

Nebula 1

Nebula 2

Step 1

Create a new document sized 800px *1132px with black background. Load the forest image into Photoshop and select a portion of the ground texture as shown below:

1 sel 550x290 Create Unique Hair Style with Leaves Texture in Photoshop

Copy and paste the selection to our document and use the free transform tool to set the following perspective:

1 persp 550x216 Create Unique Hair Style with Leaves Texture in Photoshop

and use a soft eraser to remove the edges as shown below:

1 erase 550x160 Create Unique Hair Style with Leaves Texture in Photoshop

Add the following black and white adjustment layer on top:

1 bw Create Unique Hair Style with Leaves Texture in Photoshop

and here is the effect so far:

1 effect 550x216 Create Unique Hair Style with Leaves Texture in Photoshop

Step 2

Load the model image into Photoshop and cut out of the facial area, paste it over to our document:

2 sel 550x626 Create Unique Hair Style with Leaves Texture in Photoshop

Apply the following adjustment layers as clipping masks to the model layer:

Black and White

2 bw Create Unique Hair Style with Leaves Texture in Photoshop

Layer mask on the black and white adjustment layer:

2 bw mask Create Unique Hair Style with Leaves Texture in Photoshop

Levels

2 lvs Create Unique Hair Style with Leaves Texture in Photoshop

Curves

2 curves Create Unique Hair Style with Leaves Texture in Photoshop

and here is the effect so far:

2 effect Create Unique Hair Style with Leaves Texture in Photoshop

Use a grunge/crack brush with black colour, paint some texture over the model’s face as shown below on a new layer:

2 erase 550x545 Create Unique Hair Style with Leaves Texture in Photoshop

Step 3

We will work on adding the leaves texture as hair in this step. Load the pink leaves stock image into Photoshop. Use the lasso tool with 40px feature to select the lower left part of the stock image, as shown below:

3 sel 550x227 Create Unique Hair Style with Leaves Texture in Photoshop

Copy and paste the selection to our document, use the free transform to re-size and warp the leaves as shown below:

3 warp 550x285 Create Unique Hair Style with Leaves Texture in Photoshop

Add the following adjustment layers as clipping masks to this leaves hair layer:

Levels

3 lvs Create Unique Hair Style with Leaves Texture in Photoshop

Curves

3 curves Create Unique Hair Style with Leaves Texture in Photoshop

and here is the effect so far:

3 effect Create Unique Hair Style with Leaves Texture in Photoshop

Step 4

Load the Nebula 1 and 2 stock images into Photoshop. We will copy and paste parts of those texture over to our documents, and set the copies layers’ blending mode to “Screen”:

4 screen 550x299 Create Unique Hair Style with Leaves Texture in Photoshop

4 neb 2 550x346 Create Unique Hair Style with Leaves Texture in Photoshop

Repeat the above process and copy a few more nebular texture, use the “Hard Light” layer blending mode for those extra textures:

4 more 550x277 Create Unique Hair Style with Leaves Texture in Photoshop

Step 5

We’re almost done! For final touches, we can flatten the image and duplicate the background layer, apply the following Oil Paint Filter (you need to have CS6 or later) to the duplicated layer:

5 oil paint Create Unique Hair Style with Leaves Texture in Photoshop

Add the following layer mask to this duplicated layer:

5 mask 491x700 Create Unique Hair Style with Leaves Texture in Photoshop

Add the following adjustment layers on top:

Curves

5 curves Create Unique Hair Style with Leaves Texture in Photoshop

Vibrance

5 vib Create Unique Hair Style with Leaves Texture in Photoshop

Layer mask on the vibrance adjustment layer:

5 vib mask 513x700 Create Unique Hair Style with Leaves Texture in Photoshop

and here is the final effect I have: (click to enlarge)

unique hair manipulation psdvault version2 494x700 Create Unique Hair Style with Leaves Texture in Photoshop

Here is an alternative version I have with different colours:

unique hair manipulation psdvault version1 494x700 Create Unique Hair Style with Leaves Texture in Photoshop

That’s it for this Photoshop tutorial! Hope you enjoy it and find it somehow useful. Drop me a comment if you have any questions. Till next time, have a great day!

The post Create Unique Hair Style with Leaves Texture in Photoshop appeared first on PSD Vault.

Create Rocky Face Manipulation with Abstract Lighting Effect in Photoshop

$
0
0

In this tutorial, I will show you the process of creating this Rocky Face Manipulation with Abstract Lighting Effect in Photoshop. You will learn some interesting methods of creating nice-looking abstract line effects and some fancy colouring technique with adjustment layers. Have a try!

This is an intermediate level tutorial and some steps can be tricky.

Note: The Photoshop tutorial is done in Photoshop CC – therefore some screenshot may have slighting different layout as in the earlier version. Some brushes are exclusive to Photoshop CS6.

Here is a preview of the final effect I have for this tutorial: (click to enlarge)

rocky face flatten 550x313 Create Rocky Face Manipulation with Abstract Lighting Effect in Photoshop

PSD File Download

You can download the PSD File for this tutorial via the VIP Members Area for only $6.95/Month (or less)! You will not only get this PSD File, but also 100+ other PSD Files + Extra Goodies + Exclusive Photoshop tutorials there. Signup now and get exclusive :) Find out more about the VIP Members Areas

vip sign up 250 Create Rocky Face Manipulation with Abstract Lighting Effect in Photoshop

OK Let’s get started!

To complete this tutorial, you will need the following stocks:

Model by faestock

Rock Texture

Crack Brushes (Pick one from the list)

Optional: Abstract Brush Set

Step 1

Create a new document sized 1440px * 820px with black background. Load the rock texture into Photoshop and select the rock part of the image as shown below:

1 sel1 550x404 Create Rocky Face Manipulation with Abstract Lighting Effect in Photoshop

Copy and paste the selection to our canvas and resize it, place it to the bottom right side of the canvas as shown below:

1 paste 550x271 Create Rocky Face Manipulation with Abstract Lighting Effect in Photoshop

Apply the following adjustment layers to this rock layer:

Black and White

1 bw1 Create Rocky Face Manipulation with Abstract Lighting Effect in Photoshop

Levels

1 lvs1 Create Rocky Face Manipulation with Abstract Lighting Effect in Photoshop

Repeat the above process and add another piece of the rock texture to the bottom left of the canvas, and here is the effect so far:

1 effect1 550x310 Create Rocky Face Manipulation with Abstract Lighting Effect in Photoshop

Step 2

We will work on manipulating the model’s face in this step. Load the model image into Photoshop and cut out the following portion, paste it to the centre of the canvas as shown below:

2 paste 550x312 Create Rocky Face Manipulation with Abstract Lighting Effect in Photoshop

Use the crack brush you downloaded, remove parts of the face as shown below:

2 erase 550x303 Create Rocky Face Manipulation with Abstract Lighting Effect in Photoshop

Add the following 3 adjustment layers as clipping mask to this face layer:

Black and White

2 bw Create Rocky Face Manipulation with Abstract Lighting Effect in Photoshop

Levels

2 lvs Create Rocky Face Manipulation with Abstract Lighting Effect in Photoshop

Curves

2 curves Create Rocky Face Manipulation with Abstract Lighting Effect in Photoshop

and here is the effect so far:

2 effect1 550x308 Create Rocky Face Manipulation with Abstract Lighting Effect in Photoshop

Step 3

We will add some more rock texture over the face in this step. Repeat the process in Step 1, but this time we use a smaller piece of rock texture. Add the rock texture to the following area:

3 paste 550x280 Create Rocky Face Manipulation with Abstract Lighting Effect in Photoshop

Keep adding more rock texture to the following area:

3 paste 2 550x402 Create Rocky Face Manipulation with Abstract Lighting Effect in Photoshop

You can adjust the layer opacity of the rock layer so as to add more depth for our image:

3 opacity 550x265 Create Rocky Face Manipulation with Abstract Lighting Effect in Photoshop

Step 4

We will add some abstract lines around the face. Use a particle brush to paint some particles on a new layer (I used the colour orange):

4 particle 550x440 Create Rocky Face Manipulation with Abstract Lighting Effect in Photoshop

Apply Motion Blur filer to this particle layer:

4 mo blur 550x301 Create Rocky Face Manipulation with Abstract Lighting Effect in Photoshop

4 mo set Create Rocky Face Manipulation with Abstract Lighting Effect in Photoshop

Then go to Filter > Distort > Twirl and apply the following settings:

4 twirl Create Rocky Face Manipulation with Abstract Lighting Effect in Photoshop

Use a soft eraser to remove parts of the layer, and here is the result you will aim to achieve:

4 twirl effect 550x418 Create Rocky Face Manipulation with Abstract Lighting Effect in Photoshop

Repeat the above process and add more abstract lines to our image:

4 effect 550x365 Create Rocky Face Manipulation with Abstract Lighting Effect in Photoshop

Step 5

We will work on some final touches for this image. I added some extra lighting patterns with an abstract brushset: (You can achieve the same result with a space themed stock image)

5 lighting effect 550x243 Create Rocky Face Manipulation with Abstract Lighting Effect in Photoshop

Flatten the image and duplicate the background layer, apply the following “Reduce Noise” filter to the duplicated layer:

5 redu 550x412 Create Rocky Face Manipulation with Abstract Lighting Effect in Photoshop

I added some colours to the image with the following adjustment layer:

Selective Color

5 sel red Create Rocky Face Manipulation with Abstract Lighting Effect in Photoshop

5 sel yel Create Rocky Face Manipulation with Abstract Lighting Effect in Photoshop

5 sel neu Create Rocky Face Manipulation with Abstract Lighting Effect in Photoshop

5 sel black Create Rocky Face Manipulation with Abstract Lighting Effect in Photoshop

Brightness and Contrast

5 bc Create Rocky Face Manipulation with Abstract Lighting Effect in Photoshop

and here is my final effect: (click to enlarge)

rocky face flatten 550x313 Create Rocky Face Manipulation with Abstract Lighting Effect in Photoshop

That’s it for this tutorial! Hope you enjoy it and find it useful. Till next time, have a great day!

The post Create Rocky Face Manipulation with Abstract Lighting Effect in Photoshop appeared first on PSD Vault.

Create Portal to Another Realm Photo Manipulation in Photoshop

$
0
0

In this tutorial, I will show you the process of creating this Portal to Another Realm Photo Manipulation in Photoshop. This is an intermediate level tutorial and some steps can be tricky. Have a try!

Note: The Photoshop tutorial is done in Photoshop CC – therefore some screenshot may have slighting different layout as in the earlier version. Some brushes are exclusive to Photoshop CS6.

Here is a preview of the final effect I have for this tutorial: (click to enlarge)

portal to another realm manip flatten 550x267 Create Portal to Another Realm Photo Manipulation in Photoshop

PSD File Download

You can download the PSD File for this tutorial via the VIP Members Area for only $6.95/Month (or less)! You will not only get this PSD File, but also 100+ other PSD Files + Extra Goodies + Exclusive Photoshop tutorials there. Signup now and get exclusive :) Find out more about the VIP Members Areas

vip sign up 250 Create Portal to Another Realm Photo Manipulation in Photoshop

OK Let’s get started!

To complete this tutorial, you will need the following stocks:

Forest

Boy

Gate

Nebula 1

Nebula 2

Step 1

Create a new document sized 1440px * 720px with black background. Load the Forest image into Photoshop and select a portion as shown below:

1 sel2 Create Portal to Another Realm Photo Manipulation in Photoshop

Copy and paste the selection to our document, and use the Eraser Tool with a 40% flow, 100% opacity to remove some parts of the image, to create depth:

1 paste1 550x267 Create Portal to Another Realm Photo Manipulation in Photoshop

Add the following Image Adjustment layers on top:

Black and White

1 bw2 Create Portal to Another Realm Photo Manipulation in Photoshop

Hue and Saturation

1 hue Create Portal to Another Realm Photo Manipulation in Photoshop

Levels

1 lvs2 Create Portal to Another Realm Photo Manipulation in Photoshop

and here is the effect so far:

1 effec 550x264 Create Portal to Another Realm Photo Manipulation in Photoshop

Step 2

Load the Boy stock image into Photoshop and select the boy’s body, copy and paste into our document, re-size and place it shown below:

2 paste1 550x284 Create Portal to Another Realm Photo Manipulation in Photoshop

Add the following adjustment layers as clipping masks to this boy’s layer:

Black and White

2 bw1 Create Portal to Another Realm Photo Manipulation in Photoshop

Levels

2 lvs1 Create Portal to Another Realm Photo Manipulation in Photoshop

And here is the effect so far:

2 effect2 550x294 Create Portal to Another Realm Photo Manipulation in Photoshop

Make sure you paint some dark shadow with a soft brush on the ground where the boy is standing so it blends into the forest:

2 sha 550x147 Create Portal to Another Realm Photo Manipulation in Photoshop

Step 3

Load the Gate image into Photoshop. Select the entire image and copy + paste it onto our document, re-size and place this new layer in front of the boy (underneath the boy’s layer):

3 paste1 550x378 Create Portal to Another Realm Photo Manipulation in Photoshop

Use a soft eraser to remove some parts of the image as shown below:

3 erase 550x444 Create Portal to Another Realm Photo Manipulation in Photoshop

Add the following adjustment layers as clipping masks to this gate layer:

Black and White

3 bw Create Portal to Another Realm Photo Manipulation in Photoshop

Levels

3 lvs Create Portal to Another Realm Photo Manipulation in Photoshop

and here is the effect so far:

3 effect1 550x522 Create Portal to Another Realm Photo Manipulation in Photoshop

Step 4

We will add a pair of wings for the boy. Load the Nebula 1 image into Photoshop and select the following piece with the Lasso Tool (40px feather):

4 sel1 550x463 Create Portal to Another Realm Photo Manipulation in Photoshop

Copy and paste the selection to our document, re-size and warp it as shown below:

4 warp 550x510 Create Portal to Another Realm Photo Manipulation in Photoshop

Hit Ctrl + L and apply the following levels adjustment:

4 lvs Create Portal to Another Realm Photo Manipulation in Photoshop

Repeat the above process and add another wing, and there is the effect so far:

4 effect1 550x288 Create Portal to Another Realm Photo Manipulation in Photoshop

Step 5

Load the Nebula 2 image into Photoshop and select the following area with a 40px feather Lasso Tool:

5 sel1 550x309 Create Portal to Another Realm Photo Manipulation in Photoshop

Copy and paste the selection to our document, set its blending mode to “Lighter Color”:

5 light 550x417 Create Portal to Another Realm Photo Manipulation in Photoshop

Resize and duplicate this layer a few times, scatter them around the canvas as shown below:

5 paste 550x310 Create Portal to Another Realm Photo Manipulation in Photoshop

Use a particle brush, paint some particles around gate, as shown below:

5 particle 550x490 Create Portal to Another Realm Photo Manipulation in Photoshop

Paint some cloud with a cloud brush around gate as well:

5 cloud 550x517 Create Portal to Another Realm Photo Manipulation in Photoshop

Step 6

We want to add some flame inside the gate. Let’s go back to the forest layer, and use a eraser to remove the part inside the gate:

6 remove 550x399 Create Portal to Another Realm Photo Manipulation in Photoshop

Go to the Nebula 1 image and select the following piece:

6 sel1 550x506 Create Portal to Another Realm Photo Manipulation in Photoshop

Copy and paste the selection to our document and place this layer below the forest layer, put it behind the gate: (make sure you adjust the size of the layer to fit the gate)

6 effect1 550x312 Create Portal to Another Realm Photo Manipulation in Photoshop

Step 7

We’re almost done! For final touches, we can flatten the image, and create a new layer on top, then use a big soft black brush to paint some darkness around canvas.

This will make the centre part of the image stand out:

7 darken 550x284 Create Portal to Another Realm Photo Manipulation in Photoshop

Add some fiery effect on top of the gate with the “Nebula 2″ image. As you can see I warp the selection slightly:

7 paste 550x221 Create Portal to Another Realm Photo Manipulation in Photoshop

Set the layer blending mode to “Screen” for this new layer:

7 screen 550x421 Create Portal to Another Realm Photo Manipulation in Photoshop

We will apply some colour effect with the following adjustment layers:

Selective Color

7 reds Create Portal to Another Realm Photo Manipulation in Photoshop

7 whites Create Portal to Another Realm Photo Manipulation in Photoshop

7 neu Create Portal to Another Realm Photo Manipulation in Photoshop

7 blacks Create Portal to Another Realm Photo Manipulation in Photoshop

Colour Balance

7 col sha Create Portal to Another Realm Photo Manipulation in Photoshop

7 mid Create Portal to Another Realm Photo Manipulation in Photoshop

7 hig Create Portal to Another Realm Photo Manipulation in Photoshop

and here is my final effect: (click to enlarge)

portal to another realm manip flatten 550x267 Create Portal to Another Realm Photo Manipulation in Photoshop

That’s it for this tutorial! Hope you enjoy it and find it useful. Till next time, have a great day!

The post Create Portal to Another Realm Photo Manipulation in Photoshop appeared first on PSD Vault.

VIP Exclusive Photoshop Tutorial – The Creation of “Return” Digital Art in Photoshop

$
0
0

Welcome to another Exclusive Photoshop tutorial written specifically for the PSD Vault VIP Members! In this tutorial, author Kris Shields will explain in detail the creation of his “Return” Digital Art in Photoshop.

This tutorial consists a total of 17 steps. It focuses on explaining some very interesting photo manipulation techniques, as well as texture applications, object blending, etc.

Final Image Preview

This is the image you will be creating: (click to enlarge)

psdvault vip return web res 550x528 VIP Exclusive Photoshop Tutorial   The Creation of Return Digital Art in Photoshop

What You Will Learn

This Photoshop tutorial will cover:

  1. Advanced photo manipulation techniques
  2. Decay effect
  3. Explosion effect
  4. Objects blending

Tutorial Screenshot Preview

5 550x529 VIP Exclusive Photoshop Tutorial   The Creation of Return Digital Art in Photoshop

8 550x529 VIP Exclusive Photoshop Tutorial   The Creation of Return Digital Art in Photoshop

11 550x529 VIP Exclusive Photoshop Tutorial   The Creation of Return Digital Art in Photoshop

VIP Exclusive Tutorial

If you’re a VIP member, you can log in to the VIP Members Area and click on Exclusive Tutorial button to download the tutorial. If you’re yet to become a VIP member, you can simply click on the banner below to signup:

vip sign up 250 VIP Exclusive Photoshop Tutorial   The Creation of Return Digital Art in Photoshop

About the Author

Kris Shields (Colour Drip) is a Digital Artist/ Graphic Designer from the United Kingdom who aims to work with different styles and elements, blending reality with a range of colour and shinny goodness. He is currently working on a range of projects including digital illustrations, 3D renders, typography and collaborations with other young creative minds.

Kris on Behance

Interested? Log in to your VIP members area to download it now! Not a member yet? Click on the banner below to sign up now:

vip sign up 250 VIP Exclusive Photoshop Tutorial   The Creation of Return Digital Art in Photoshop

Hope you enjoy it and find it useful! Thank you for your support and have a nice day!

The post VIP Exclusive Photoshop Tutorial – The Creation of “Return” Digital Art in Photoshop appeared first on PSD Vault.

Photo Manipulation of Underworld Demon Lord in Photoshop

$
0
0

In this tutorial, I will show you the process of creating this abstract style, underworld demon lord in Photoshop. We will use a variety of custom brushes and textures to manipulate a model’s image. You will be doing lots of painting and image adjustments along the way. Have a try!

Note: The Photoshop tutorial is done in Photoshop CC – therefore some screenshot may have slighting different layout as in the earlier version. Some brushes are exclusive to Photoshop CS6.

Here is a preview of the final effect I have for this tutorial: (click to enlarge)

arise from the dead digital art 550x550 Photo Manipulation of Underworld Demon Lord in Photoshop

PSD File Download

You can download the PSD File for this tutorial via the VIP Members Area for only $6.95/Month (or less)! You will not only get this PSD File, but also 100+ other PSD Files + Extra Goodies + Exclusive Photoshop tutorials there. Signup now and get exclusive :) Find out more about the VIP Members Areas

vip sign up 250 Photo Manipulation of Underworld Demon Lord in Photoshop

OK Let’s get started!

To complete this tutorial, you will need the following stocks:

Model by Null-Entity

Metal Texture

Human Vector Graphics

Grunge Brushset

Dirt Brushset

Splatter Brushset

Step 1

Create a document sized 1500px * 1500px with white background. Use the grunge brushset and paint some blacks over the canvas. Be creative with your brushes, use a mixture of them and don’t just stick to one brush:

1 paint 550x551 Photo Manipulation of Underworld Demon Lord in Photoshop

Keep painting, this time we use a white grunge brush to paint over the black colour:

1 paint 2 550x554 Photo Manipulation of Underworld Demon Lord in Photoshop

1 paint 3 550x550 Photo Manipulation of Underworld Demon Lord in Photoshop

Step 2

We will add the model’s image onto our document. Select the facial area and copy + paste it onto our canvas, re-size it to fit our canvas size:

2 paste 550x569 Photo Manipulation of Underworld Demon Lord in Photoshop

Use the grunge brushset as eraser, remove the edges off the face layer:

2 erase 550x560 Photo Manipulation of Underworld Demon Lord in Photoshop

Add the following adjustment layers as clipping masks to the face layer”

2 bw Photo Manipulation of Underworld Demon Lord in Photoshop

2 lvs Photo Manipulation of Underworld Demon Lord in Photoshop

2 curves Photo Manipulation of Underworld Demon Lord in Photoshop

Then, load the metal texture into Photoshop, and select a portion as shown below:

2 metal 550x444 Photo Manipulation of Underworld Demon Lord in Photoshop

Copy and paste the selection over to our document and cover the face area. Make sure you place this layer above the previous 3 adjustment layer. Then set it as clipping mask to the layer below, and change its blending mode to “Color Burn”:

2 color burn 550x394 Photo Manipulation of Underworld Demon Lord in Photoshop

and here is the effect so far with the metal texture applied to the model’s face:

2 effect 550x404 Photo Manipulation of Underworld Demon Lord in Photoshop

Step 3

We will do some further painting around the face. Create a new layer and again use the grunge brushset to paint some white colour gaps (you may need to use the free transform tool to rotate and resize your paintings):

3 erase 550x551 Photo Manipulation of Underworld Demon Lord in Photoshop

Use the dirt brush to paint some particles around the face, use the eraser tool to remove any extra dirt:

3 particle 550x655 Photo Manipulation of Underworld Demon Lord in Photoshop

Use the splatter brushset (small brush tip) to paint some drippings from the eye and month area:

3 splatter 550x380 Photo Manipulation of Underworld Demon Lord in Photoshop

Step 4

We will add some “floating humans” around the canvas. Download the human vector graphics and open it in Illustrator, then export it into a JPEG file. If you don’t have Illustrator, simply download the image below:

human image 550x391 Photo Manipulation of Underworld Demon Lord in Photoshop

Select the following portion from the image:

4 sel Photo Manipulation of Underworld Demon Lord in Photoshop

Copy and paste the selection to our document, apply the following Hue/Saturation adjustment for this layer:

4 hue Photo Manipulation of Underworld Demon Lord in Photoshop

Re-size this human layer into a smaller scale, rotate it slightly as well:

4 resize Photo Manipulation of Underworld Demon Lord in Photoshop

Duplicate this layer a few times, scatter them around the canvas as shown below:

4 effect 550x497 Photo Manipulation of Underworld Demon Lord in Photoshop

Step 5

We will add some red glows to the eye. Use a small soft brush with red colour:

5 paint red 550x286 Photo Manipulation of Underworld Demon Lord in Photoshop

Paint it over the eye area:

5 paint red 1 550x314 Photo Manipulation of Underworld Demon Lord in Photoshop

Then switch the brush colour to white, and use a smaller brush to paint a dot at the centre of the red:

5 paint white 550x290 Photo Manipulation of Underworld Demon Lord in Photoshop

and here is the effect so far:

5 effect 550x251 Photo Manipulation of Underworld Demon Lord in Photoshop

Step 6

We’re almost done! I further added the following Selective Color adjustment layer on top:

6 sel black Photo Manipulation of Underworld Demon Lord in Photoshop

6 sel neu Photo Manipulation of Underworld Demon Lord in Photoshop

6 sel whites Photo Manipulation of Underworld Demon Lord in Photoshop

and here is my final effect: (click to enlarge)

arise from the dead digital art 550x550 Photo Manipulation of Underworld Demon Lord in Photoshop

That’s it for this tutorial! Hope you enjoy it and find it useful. Till next time, have a great day!

The post Photo Manipulation of Underworld Demon Lord in Photoshop appeared first on PSD Vault.

Best of PSD Vault Photoshop Tutorials 2014

$
0
0

Hi guys, this is James here and 2014 has flown past us – as we step into the holiday season, I would like to say a big thank-you for all your readers out there who have visited my blog in the past year. I really do hope my tutorials and articles have helped you with your Photoshop adventure! It has been a great joy for me and the tutorial writers on PSD Vault to share our knowledge with you guys.

In this final post of the year, I will showcase a list of the most popular Photoshop tutorials in 2014 here on PSD Vault! Have a wonderful New Year!

Design Layered Rock Text Effect with Natural Elements in Photoshop

In this tutorial, I will show you the steps I took to create this layered text effect with natural textures in Photoshop. This effect might look a little bit complex but it really is quite simple to create. Have a try!

layered rock natural text flatten 467x700 Best of PSD Vault Photoshop Tutorials 2014

Create “Dark Power Unleashed” Surreal Digital Art in Photoshop

In this tutorial, I will show you the processes of creating this “Dark Power Unleashed” Surreal Digital Art in Photoshop. We will start from a simple city image, and combine it with cloud, model and several other objects to form this surreal effect. Have a try!

dark power unleashed art flatten 550x243 Best of PSD Vault Photoshop Tutorials 2014

Create Unique Neon Text Effect in Photoshop

In this tutorial, I will show you the processes used to created this unique neon text effect in Photoshop. We will be using a number of Photoshop techniques such as layer masking, selection, blending options, pen tool and adjustment layers.

translucent text flatten 550x307 Best of PSD Vault Photoshop Tutorials 2014

Create Colourful Fiery Portrait in Photoshop

In this tutorial, I will show you the steps I took to create this awesome fiery portrait in Photoshop.This is a beginner-intermediate level tutorial aiming to give some practices on layer blending, selection and coloring techniques in Photoshop. Some steps can be a little tricky, but why not have a try!

portrait 2 flatten 532x700 Best of PSD Vault Photoshop Tutorials 2014

Draw a Realistic Retro Radio using Photoshop and Illustrator from Scratch

In this tutorial, we will draw a retro radio from scratch in Photoshop and Illustrator. We will start by drawing its wireframe in Illustrator and then export the path to Photoshop where we will continue to polish it. This is extra long tutorial with a total of 131 steps! If you think you’re up to the challenge, dig in now!

Photo Realistic Retro Radio 177 550x394 Best of PSD Vault Photoshop Tutorials 2014

Create “Unleash the Dark Power” Surreal Scene in Photoshop

In this tutorial, I will show you the steps I took to create this “Unleash the Dark Power” surreal scene in Photoshop. You will have the opportunity to practice objects merging, image adjustments, selection techniques, as well as a number of filter effects.

city scene flatten 550x276 Best of PSD Vault Photoshop Tutorials 2014

Create Distorted Lady Figure Effect in Photoshop

In this tutorial, I will show you the steps used to create this distorted lady figure effect in Photoshop. We will use metal and rock texture over a female body to create the main effect, and use various image adjustments, layer masks and filter to fine-tune the effect.

distorted lady manip flatten 474x700 Best of PSD Vault Photoshop Tutorials 2014

How To Draw a Halloween Pumpkin In Photoshop

In this tutorial, we are going to draw the famous icon of halloween, the pumpkin with scary face, Jack O’ Lantern. We will start drawing its basic shape with help from Pen tool and continue with drawing manually using the old realiable Brush tool.

ps tutorial draw a halloween pumpkin final1 550x428 Best of PSD Vault Photoshop Tutorials 2014

Create Underwater Themed Abstract Piece In Photoshop and Cinema 4D

In this tutorial, I will teach you to create a Underwater Themed Abstract Piece similar to my own piece “Marianas Trench”, which includes photo manipulation, 3D modeling and Photoshop postwork.

Create Underwater Themed Abstract Piece In Photoshop and Cinema 4D PSD Vault 24 440x700 Best of PSD Vault Photoshop Tutorials 2014

Create Portal to Another Realm Photo Manipulation in Photoshop

In this tutorial, I will show you the process of creating this Portal to Another Realm Photo Manipulation in Photoshop. This is an intermediate level tutorial and some steps can be tricky. Have a try!

portal to another realm manip flatten 550x267 Best of PSD Vault Photoshop Tutorials 2014

That’s it for this post! Hope you have a fantastic holiday season and Happy New Year! I will see you in 2015!

The post Best of PSD Vault Photoshop Tutorials 2014 appeared first on PSD Vault.


Create Surreal Floating Tree Above Ocean in Photoshop

$
0
0

In this tutorial, I will show you the steps I took to create this surreal floating tree above ocean in Photoshop. We will be mixing lots of natural elements to form this design. Have a try!

Note: The Photoshop tutorial is done in Photoshop CC – therefore some screenshot may have slighting different layout as in the earlier version. Some brushes are exclusive to Photoshop CS6.

Here is a preview of the final effect I have for this tutorial: (click to enlarge)

psdvault fantasy floating tree above ocean flatten 491x700 Create Surreal Floating Tree Above Ocean in Photoshop

PSD File Download

You can download the PSD File for this tutorial via the VIP Members Area for only $6.95/Month (or less)! You will not only get this PSD File, but also 100+ other PSD Files + Extra Goodies + Exclusive Photoshop tutorials there. Signup now and get exclusive :) Find out more about the VIP Members Areas

vip sign up 250 Create Surreal Floating Tree Above Ocean in Photoshop

OK Let’s get started!

To complete this tutorial, you will need the following stocks:

Ocean

Fish

Ground

Sky

Tree

Birds

Step 1

Create a document sized 800px * 1140px with white background. Load the Ocean stock into Photoshop and select the following area:

1 sel 550x290 Create Surreal Floating Tree Above Ocean in Photoshop

Copy and paste the selection to our document, re-size it to fit the width of our canvas:

1 resize 550x225 Create Surreal Floating Tree Above Ocean in Photoshop

Use a soft eraser to fade the top edge of the ocean layer:

1 fade 550x136 Create Surreal Floating Tree Above Ocean in Photoshop

Add the following 2 adjustment layers on top as clipping mask for this ocean layer:

Levels

1 lvs Create Surreal Floating Tree Above Ocean in Photoshop

Curves

1 curves Create Surreal Floating Tree Above Ocean in Photoshop

and here is the effect so far:

1 effect 550x218 Create Surreal Floating Tree Above Ocean in Photoshop

Step 2

We will add some fish into the ocean. Load the fish stock image into Photoshop and select a few fish from it: (this should be a simple selection, as the background of the fish stock image is transparent. You can use either Magic Wand or Quick Selection tool to select them.)

2 sel 2 Create Surreal Floating Tree Above Ocean in Photoshop

2 sel Create Surreal Floating Tree Above Ocean in Photoshop

Paste the fish into our document and place the layers above all the previous ocean layers. Change the blending mode of each fish layer to “Overlay”, and here is the effect:

2 paste 550x239 Create Surreal Floating Tree Above Ocean in Photoshop

Step 3

Let’s add the sky part into our design. Load the sky stock image into Photoshop and select the following area:

3 sel 550x383 Create Surreal Floating Tree Above Ocean in Photoshop

Copy and paste the selection to our document, re-size to fit our canvas size and apply the following adjustment layers as clipping masks:

Levels

3 lvs Create Surreal Floating Tree Above Ocean in Photoshop

Curves

3 curves Create Surreal Floating Tree Above Ocean in Photoshop

You can use a soft eraser to fade the bottom edge of the sky layer to blend it in with the ocean:

3 erase 550x137 Create Surreal Floating Tree Above Ocean in Photoshop

and here is the effect so far:

3 effect 487x700 Create Surreal Floating Tree Above Ocean in Photoshop

Step 4

We will work on the ground which will hold our tree in this step. Load the ground stock image into Photoshop and select a piece as shown below:

4 sel 550x268 Create Surreal Floating Tree Above Ocean in Photoshop

Copy and paste the selection to our document. Re-size and place it above the ocean. Use a soft eraser to work on its edge until it forms the following shape:

4 erase 550x278 Create Surreal Floating Tree Above Ocean in Photoshop

Grab the burn tool to darken the bottom of the ground as shown below:

4 burn 550x455 Create Surreal Floating Tree Above Ocean in Photoshop

4 burn effect 550x261 Create Surreal Floating Tree Above Ocean in Photoshop

Add the following Curves adjustment layer as clipping mask to this ground layer:

4 curves Create Surreal Floating Tree Above Ocean in Photoshop

and here is the effect so far:

4 effect Create Surreal Floating Tree Above Ocean in Photoshop

Step 5

We will add the tree into our design in this step. Load the tree stock image into Photoshop and add it to our document, re-size it to fit the width of the ground:

5 paste 550x598 Create Surreal Floating Tree Above Ocean in Photoshop

Add the following Curves adjustment layer as clipping mask to this tree layer:

5 curves Create Surreal Floating Tree Above Ocean in Photoshop

Apply the following layer mask on the curves adjustment layer above:

5 mask 550x384 Create Surreal Floating Tree Above Ocean in Photoshop

And here is the effect so far:

5 effect 550x486 Create Surreal Floating Tree Above Ocean in Photoshop

Step 6

Create a new layer and use a cloud brush to paint some cloud around the ground and tree:

6 cloud 550x365 Create Surreal Floating Tree Above Ocean in Photoshop

Optionally, you can add some particles around the tree to add some motion to our design:

6 particles 550x419 Create Surreal Floating Tree Above Ocean in Photoshop

Use an abstract brushset to paint some abstract lines around the tree: (Use “Overlay” blending mode for some fancy lighting effect)

5 overlay 550x314 Create Surreal Floating Tree Above Ocean in Photoshop

Load the Birds stock image into and select some birds:

6 sel Create Surreal Floating Tree Above Ocean in Photoshop

Add the birds around the tree and ground – make sure you adjust the size of the birds to ensure variety:

6 paste 550x547 Create Surreal Floating Tree Above Ocean in Photoshop

Step 7

We’re almost done! For final touches, we can flatten the image and use the Burn Tool to add some shadow under the tree – this will allow better blending of the tree and ground:

7 burn 550x220 Create Surreal Floating Tree Above Ocean in Photoshop

Add the following Curves adjustment layer on top to fine-tune its contrast:

7 curves Create Surreal Floating Tree Above Ocean in Photoshop

and here is my final effect: (click to enlarge)

psdvault fantasy floating tree above ocean flatten 491x700 Create Surreal Floating Tree Above Ocean in Photoshop

That’s it for this tutorial! Hope you enjoy it and find it useful. Till next time, have a great day!

The post Create Surreal Floating Tree Above Ocean in Photoshop appeared first on PSD Vault.

Create Fiery Dragon Ravaging Mountain Village Scene in Photoshop

$
0
0

In this tutorial, I will show you the process used to Create Fiery Dragon Ravaging Mountain Village Scene in Photoshop. We will use a photo of a metal dragon display in a museum and make it alive and breath fire. We will also create a mountain village scene from several stock images. Have a try!

Note: The Photoshop tutorial is done in Photoshop CC – therefore some screenshot may have slighting different layout as in the earlier version. Some brushes are exclusive to Photoshop CS6.

Here is a preview of the final effect I have for this tutorial: (click to enlarge)

mountain-dragon-flatten

PSD File Download

You can download the PSD File for this tutorial via the VIP Members Area for only $6.95/Month (or less)! You will not only get this PSD File, but also 100+ other PSD Files + Extra Goodies + Exclusive Photoshop tutorials there. Signup now and get exclusive :) Find out more about the VIP Members Areas

OK Let’s get started!

To complete this tutorial, you will need the following stocks:

Mountain

Village by Cat-in-the-Stock

Dragon by MrDragonfyr-Stock

Fire

Cloud Brushes

Step 1

Create a new document sized 1440px * 720px with black background. Load the mountain stock image into Photoshop and select the top left side of the mountain indicated below:

1 sel

Copy and paste the selection to our document. Adjust its layer size with the free transform tool to fit the size of our canvas, then use a soft eraser to fade the edges as shown below:

1 erase

Apply the following adjustment layers as clipping masks to this mountain layer:

Black and White

1 bw

Levels

1 lvs

Curves

1 curves

and here is the effect so far:

1 effect

Step 2

We will add another piece of the mountain stock onto our canvas. Select this piece shown below from the right side of the mountain stock image:

2 sel

Copy and paste the selection to our document. Place the layer on the right and reduce its size. Then use a soft eraser to fade the top edges:

2 erase

Add the following adjustment layer as clipping masks for this new mountain layer:

Black and white

2 bw

Levels

2 lvs

Curves

2 curves

and here is the effect so far:

2 effect

Step 3

We will start working on the dragon in this step. Load the dragon stock image into Photoshop and select the dragon:

3 sel

Copy and paste the selection to our document. Reduce its layer size and rotate it a bit counter clockwise. This will make the dragon look like it’s descending from the sky:

3 rotate

Use a big soft eraser to fade the head of the dragon, and its claws:

3 fade

3 fade 2

Add the following adjustment layers as clipping masks to this dragon layer:

Black and White

3 bw

Levels

3 lvs

Curves

3 curves

and here is the effect so far:

3 effect

Step 4

We will add fire to the dragon in this step. Load the fire stock image into Photoshop and select the fire:

4 sel

Copy and paste the selection to our document and reduce its size. Use the Warp Tool to compress it a bit and fit it to the dragon’s mouth:

4 warp

Select some smaller fire particles from the fire stock image:

4 small

Copy and paste the selection to our document, set its layer blending mode to “Color Dodge”:

4 color dodge

Duplicate this small fire layer a few times and scatter them around the canvas, make sure you adjust the size of each duplicated layer to ensure variety:

4 scatter 2

4 scatter

Step 5

Use a combination of cloud brush and cloud filter, add some cloud overlay for our image: (Make sure you set the opacity and flow of the brush to around 40%, so you don’t over-paint the canvas)

5 cloud

Paint some cloud around the dragon as well:

5 cloud 2

Step 6

We will add some flying fire particles around the canvas to make our design more epic. Go back to the fire stock image, create a new layer and use a particle brush to paint on the new layer:

6 paint

Select this newly painted particle layer:

6 sel

Go back to the background layer, and Ctrl + C to copy the selection:

6 bg

Paste the selection to our document, then apply the following motion blur filter:

6 mo blur

and you will have some flying particle effect like this:

6 effect

Step 7

We’re almost done! For final touches, we can flatten the image, duplicate the background layer, and use apply the following Oil Paint (Photoshop CS6 or above) filter:

oil paint

Add the following adjustment layer on top to fine-tune its colour and contrast:

Curves

6 curves

Layer mask on the curves adjustment layer:

7 mask

Selective Color

7 sel red

7 sel yellows

7 sel whites

7 sel neu

7 sel black

Brightness and Contrast

7 bc

and here is my final effect: (click to enlarge)

mountain-dragon-flatten

That’s it for this tutorial! Hope you enjoy it and find it useful. Till next time, have a great day!

The post Create Fiery Dragon Ravaging Mountain Village Scene in Photoshop appeared first on PSD Vault.

VIP Exclusive Photoshop Tutorial – Create Paradise Landscape in Photoshop

$
0
0

Welcome to another Exclusive Photoshop tutorial written specifically for the PSD Vault VIP Members! In this tutorial, author Matteo Della Chiesa will explain the process of creating a paradise landscape in Photoshop. You will gain understanding of how to manipulate images to create a surreal floating tree above a waterfall in the middle of a paradisiac landscape.

Final Image Preview

This is the image you will be creating: (click to enlarge)

psdvault-vip-paradise-landscape-final-image

What You Will Learn

This Photoshop tutorial will cover:

  1. How to manipulate images to create a surreal floating tree
  2. Perspective and adding depth
  3. Objects blending
  4. Cloud composition

Tutorial Screenshot Preview

psdvault-vip-paradise-landscape-Step2c

psdvault-vip-paradise-landscape-Step3e

psdvault-vip-paradise-landscape-Step5g

VIP Exclusive Tutorial

If you’re a VIP member, you can log in to the VIP Members Area and click on Exclusive Tutorial button to download the tutorial. If you’re yet to become a VIP member, you can simply click on the banner below to signup:

vip sign up 250 VIP Exclusive Tutorial   Create Advanced Photo Manipulative Artwork via Grunge Textures and Colour Effect

About the Author

Matteo Della Chiesa is a 19 Years old Multi-Awarded Graphic & Web Designer, Illustrator, Photo-Manipulator, Digital Artist, Traditional Drawer and Football addicted.

+6 years of experience with Adobe Photoshop and +5 years with Adobe Illustrator. Since 2009, Matteo has gained over 45 Awards, Features and Publications on many websites, magazines and Design books. I have worked for 3 Graphic Agencies, 3 Marketing Agencies and many other clients, including FAAC, Trenkwalder and Deloitte.

Follow Matteo on Behance


Interested? Log in to your VIP members area to download it now! Not a member yet? Click on the banner below to sign up now:

vip sign up 250 VIP Exclusive Tutorial   Create Advanced Photo Manipulative Artwork via Grunge Textures and Colour Effect

Hope you enjoy this tutorial and find it useful! Till next time, have a great day!

The post VIP Exclusive Photoshop Tutorial – Create Paradise Landscape in Photoshop appeared first on PSD Vault.

Create Stone Face Wrapped by Tree Roots in Photoshop

$
0
0

In this tutorial, I will show you the steps I took to create this Stone Face Wrapped by Tree Roots in Photoshop. This effect looks complicated but it’s in fact easy to create. You do need have some knowledge of image adjustments and layer blending.

We will apply the stone texture onto the face first, then work on the tree roots. We will finalise the effect with lighting and cloud effect.

Note: The Photoshop tutorial is done in Photoshop CC – therefore some screenshot may have slighting different layout as in the earlier version. Some brushes are exclusive to Photoshop CS6.

Here is a preview of the final effect I have for this tutorial: (click to enlarge)

tree-root-face-flatten

PSD File Download

You can download the PSD File for this tutorial via the VIP Members Area for only $6.95/Month (or less)! You will not only get this PSD File, but also 100+ other PSD Files + Extra Goodies + Exclusive Photoshop tutorials there. Signup now and get exclusive :) Find out more about the VIP Members Areas

OK Let’s get started!

To complete this tutorial, you will need the following stocks:

Face by Random-Acts-Stock

Stone

Tree Root

Step 1

Create a new document sized 800px * 1132px with white blackground. Grab the Gradient Fill tool and set its option to be “Radial Gradient”, and fill the background layer with colours as shown below:

1 grad

Load the model image into Photoshop and copy out the facial area. Paste it to our document and re-size the layer and position it as the canvas centre. Use a soft eraser to face the edges as shown below:

1 resize

Apply the following image adjustment layers as clipping mask to the face layer:

Black and White

1 bw

Levels

1 lvs

Curves

1 curves

Load the stone texture into Photoshop and select the following portion:

1 sel

Copy and paste the selection to our document, resize the new layer to roughly the size of the face, then set it as clipping mask to the layer below:

1 clip

Use a soft eraser to remove part of the stone off the top:

1 erase top stone

Apply the following black and white adjustment layer as shown below:

1 bw stone

and here is the effect so far:

1 effect

Step 2

Load the tree root stock image into Photoshop. Select a piece of the tree root as shown below:

2 sel

Then copy and paste the selection to our document. Re-size and attach it to the face bottom left. Use a soft eraser to remove the edge to it blends into the face. Depending on your selection above, your result might be different to mine:

2 attach

Use a hard brush, remove parts of the roots as shown below:

2 erase

Apply the following adjustment layers as clipping masks to the tree root layer:

Black and White

2 bw

Levels

2 lvs

and here is the effect so far:

2 effect

Repeat the above process, add another tree root on the top:

2 top

Step 3

We will add some stone texture in the background. Select another piece of stone from the stock image:

3 sel

Copy and paste the selection, place it below the face layer, and use a soft eraser to fade it as shown below:

3 place

Apply the following black and white adjustment to this stone layer:

3 bw

Add some more stone texture below the face layer – this time put it around the forehead:

3 more stone

and here is the effect so far:

3 effect

Step 4

We can use a cloud brush to paint some cloud/smoke effect behind the face to add some dynamics to the image:

4 cloud

Use a particle brush to paint some particles around the face:

4 part

Step 5

In this final step, we will add some touch-ups to the image. Create a new layer and use a soft white brush to paint some lighting effect around the cheek/lips area:

5 highlight

Create a new layer and paint some cloud around with a cloud brush:

5 more cloud

Add the following adjustment layers on top:

Levels

5 lvs

Curves

5 curves

and here is my final effect for this Photoshop tutorial: (click to enlarge)

tree-root-face-flatten

That’s it for this tutorial! Hope you enjoy it and find it useful. Till next time, have a great day!

The post Create Stone Face Wrapped by Tree Roots in Photoshop appeared first on PSD Vault.

Photo Manipulation of a Barbarian Warrior in Photoshop

$
0
0

In this tutorial, I will show you the steps I took to create this photo manipulation of a Barbarian Warrior in Photoshop. We will mix rock and metal texture, as well as fire into a warrior photo. We will be practicing layer blending, image adjustments, free transform tool and a number of other manipulation techniques.

This is an intermediate level difficulty tutorial and require prior knowledge of basic Photoshop commands, as well as using layer masks in Photoshop to complete.

Note: The Photoshop tutorial is done in Photoshop CC – therefore some screenshot may have slighting different layout as in the earlier version. Some brushes are exclusive to Photoshop CS6.

Here is a preview of the final effect I have for this tutorial: (click to enlarge)

dark-warrior-flatten

PSD File Download

You can download the PSD File for this tutorial via the VIP Members Area for only $6.95/Month (or less)! You will not only get this PSD File, but also 100+ other PSD Files + Extra Goodies + Exclusive Photoshop tutorials there. Signup now and get exclusive :) Find out more about the VIP Members Areas

OK Let’s get started!

To complete this tutorial, you will need the following stocks:

Barbarian Warrior by mjranum-stock

Rock Texture

Metal Texture

Fire Texture

Step 1

Create a new document sized 1200px * 1303px with black background. Load the rock texture into Photoshop and select a portion of it:

1 sel

Copy and paste the selection to our document, drop its layer opacity to around 40%, and use the Perspective tool to adjust its shape:

1 persp

Use a soft eraser to fade its edge as shown below:

1 erase

Apply the following Levels adjustment to this ground layer:

1 lvs

Use a cloud brush, paint some subtle cloud effect over the background (opacity should be around 10-20%):

1 effect

Optional: Use a particle brush to add some particles on the ground, as shown below:

1 particle

Step 2

We will add some rock texture onto the background in this step. Select the following portion from the rock texture:

2 sel

Copy and paste the selection to our document, re-size it to fit the size of our canvas. Desaturate the layer afterward and turn it into black and white:

2 paste

Use a soft eraser tool, remove the centre and bottom parts of the texture as shown below:

2 erase

Step 3

Load the warrior stock into Photoshop and cut the warrior out, and paste it onto our document. Place the warrior at the centre of the canvas:

3 paste

Use a soft eraser to fade the edge of the warrior’s body, so that he blends with the background texture:

3 mask

Apply the following 3 adjustment layers as clipping masks to this warrior layer:

Levels

3 lvs

Layer mask on the levels adjustment layer:

3 lvs mask

Curves

3 curves

Color Balance

3 col bal

and here is the effect so far:

3 effect

Step 4

We will add some metals around the warrior to act as shattered Armour after a big battle. Load the metal texture into Photoshop and select a few pieces from it:

4 more sel

Copy and paste your selection to our warrior’s body, make sure you set those layers as clipping mask to the warrior layer:

4 paste

Change the layer blending mode of the above metal layers to “Color Burn”, this will create some scar/blood effect on the warrior’s body:

4 col burn

Keep adding more metal texture to our document – now use the “Pin Light” layer blend mode for those metal textures:

4 pin light

I attached the metal to the shoulder area of the warrior, and here is the effect so far:

4 effect

Step 5

We will be adding some fiery effect to our image in this step. Load the fire stock into Photoshop, select the tip of the fire as shown below:

5 fire

Copy and paste the selection to our document, use the “Screen” blend mode and reduce the size of the fire layer to roughly the width of our warrior:

5 screen

This is the fiery effect you will aim to achieve:

5 effect

Add some fire around the Axe as well:

5 fire on axe

Paint some dust effect on the feet:

5 smoke

Step 6

We’re almost done! For final touches, we can add the following adjustment layers on top:

Selective Color

6 sel red

6 sel neu

6 sel whites

Brightness/Contrast

6 brigh

And here is my final effect: (click to enlarge)

dark-warrior-flatten

That’s it for this tutorial! Hope you enjoy it and find it useful. Till next time, have a great day!

The post Photo Manipulation of a Barbarian Warrior in Photoshop appeared first on PSD Vault.

Viewing all 245 articles
Browse latest View live


Latest Images