In this tutorial, I will show you the process of creating this “Resurrection” surreal photo manipulation in Photoshop. The photo manipulation simply tells a story about a girl’s spirit being resurrected in a surreal environment. The environment is filled with space elements such as nebula & star.
Along the way, we will practice selection, image adjustments, object/layer blending, and painting of hair with pen tool.
The PSD file of this tutorial is available to buy on PSD Vault Shop, or via the PSD Vault VIP members area.
This is an intermediate level tutorial.
Note: The Photoshop tutorial is done in Photoshop CC – therefore some screenshot may have slighting different layout as in the earlier version. Some brushes are exclusive to Photoshop CS6 or above.
Here is a preview of the final effect I have for this tutorial: (click to enlarge)
PSD Vault VIP Membership
You can download the PSD File for this tutorial via the VIP Members Area for only $6.95/Month (or less)! You will not only get this PSD File, but also 200+ other PSD Files + Extra Goodies + Exclusive Photoshop tutorials there. Signup now and get exclusive!
Let’s get started!
To complete this tutorial, you will need the following stocks:
Water Splash Photoshop Brushes
Step 1
Create a new document sized 1440px * 800px with black background. Load the lake image into Photoshop and select the following portion:
Copy and paste the selection to our document, re-size it to fit the size of the canvas:
Apply the following adjustment layers as clipping mask to this lake layer:
Black & White (set its layer opacity to 90%)
Levels
Use the cloud brush, paint some cloud over the sky. Here is the effect so far:
Step 2
Load the model image into Photoshop. Cut out the model and paste it to the following position. Erase the legs.
Apply the following adjustment layer as clipping masks:
Black & White
Levels
Use the following layer mask on the levels adjustment layer:
Curves
and here is the effect so far:
Step 3
Use the water splash brushes, paint some splashing effect around the body:
Use a soft black brush, paint some subtle shadow effect to the following position:
Step 4
Load the “Nebula 1” stock image into Photoshop and select the entire image, paste it onto our canvas:
Change the layer blending mode to “Screen” for this nebula layer:
Apply the following layer mask for this nebula layer:
Go back to the “Nebula 1” image and use the lasso tool with 40px feather, select the following portion:
Paste the selection to the right side of the model (You will need to reduce its size a bit from the copy):
Load the “Nebula 2” image into Photoshop, select the following portion with the Lasso Tool (again set feather to 4opx):
Copy and paste the selection to our document, paste it to the centre of the sky:
Step 5
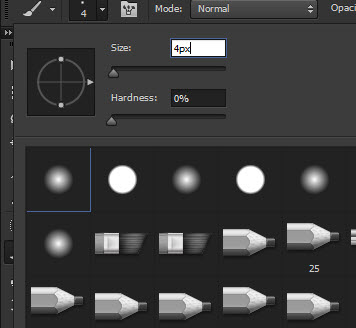
We will work on creating the hair in this step. Firstly let’s pick a 4px, soft brush:
Use the Pen Tool, draw a path as shown below:
Right-click the path and select “Stroke Path …”:
Stroke the path with the brush tool and tick “Simulate Pressure”, then press “OK”:
You will have the following effect:
Duplicate this layer and adjust the size with free transform tool:
Use the Hue/Saturation adjustment to adjust the lightness of the hair:
Keep duplicating and adjusting, you will finish with the hair effect similar to below:
Step 6
Use the lightening brush we downloaded, add some lightening effect to the following area:
I added some colour to the image with a couple of colour balance adjustment layers, and this is my final result: (click to enlarge)
That’s it for this tutorial! Leave me a comment below if you have any questions. Enjoy it? Help me share it around by using the share buttons at the top of the tutorial!
The post Create “Resurrection” Surreal Photo Manipulation in Photoshop appeared first on PSD Vault.


