In this tutorial, I will show you the process of creating this abstract style, underworld demon lord in Photoshop. We will use a variety of custom brushes and textures to manipulate a model’s image. You will be doing lots of painting and image adjustments along the way. Have a try!
Note: The Photoshop tutorial is done in Photoshop CC – therefore some screenshot may have slighting different layout as in the earlier version. Some brushes are exclusive to Photoshop CS6.
Here is a preview of the final effect I have for this tutorial: (click to enlarge)
Image may be NSFW.
Clik here to view.
PSD File Download
You can download the PSD File for this tutorial via the VIP Members Area for only $6.95/Month (or less)! You will not only get this PSD File, but also 100+ other PSD Files + Extra Goodies + Exclusive Photoshop tutorials there. Signup now and get exclusive :) Find out more about the VIP Members Areas
Image may be NSFW.
Clik here to view.
OK Let’s get started!
To complete this tutorial, you will need the following stocks:
Model by Null-Entity
Step 1
Create a document sized 1500px * 1500px with white background. Use the grunge brushset and paint some blacks over the canvas. Be creative with your brushes, use a mixture of them and don’t just stick to one brush:
Image may be NSFW.
Clik here to view.
Keep painting, this time we use a white grunge brush to paint over the black colour:
Image may be NSFW.
Clik here to view.
Image may be NSFW.
Clik here to view.
Step 2
We will add the model’s image onto our document. Select the facial area and copy + paste it onto our canvas, re-size it to fit our canvas size:
Image may be NSFW.
Clik here to view.
Use the grunge brushset as eraser, remove the edges off the face layer:
Image may be NSFW.
Clik here to view.
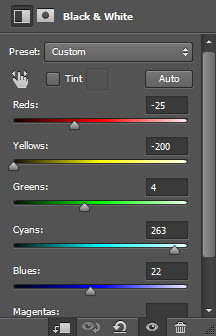
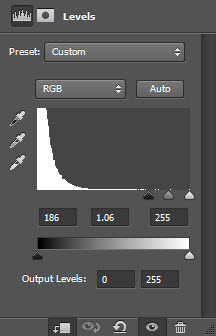
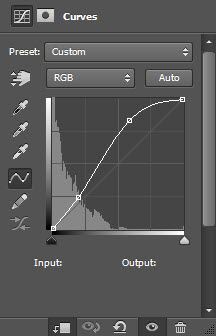
Add the following adjustment layers as clipping masks to the face layer”
Image may be NSFW.
Clik here to view.
Image may be NSFW.
Clik here to view.
Image may be NSFW.
Clik here to view.
Then, load the metal texture into Photoshop, and select a portion as shown below:
Image may be NSFW.
Clik here to view.
Copy and paste the selection over to our document and cover the face area. Make sure you place this layer above the previous 3 adjustment layer. Then set it as clipping mask to the layer below, and change its blending mode to “Color Burn”:
Image may be NSFW.
Clik here to view.
and here is the effect so far with the metal texture applied to the model’s face:
Image may be NSFW.
Clik here to view.
Step 3
We will do some further painting around the face. Create a new layer and again use the grunge brushset to paint some white colour gaps (you may need to use the free transform tool to rotate and resize your paintings):
Image may be NSFW.
Clik here to view.
Use the dirt brush to paint some particles around the face, use the eraser tool to remove any extra dirt:
Image may be NSFW.
Clik here to view.
Use the splatter brushset (small brush tip) to paint some drippings from the eye and month area:
Image may be NSFW.
Clik here to view.
Step 4
We will add some “floating humans” around the canvas. Download the human vector graphics and open it in Illustrator, then export it into a JPEG file. If you don’t have Illustrator, simply download the image below:
Image may be NSFW.
Clik here to view.
Select the following portion from the image:
Image may be NSFW.
Clik here to view.
Copy and paste the selection to our document, apply the following Hue/Saturation adjustment for this layer:
Image may be NSFW.
Clik here to view.
Re-size this human layer into a smaller scale, rotate it slightly as well:
Image may be NSFW.
Clik here to view.
Duplicate this layer a few times, scatter them around the canvas as shown below:
Image may be NSFW.
Clik here to view.
Step 5
We will add some red glows to the eye. Use a small soft brush with red colour:
Image may be NSFW.
Clik here to view.
Paint it over the eye area:
Image may be NSFW.
Clik here to view.
Then switch the brush colour to white, and use a smaller brush to paint a dot at the centre of the red:
Image may be NSFW.
Clik here to view.
and here is the effect so far:
Image may be NSFW.
Clik here to view.
Step 6
We’re almost done! I further added the following Selective Color adjustment layer on top:
Image may be NSFW.
Clik here to view.
Image may be NSFW.
Clik here to view.
Image may be NSFW.
Clik here to view.
and here is my final effect: (click to enlarge)
Image may be NSFW.
Clik here to view.
That’s it for this tutorial! Hope you enjoy it and find it useful. Till next time, have a great day!
The post Photo Manipulation of Underworld Demon Lord in Photoshop appeared first on PSD Vault.