In this tutorial, I will show you the steps I took to create this ”Unleash the Dark Power” surreal scene in Photoshop. You will have the opportunity to practice objects merging, image adjustments, selection techniques, as well as a number of filter effects.
This is an immediate level tutorial and some steps can be a little tricky, have a try!
Note: The Photoshop tutorial is done in CS6 – therefore some screenshot may have slighting different layout as in the earlier version. Some brushes are exclusive to Photoshop CS6.
Here is a preview of the final effect I have for this tutorial: (click to enlarge)
PSD File Download
You can download the PSD File for this tutorial via the VIP Members Area for only $6.95/Month (or less)! You will not only get this PSD File, but also 100+ other PSD Files + Extra Goodies + Exclusive Photoshop tutorials there. Signup now and get exclusive :) Find out more about the VIP Members Areas
OK Let’s get started!
To complete this tutorial, you will need the following stocks:
Model by Falln-Stock
Step 1
Create a new document sized 1400px * 704px with black background. Load the city stock image into Photoshop and select the buildings on the right:

Copy and paste the selection over to our document, use the free transform tool to distort the selection as shown below:

Use a soft eraser to remove the following areas of the building:

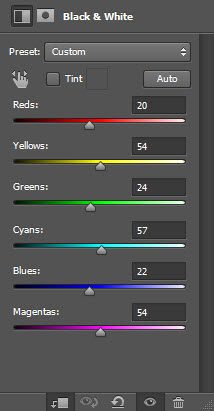
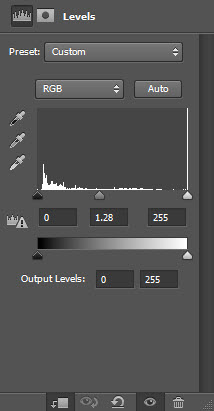
Add the following adjustment layers as clipping masks to this building layer:
Black and White

Layer mask on the black and white adjustment layer:
Levels
Layer mask on the levels adjustment layer:

Curves
Layer mask on the curves adjustment layer:
Group the building layer and all its 3 adjustment layers together, duplicate the group and move the duplicated layers to the position shown below, and use the free transform tool to scale and rotate the group:

Repeat the above step and add more buildings into the image, make sure you use free transform to rotate and re-size them to add more variety and depth for our image:
Step 2
We will work on the model in this step. Load the model stock image into Photoshop and cut the guy’s figure out, paste it over to our document as shown below:

Use a eraser tool to remove the bottom part of the model:

Add the following 3 adjustment layers as clipping masks to this model layer:
Black and White

Levels

Curves

and here is the effect so far:
Step 3
We will add extra effect over the model in this step. Create a new layer above all previous layer and set its layer blending mode to “overlay”. Load the crack brushes you downloaded at the beginning of the tutorial and select the following brush:
Set the color of the brush to white and paint on the following position: (you need to reduce the size of the brush before you paint)
Keep adding similar brush paintings to the other arm:

Load the flame stock image into Photoshop and select the flame portion:
Add the flame to the left and right hand of the model as shown below:
Step 4
We will add some extra fire effect to the image in this step. Go back to the fire stock image and select the fire, copy and paste it over to our document – this time don’t reduce its size, simply cover the buildings with the fire and only erase the parts to reveal the model below:

Change the layer blending mode of this fire layer to “Overlay”, and here is the effect you will have:
Add some cloud/smoke effect around the model with the cloud filter:

Step 5
We will continue to add more fire to the image to fill the empty space on the canvas. Simply use the quick selection tool to select more pieces from the fire stock and paste them to our canvas:

You can use the liquify filter to warp the fire pattern as shown below:
Step 6
We will add some final touches to our image in this final step. Flatten the image, duplicate the background layer and use the liquify filter on the buildings and warp the edges as shown below:

Add some colours to our image with this selective color adjustment layer:

Layer mask on this selective color adjustmemt layer:

and you will have the following effect:

I further added some colors around the model and here is my final effect: (click to enlarge)

That’s it for this tutorial! Hope you enjoy going through it and find it useful. Drop me a comment below if you have any question.
Till next time, have a great day!
The post Create “Unleash the Dark Power” Surreal Scene in Photoshop appeared first on PSD Vault.


