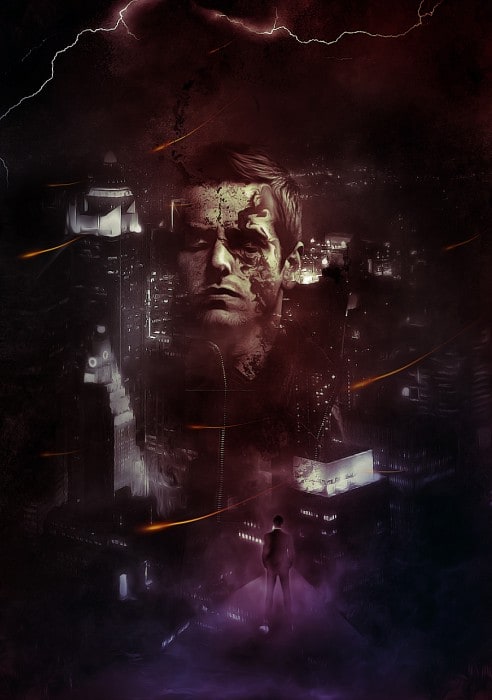
In this tutorial, I will show you the steps I took to Create a Surreal Urban City Montage with Lightning Effect in Photoshop . This is an intermediate level Photoshop tutorial so some steps can be a bit tricky, but why not have a try!
Note: The Photoshop tutorial is done in CS6 – therefore some screenshot may have slighting different layout as in the earlier version.
Along the way, we will practice mixing a series of photos and form a surreal, urban city scene with layer blending options and image adjustments, as well using various toolbox tools to adjust and fine-tune the image.
Here is a preview of the final effect I have for this tutorial: (click to enlarge)
Version 1
Image may be NSFW.
Clik here to view.
Version 2
Image may be NSFW.
Clik here to view.
PSD File Download
You can download the PSD File for this tutorial via the VIP Members Area for only $6.95/Month (or less)! You will not only get this PSD File, but also 100+ other PSD Files + Extra Goodies + Exclusive Photoshop tutorials there. Signup now and get exclusive :) Find out more about the VIP Members Areas
Image may be NSFW.
Clik here to view.
OK Let’s get started!
To complete this tutorial, you will need the following stocks:
City by ~Ealucids-Photos
Step 1
Create a new document sized 900px * 1278px with a black background, create a new layer and use a grunge brushset (you should be able to find lots of those on the net) and paint a background:
Hint: set the brush opacity and flow to around 30% so we can have subtle painting effect, use a soft eraser along the way to remove the area we don’t want.
Image may be NSFW.
Clik here to view.
Load the city image into Photoshop, select a piece as shown below:
Image may be NSFW.
Clik here to view.
Copy and paste the selection onto our document, resize and erase the edge as shown below:
Image may be NSFW.
Clik here to view.
Add the following adjustment layers as clipping mask to this city layer:
Black and white
Image may be NSFW.
Clik here to view.
Levels
Image may be NSFW.
Clik here to view.
On this levels layer mask, I used the soft eraser tool to remove some part of it to reveal the lighting behind it”
Image may be NSFW.
Clik here to view.
and here is the effect so far:
Image may be NSFW.
Clik here to view.
Step 2
We will now add the face into the image. Load the model face into Photoshop and cut out the face, resize and position it into the centre of the image:
Image may be NSFW.
Clik here to view.
Erase the edge of the face with a soft erase:
Image may be NSFW.
Clik here to view.
Then attach the following 2 adjustment layers as clipping mask to this face layer:
Black and white
Image may be NSFW.
Clik here to view.
Levels
Image may be NSFW.
Clik here to view.
Optional: you can add a bit grungy brush paint effect on the face to as some roughness on the image:
Image may be NSFW.
Clik here to view.
and here is the effect so far:
Image may be NSFW.
Clik here to view.
Step 3
We will now add a triangle platform on the bottom of the image and add a standing man on top of it. So let’s create a new layer and use the Pen Tool to draw a shape as below, and fill it with a light grey colour:
Image may be NSFW.
Clik here to view.
Apply the following Gradient Overlay blending option on this triangle layer:
Image may be NSFW.
Clik here to view.
Use a soft eraser to fade the bottom and the edge of this triangle to create some depth, also add some cloud around it:
Image may be NSFW.
Clik here to view.
Load the “man in suit” image into Photoshop and paste it over the platform as shown below:
Image may be NSFW.
Clik here to view.
Use a soft eraser to darken the lower half of his body as shown below:
Image may be NSFW.
Clik here to view.
Add the following 2 adjustment layers on this man standing layer:
Black and white
Image may be NSFW.
Clik here to view.
Levels
Image may be NSFW.
Clik here to view.
and here is the effect so far:
Image may be NSFW.
Clik here to view.
Step 4
We can add some cloud on the top of the canvas as shown below, either with a cloud brush or the cloud filter:
Image may be NSFW.
Clik here to view.
Now we will create some abstract flying lines – we will create a new layer and paint an orange dot:
Image may be NSFW.
Clik here to view.
Paint a smaller yellow dot in the centre as shown below:
Image may be NSFW.
Clik here to view.
Then merge those two layers, duplicate it, and apply the liquify filter on it as shown below on the duplicated layer:
Image may be NSFW.
Clik here to view.
Then we adjust the shape of the original dot layer with the distort tool:
Image may be NSFW.
Clik here to view.
Once you’re happy with the shape, merge those two layers again and use the free transform tool to adjust the shape:
Image may be NSFW.
Clik here to view.
Duplicate and scatter those lines around the image, rotate them and adjust the layer opacity as you see fit:
Image may be NSFW.
Clik here to view.
Step 5
Load the lightning image into Photoshop and select a portion of it with the Lasso Tool (30px feather):
Image may be NSFW.
Clik here to view.
Copy and paste the selection onto our document, and apply the black and white adjustment to this layer:
Image may be NSFW.
Clik here to view.
Set the blending mode of this layer to ”Screen”, duplicate this layer once and move them to the top of the canvas:
Image may be NSFW.
Clik here to view.
and you will have the following effect so far:
Image may be NSFW.
Clik here to view.
We can add some colour effect to the image, and here is the final effect I have: (click to enlarge)
Version 1
Image may be NSFW.
Clik here to view.
Version 2
Image may be NSFW.
Clik here to view.
If you wish to find out a thing or two with how to apply this colour effect, check out this video Photoshop tutorial below:
That’s it for this tutorial! Hope you enjoy it and find it useful! Till next time, have a great day!