In this tutorial, you will learn how to make disintegrating human effect in Photoshop. We will turn a stand female model photo into a dark, mysterious disintegrating portrait of a witch. Custom Photoshop brushes will be the main tool of this tutorial.
This is an intermediate level tutorial and prior knowledge of Photoshop layers, image adjustments, layer masks are required.
Note: The Photoshop tutorial is done in Photoshop CC – therefore some screenshot may have slighting different layout as in the earlier version. Some brushes are exclusive to Photoshop CS6 or above.
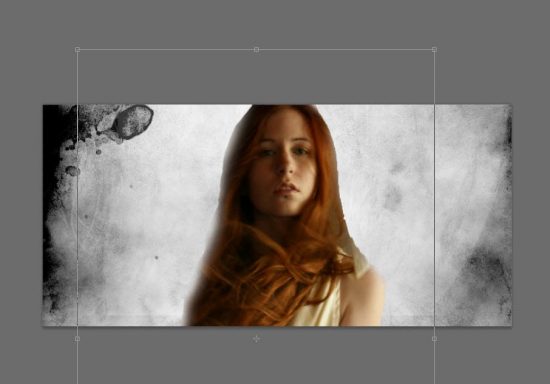
Here is a preview of the final effect I have for this tutorial: (click to enlarge)

PSD File Download
You can download the PSD File for this tutorial via the VIP Members Area for only $6.95/Month (or less)! You will not only get this PSD File, but also 200+ other PSD Files + Extra Goodies + Exclusive Photoshop tutorials there. Signup now and get exclusive :) Find out more about the VIP Members Areas

Let’s get started!
To complete this tutorial, you will need the following stocks:
Step 1
Create a new document sized 1440px * 679px with black background. Load the grunge texture (I used image 02 in the pack) into Photoshop and make a selection as shown below:

Copy and paste the selection to our document, adjust its size with free transform tool and cover the canvas:

Apply the following image adjustment layers as clipping masks:
Black and White

Levels

and here is the effect so far:

Step 2
Load the model image into Photoshop and cut out the upper part of the model, paste it into the following position on our canvas:
Apply the following image adjustments as clipping masks for this model layer:
Black and White

Levels

Curves

Use the hair brushes, paint some hair on the right side of the face as shown below:

Step 3
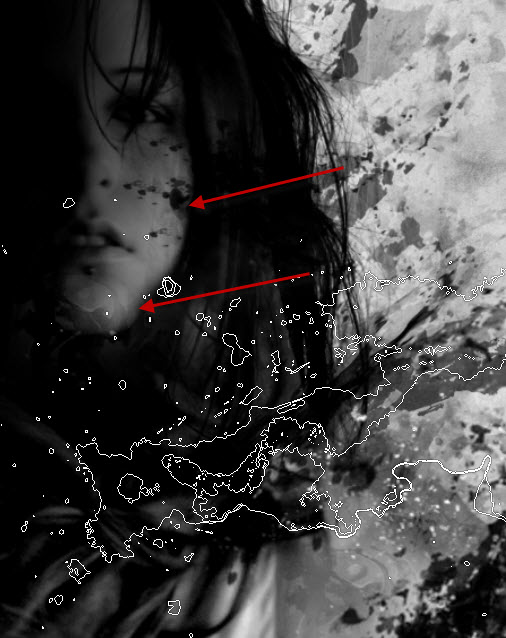
We will work on the disintegrating effect in this step. I decided to use the “Dried Blood Splatter” set:

Paint some splatter around the body:

Then use the eraser tool, set the eraser to use the same dried blood splatter set, break the splatter painting apart:

This is the effect I have after I repeat the above process several times:

I also added some splatter painting around the face area:
On the left side, I add some cloud painting:


Step 4
We will add a magic glyph into the image. Load the glyph stock image into Photoshop:

Select the entire image, paste into on our document and place the new layer below the model layer. Set its layer blend mode to “Multiply”:

Reduce the layer opacity to around 40% for the glyph layer, so it’s barely visible:

Load the fire stock into Photoshop and select the left side of the fire ring:

Copy and paste the selection to our document and set its layer blend mode to “Screen”:

Move the fire to the glyph area, adjust its size and here is the effect you will aim to achieve:

Step 5
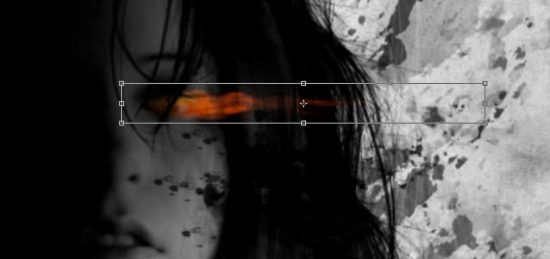
We will add fire to the model’s eye in this step. Go to the fire stock image and select the following part with Lasso Tool (set feather to 40px):

Copy and paste the selection, use the free transform tool to compress, stretch it as shown below:
Create a new layer on top of the fire layer, use a soft white brush to paint a dot as shown below:

Change the layer blend mode of this white dot layer to “Overlay”:

Duplicate this white dot layer 10 times, and this is the effect you will have:

Step 6
We’re almost done! For final touches, I added some red/blood particles around the canvas to spice up the disintegrating human effect:

Paint some cloud at the bottom of canvas:

Finally, I flatten the image and made an duplicate of the background layer, applied the following “Accented Edges” effect to the image:

This is the effect so far:

I further added some colours to image with a couple of colour balance adjustment layers, and this is my final result: (click to enlarge)
That’s it for this tutorial! Hope you enjoy it and find it useful! If you have any questions about the steps, please contact me or leave a comment below. I will try my best to answer them.
Till next time, have a great day!
The post How to Make Disintegrating Human Effect in Photoshop appeared first on Photoshop Tutorials, Digital Art Tutorials and Showcase - PSD Vault.